Data Integration
This article details the process of getting your data into the Brinqa Platform through connectors.
What is data integration?
Data integration in the Brinqa Platform refers to the initial step where data is collected from various sources, such as security tools, vulnerability scanners, and other IT systems. During this phase, Brinqa connects to these sources using connectors to access and retrieve data.
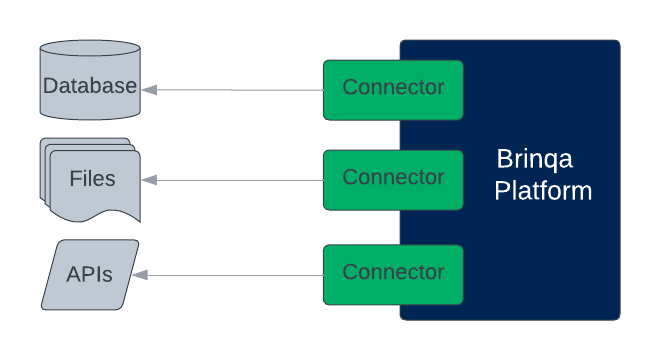
Figure 1. The sync process in data integration.
After data integration, you must also perform data orchestration to consolidate, compute, and prepare your data for visualization and searching, on both the list views and the Explorer graph. Without data orchestration, your data is not ready for validation or viewing.
Create a data integration
Data integration involves configuring and authenticating these connectors with Brinqa, indicating how far back in time you want to retrieve your data, and how long you want to retain the source data in Brinqa. If you have already configured a data integration and are comfortable with the steps in creating data integrations, you can skip to run the data integration.
Only users with the System Administrator role can create data integrations. To create a new data integration, follow these steps:
-
Navigate to Integrations > Sources and click Create.
- You can also navigate to Integrations > Connectors and click Use on the connector after it is installed. The Connector field in the data integration information section is filled out with the connector you have selected.
-
In General, complete the following fields:
-
Title: The title of your data integration as it appears in list views.
-
Connector: Click the Connector drop-down and choose the connector you want to use in the integration.
-
Server: The server to process data in the data integration. Local server is selected by default for cloud data sources. You can also create your own data servers.
-
Description: Description of the data integration. For example, a list of the services or data it provides.
-
-
In Connection, complete the required authentication settings and any optional additional settings for the connector. Specific fields differ based on the connector. The fields may include:
-
API URL or Server URL: The Uniform Resource Locator (URL) to access the data source, typically an API URL or the URL for your organization's environment.
-
Username and Password: The account credentials for the specific connector account, which must have permissions to access the vendor API and return data.
-
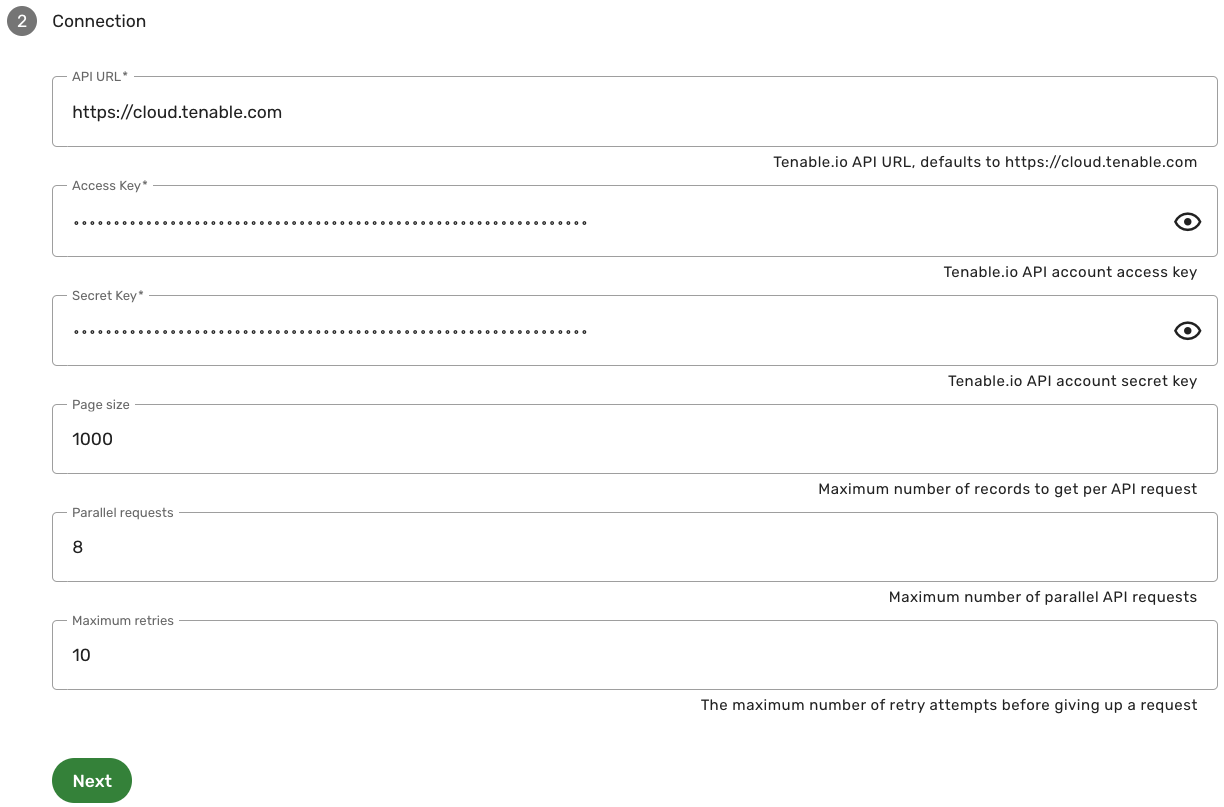
API Keys/Tokens: Access codes used to authenticate the connector with Brinqa. Certain connectors have configuration settings that replace the Username and Password fields with API keys. For example, the Tenable Vulnerability Management connector requires an Access Key and a Secret Key.
-
Additional settings: (Optional) Some connectors contain additional options for specific configuration. For example, you can set the page size (maximum number of records to get per API request), modify the number of parallel requests (maximum number of parallel API requests), or skip certificate verification.
The following screenshot illustrates example connection settings for the Tenable Vulnerability connector:
 note
noteIf you are unsure of the correct server URL, credentials, or API keys for the connector, refer to the specific connector documentation or contact an administrator.
-
-
Click Next to test the connection and save the configuration.
The connector tries to access the data sources as specified. If the connection settings are correct, more options display.
-
In Sync configuration, you can view the types of data the connector retrieves and, if supported, configure any connector operation options. You can also set the data integration sync interval or enable multiple sync (multi-sync) configurations and schedules, if desired.
With Multi-sync disabled (Default)
-
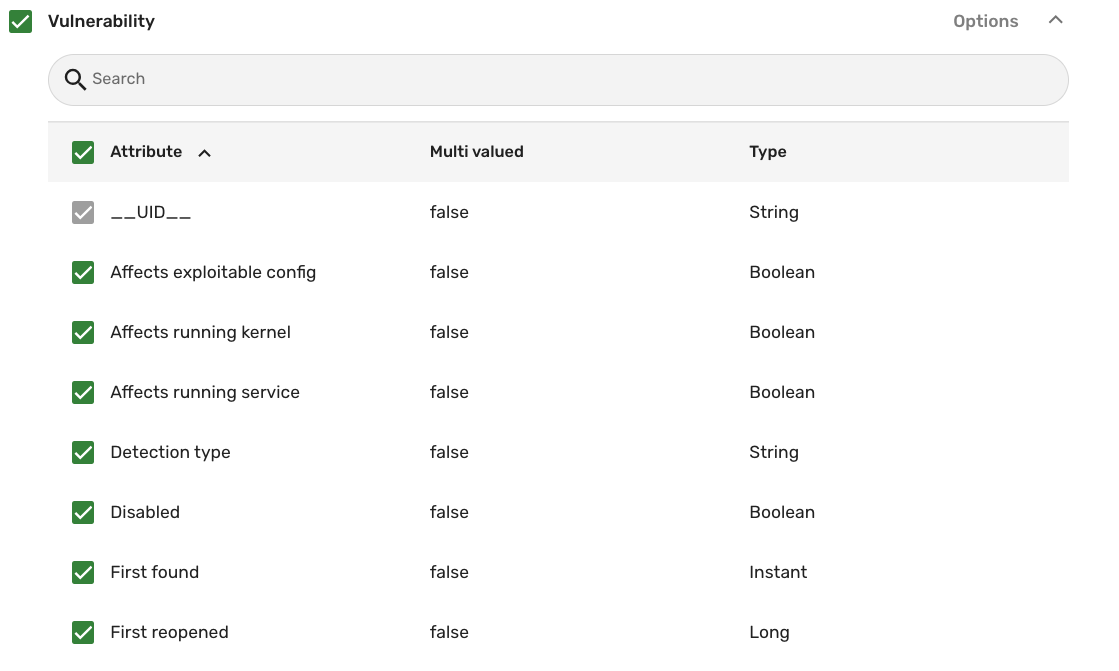
View data types: Review the types of data the connector retrieves. For example, the Qualys Vulnerability Management connector brings in data for Host, Vulnerability, and Vulnerability Definition.
- Click each type to see the attributes associated with the data model. For example, the screenshot below shows some of the attributes the Vulnerability data model provides from Qualys:
-
Configure operation options: (Optional) Filter the data retrieved by the connector. See connector operation options for additional information.
-
Set the sync interval: Click the Sync data from drop-down to determine how far back you want to sync your data.
tipBrinqa recommends that you use the beginning of time option when you run the data integration initially to import all your data thus far. After the first sync, change the sync interval to the last sync to save time and resources.
With Multi-sync enabled
- Enable multiple sync configurations and schedules: Toggle the option to configure multiple individual integration syncs and schedules. This option enables you to manage and schedule syncs more granularly based on your needs. See Multi-sync configurations and schedules for detailed instructions on configuring multi-sync.
-
-
In Data lifecycle, you can set a data inactivity and a purging policy for the integration. See data lifecycle management for additional information.
-
Click Create.
If the connection is successful, the page reloads and you should see your new data integration listed. If you do not see it, click Refresh.
If the connection is not successful, the data integration is not created. Double-check the authentication credentials to ensure that they are correct and follow the rest of our Troubleshooting tips.
Multi-sync configurations and schedules
Brinqa recommends working with your Brinqa Support team before enabling Multi-sync configurations, as this feature may require additional assistance to deploy successfully.
Multi-sync enables you to create and manage multiple sync configurations and schedules, separating data integration from data orchestration. By enabling this option, you can handle various data synchronization scenarios with greater flexibility. For example, you might want to sync different data types at different intervals or manage peak data loads more effectively. Enabling multiple sync configurations allows you to schedule longer syncs during off-peak hours, ensuring that other syncs can proceed without waiting. For instance, you can schedule a sync for Tenable Vulnerability Management at 11:00 PM. The next day, when the orchestration runs, all data from Tenable Vulnerability Management will already be updated, expediting the computation and consolidation process.
Additionally, for environments with rapidly changing cloud resources, syncing multiple times a day ensures that your data remains current, even if resources are created and deleted within the same day. This approach prevents the loss of important data and provides a more accurate reflection of your cloud environment.
By default, multi-sync configuration is disabled and integration sync runs as part of your data orchestration. To enable and configure multi-syncs, follow these steps:
-
Open the data integration and go to Sync configuration.
-
Toggle Enable multiple sync configurations and schedules. More options appear below.
-
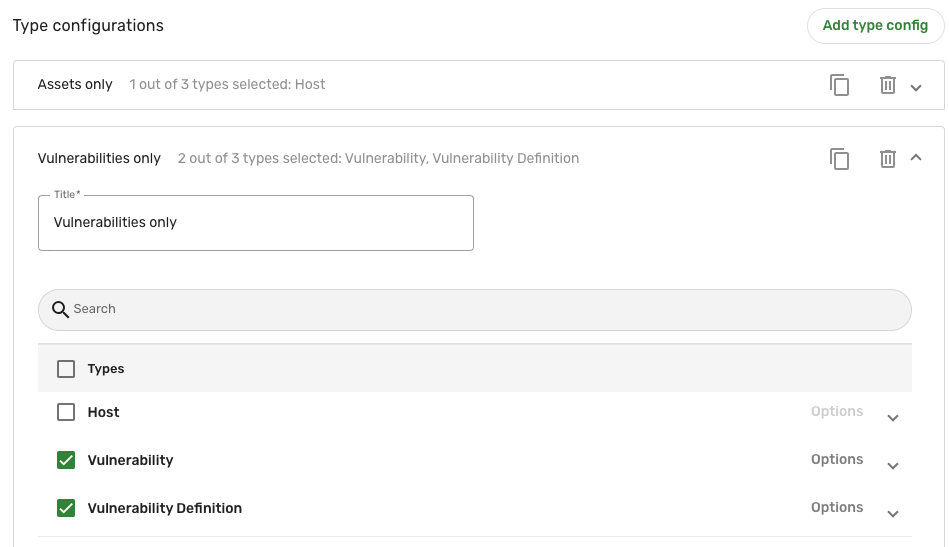
Type configurations: Defines the types of object and specific attributes retrieved by the connector.
-
Edit the default type configuration by clicking the entry and making modifications. You can also click Add type config to create a new type configuration.
-
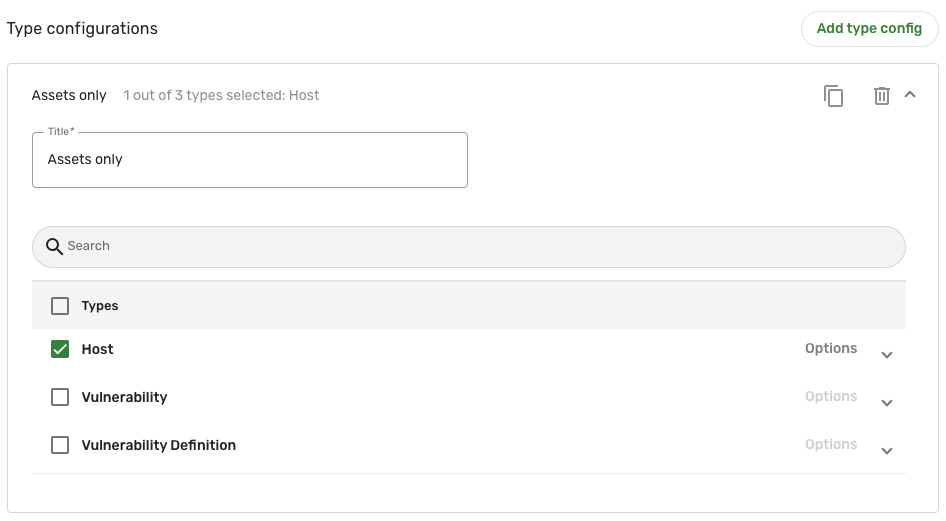
Give the type config a new title, check the types of data or specific attributes to determine the data retrieved by the connector, and configure any filters needed for this configuration.
In the following examples, we've created two type configs to optimize sync schedules based on different data types and potential volumes of data: one solely for hosts, and the other for vulnerabilities (Vulnerability and Vulnerability Definition):
-
-
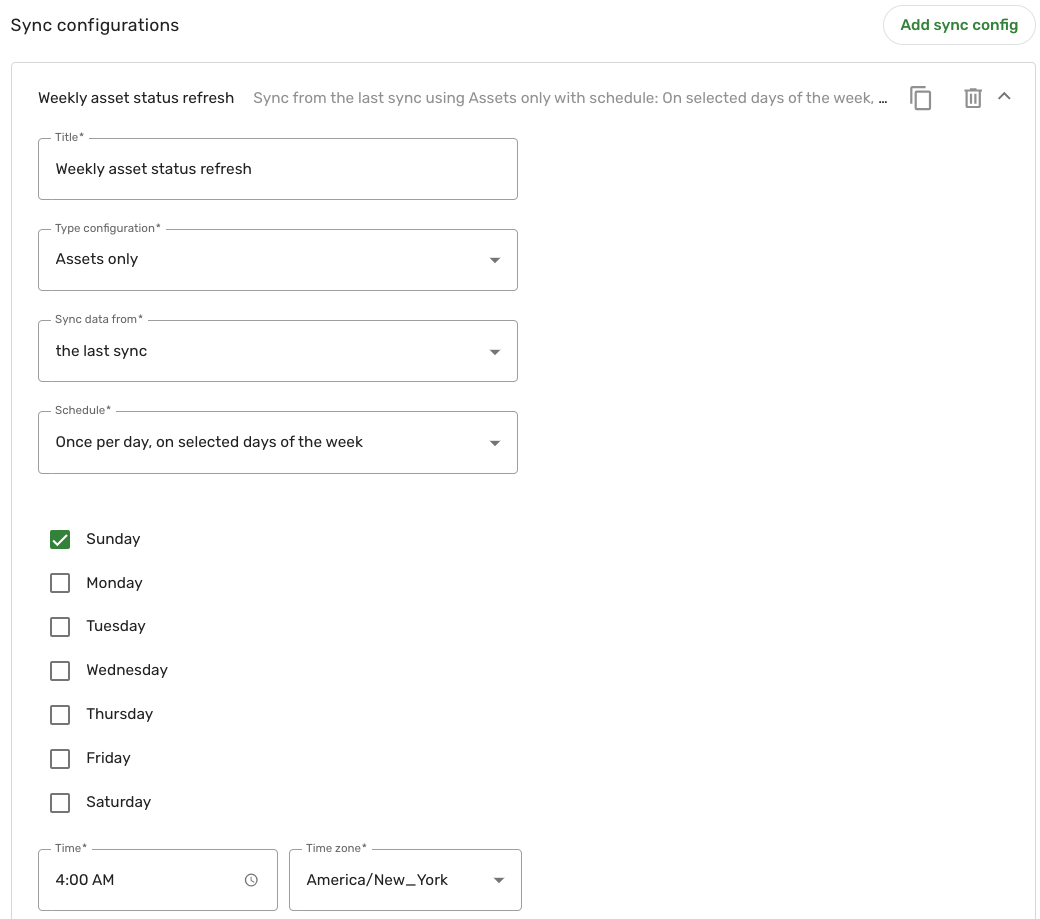
Sync configurations: Defines how far back to retrieve the data and when the data syncs run for a specific type configuration.
-
Edit the default sync configuration by clicking the entry and making modifications. You can also click Add sync config to create a new sync configuration.
Complete the following fields:
-
Title: Give the sync config a title.
-
Type configuration: Click the drop-down and select the type config that this sync config applies to.
-
Sync data from: Click the drop-down and select the sync interval option you want to use.
-
Schedule: Click the drop-down and select how often you want the sync config to run.
-
In the following example, we've created two sync configs, one for each type config created in step 3.
The first sync config runs once a week, on every Sunday at 4:00 AM EST, for the Assets only type config:
The second sync config retrieves vulnerability data once everyday at 5:00 AM EST, for the Vulnerabilities only type config:

-
-
Complete the rest of the steps as needed in the data integration configuration.
This setup can be beneficial because it allows you to manage sync schedules based on the specific needs of different data types. For example, asset data may not change as frequently and can be synced less often, reducing system load during peak hours. On the other hand, vulnerability data might change frequently and require more frequent syncing to ensure up-to-date information. By using multi-sync configurations, you can optimize the efficiency and performance of your data integration processes.
If you use multi-sync, the data integration is no longer part of your data orchestration, meaning the integration runs on its specified schedule. You can also manually run the integration when needed.
Connector operation options
Some connectors support Operation options. Operation options are used by the connector to build filters when retrieving data. Operation options can impact the amount of time for data integration to complete and help find more targeted data to ensure that your system is populated with the data you want to bring into the Brinqa Platform. Operation options are connector-specific and can only be applied if the vendor API supports them. See individual connector documentation for more information.
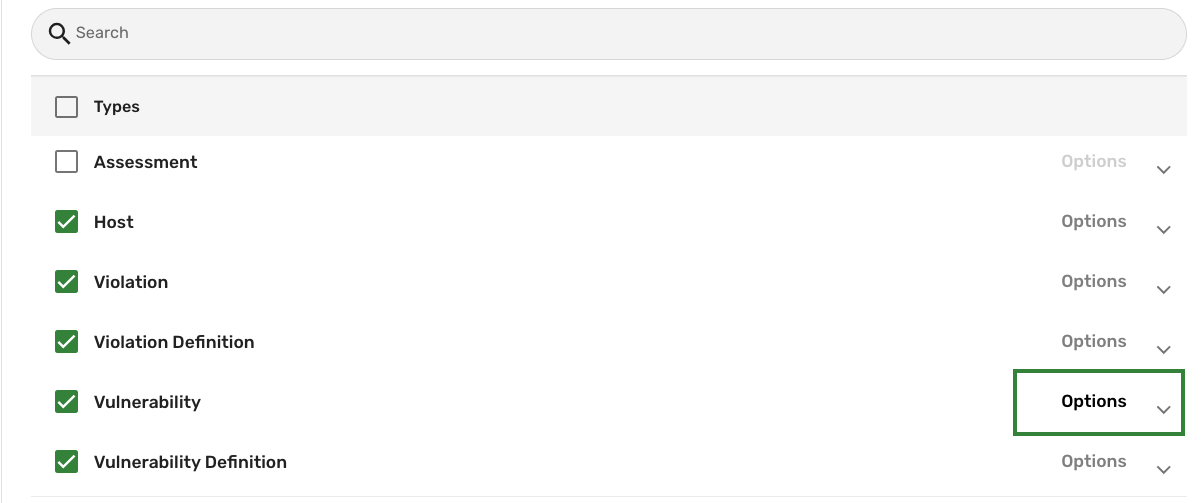
You can define operation options for the type of data you want the connector to retrieve. For example, the Tenable Vulnerability Management connector supports operation options that give you the ability to filter the vulnerabilities retrieved by the connector by their severity level. To do so, follow these steps:
-
In the Types table within the Sync configuration section, without expanding the attributes, click Options in the Vulnerability row.
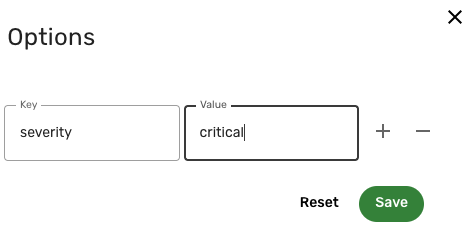
The Options dialog appears. Complete the following fields:
-
For Key, type severity; for Value, type critical.
-
Key: Specifies the attribute or parameter that you want to filter by. This value is determined by the connector and the supported operation options of the vendor's API. Examples of keys may include status, severity, publishStart, or scanEnd. Keys are case-sensitive.
-
Value: Specifies the criteria you want to use for filtering based on the Key. For example, for the Key severity, possible values might include Low, Medium, High, or Critical. Values are case-sensitive.
The following screenshot illustrates using operation options to retrieve only critical vulnerabilities from Tenable Vulnerability Management:
-
-
Click Save.
The operation options apply upon the next data integration sync.
Data lifecycle management
Data Lifecycle Management (DLM) was introduced in Brinqa Platform version 11.27. Brinqa strongly recommends upgrading to the latest platform version to take full advantage of the functionality.
Data lifecycle management (DLM) provides a structured method to help maintain your data in the Brinqa Platform. It enables you to designate data as inactive if it hasn't been updated within a set timeframe. Inactive data can then be scheduled for automatic purging, ensuring that your system contains only relevant and current data. DLM policies can help eliminate outdated information, which can declutter the system, speed up response times, and ultimately lead to more efficient and accurate analysis of your data.
The following diagram illustrates the concept of DLM:
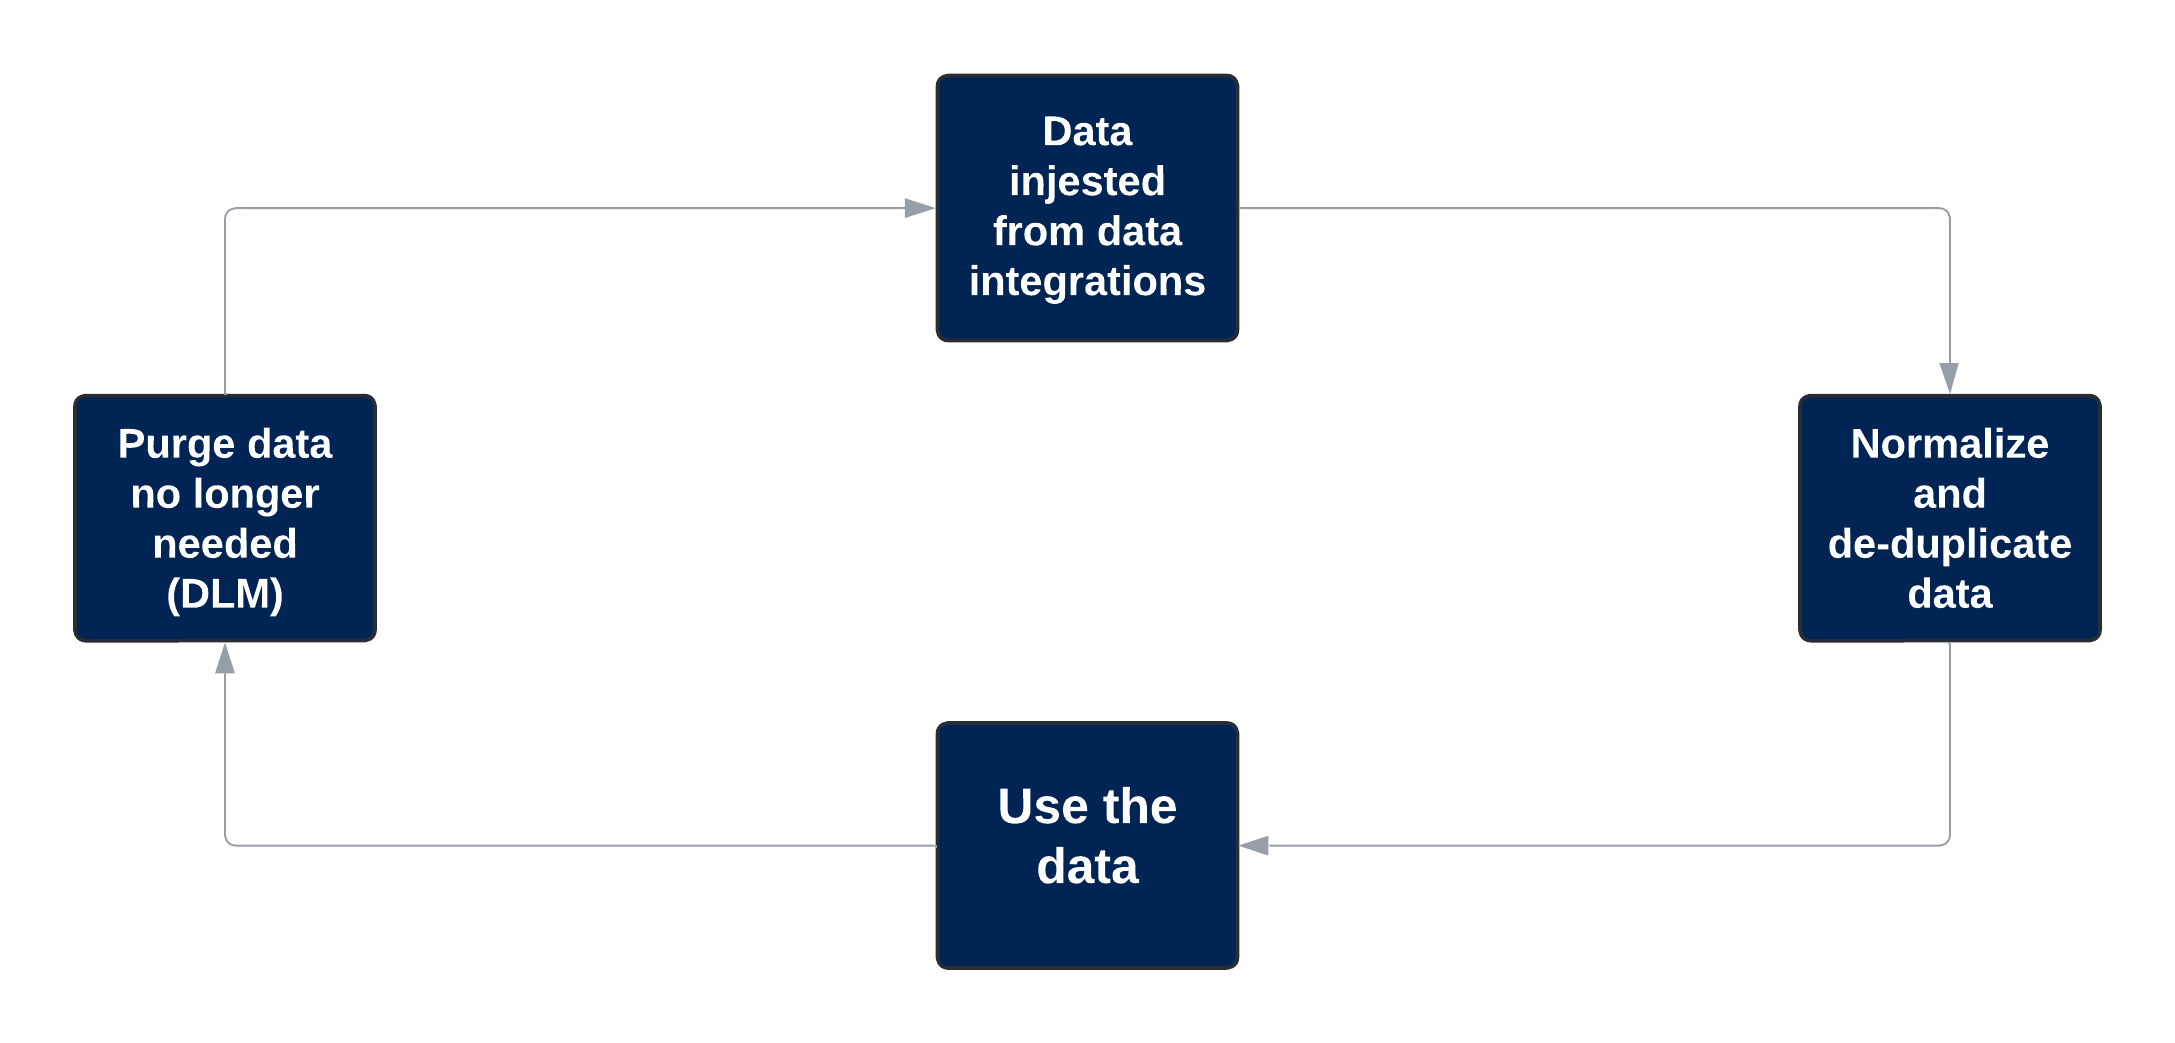
Figure 2. DLM feature workflow
To help determine the status of your data under DLM policies, the following attributes provide visibility into when they are marked as inactive and purged, based on the configured DLM policies. You can see the values for these attributes in the Detail or Show view of any data model that supports a DLM policy:
-
Lifecycle inactive date: Indicates the date that the dataset is marked as inactive based on the DLM policy.
-
Lifecycle purge date: Indicates the date that the dataset is purged based on the DLM policy.
-
Lifecycle status: Indicates the current status of the dataset based on the DLM policy.
For additional information about how the Brinqa Platform determines the status of your assets and findings, see Status Configuration.
Consider the following scenario: You have created two data integrations that bring in Host records, specifically from Tenable Vulnerability Management and Qualys Vulnerability Management (VM). The source data from these integrations feed into a single consolidated Host record in the Brinqa Platform (see Data consolidation for additional information).
The following diagram illustrates the process.

Figure 3. Multiple source data consolidated into a unified data model.
In addition, let's say you've configured these integrations to have a DLM policy to mark hosts as inactive after 30 days of no updates and then to purge them 30 days later, resulting in a total of 60 days from inactivity to removal. The process works as follows:
-
Should the Tenable Vulnerability Management integration not update the Host record for 30 days, that source data coming in from Tenable Vulnerability Management is labeled as inactive. However, the consolidated Host record remains active as long as it continues to receive fresh source data from the Qualys VM integration. And the reverse is true for the Qualys VM integration.
-
If neither Tenable Vulnerability Management nor Qualys VM provide updates within a 30-day window, both the source data and the consolidated Host record are tagged as inactive. They are then scheduled for removal after the designated period, provided that no other source has been consolidated into this Host record.
This approach ensures that the Brinqa Platform manages your data by marking it as inactive based on specified periods of inactivity or other conditions, allowing for the removal of data that is no longer being updated.
In summary:
- If any Source Data Model (SDM) does not have DLM enabled, the lifecycle status will always be "Not applicable," since the Unified Data Model (UDM) record will never be deleted.
- If all SDMs have DLM enabled and all of them are inactive, the UDM lifecycle status is inactive.
- If all SDMs have DLM enabled and at least one of them is active, the UDM lifecycle status is active.
When configuring a data integration, you have the option to enable a DLM policy for each type of data you try to bring in. The options are located in the Data lifecycle section, accessible when either creating a new integration or editing an existing one. These options include:
-
Mark data inactive (days): Select the appropriate duration for data to be marked as inactive if not updated. Options include: 1, 5, 10, 30, 60, 90, 120, 180, or 365 days.
-
Delete inactive data after (days): Select the appropriate duration after which the inactive data will be deleted. Options include: 1, 5, 10, 30, 60, 90, 120, 180, or 365 days.
-
Advanced settings: (Optional) You can use a specific condition to determine when source data should be marked as inactive. The default attribute used to determine inactivity is
lastCaptured, but you can enter a BCL condition to specify a different attribute to define activity.-
You must make sure that the attributes used in the condition exist on the object that you are configuring. For example, when setting a lifecycle policy for the Host object, use attributes that are associated with Host. You can find the available attributes for each object from the Types section, as shown in step 6 of the create a data integration steps.
cautionBrinqa recommends starting out by using the default DLM policy provided with the data integration. Using the advanced feature can have unintended consequences. Brinqa provides you with recommended practices and policies for DLM, including the default number of inactivity days and deletion days. If you want to use the advanced feature, the option is available, but we highly recommend consulting your Brinqa Support specialists beforehand.
-
The following screenshot illustrates what a DLM configuration may resemble:
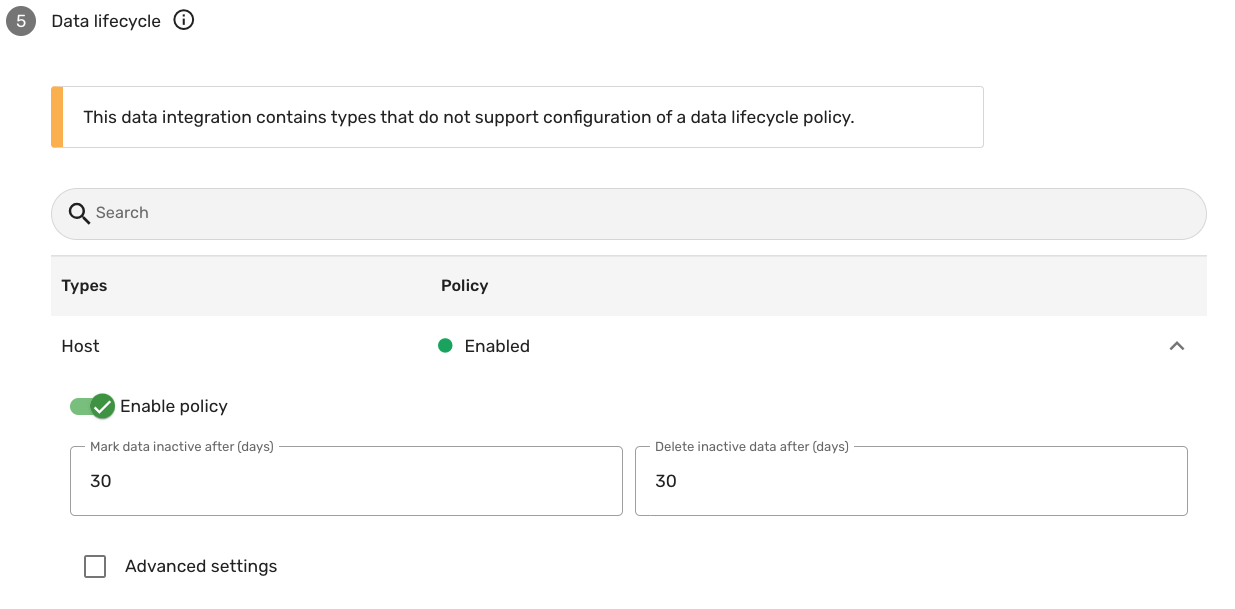
You may encounter a message stating, "This data integration contains types that do not support configuration of a data lifecycle policy." This message appears because not all data types are suitable for lifecycle management due to their nature. Certain data types, such as vulnerability definitions, do not adhere to a lifecycle policy, as their validity is not time-sensitive.
Run the data integration
Now that you have created your data integration, you can start running syncs to gather data. By default, the data integration runs as part of your data orchestration, but you can sync your data manually as well. A successful sync ensures that your connector credentials are correct, the appropriate permissions to make API calls and return data are applied, and the data retrieved is valid. Data integration does not consolidate your data or calculate risk scores. Data orchestration and data integration work together to get your data ready for searching and visualization.
Hold the pointer over the data integration until you see a few options appear on the right-hand side. Click Sync to manually sync and run your data integration. You can also perform a manual sync of your data by clicking Sync on the data integration details page. Both methods run the data integration sync to bring your data into the Brinqa Platform. There are options to select how far back you want to sync your data. See Step 8 in Create a data integration for more information.
The time it takes for the sync to complete depends on a multitude of factors. For example, the number of connector objects retrieved, the number of attributes, the number of filters, or the amount of data coming in. Therefore, the sync can take a few minutes or up to a few hours.
Make sure you also run data orchestration before you begin to validate your data.
Edit or delete a data integration
Proceed with caution when deleting a data integration. This action removes all source data exclusively linked to that integration. Specifically, UDMs that rely solely on the data integration you are deleting will also be removed. Additionally, dependent datasets and requests, including exceptions or remediation tasks, may be affected. To prevent unintended data loss, carefully review all potentially impacted areas prior to deletion.
Navigate to Integrations. Hold the pointer over the data integration until you see a few options appear on the right-hand side. These options are Sync, Show, Edit, and a kebab (three vertical dots) menu. The kebab menu contains options to configure the mapping (if applicable), test the connection, delete the data integration, or cancel the data integration sync if it is running.
After initiating the deletion of a data integration, it is not immediately removed. Instead, the data integration is marked for deletion. The process can take up to 60 minutes to complete. During this time, you can continue to create new data integrations and run syncs.
Troubleshooting tips
This section outlines some troubleshooting tips to help you identify and resolve some common issues you may come across when creating and running data integrations.
Incorrect API or server URL
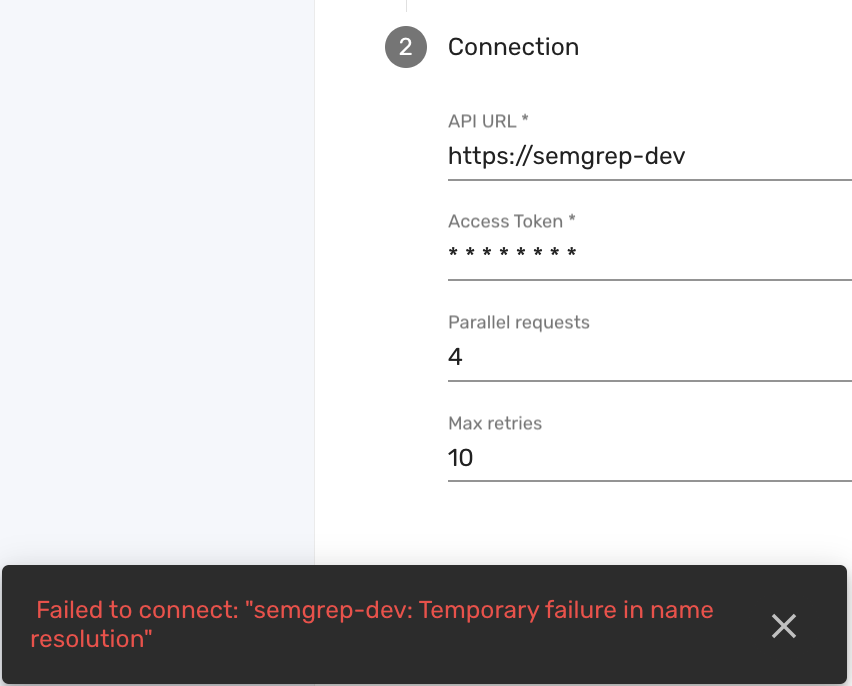
The data integration can fail if you use an incorrect API or server URL. An incorrect URL prevents the connector from reaching the appropriate server, which can lead to connection errors.
For example, the correct API URL for the Semgrep connector is https://semgrep.dev. If you use an incorrect API URL, such as https://semgrep-dev, the system may fail to connect and return an error message indicating a "Temporary failure in name resolution". This means that the provided URL does not point to a valid server address. Below is an example of this error message:
To resolve this error, follow these steps:
-
Verify the correct API or server URL from the individual connector documentation.
-
Double-check the URL provided in the integration connection settings for any mistakes:
-
Pay special attention to common errors like misplaced dots, hyphens, or unnecessary spaces.
-
Ensure that you're using the correct protocol (
httpversushttps).
-
-
Replace the incorrect URL with the verified one in your integration configuration.
-
Click Next to save the changes and confirm that the connection is successful.
Inaccurate authentication credentials
The data integration can fail due to inaccurate or expired credentials such as API or access keys, or user authentication details such as emails, usernames, or passwords. These credentials are crucial for the Brinqa connectors to authenticate and communicate with the external source.
For example, using an incorrect API token for the LeanIX EAM connector results in an error message with a 401 Unauthorized status. This status indicates that the system could not authenticate your credentials, specifically during the OAuth 2.0 token exchange, as suggested by the /oauth2/token endpoint in the error message. Below is an example of such an error message:
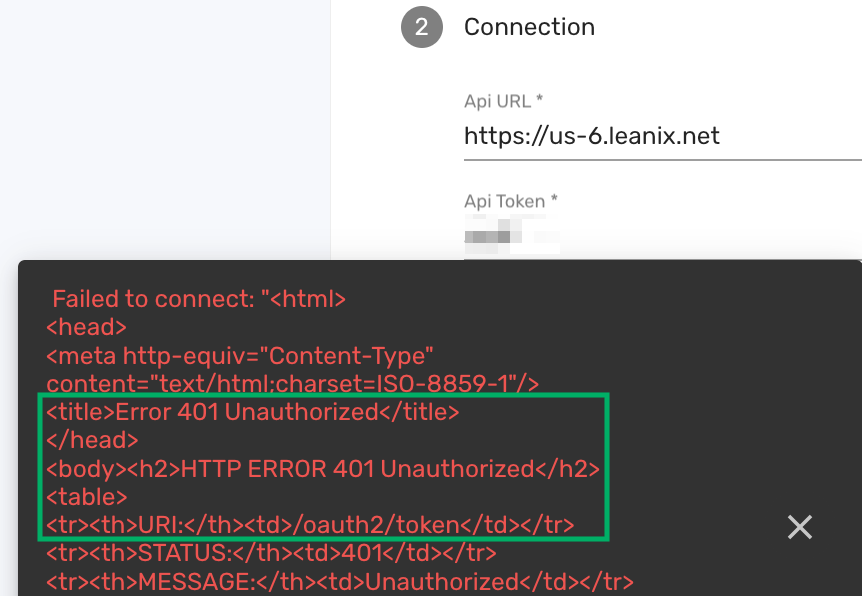
The 401 Unauthorized error is a standard HTTP response indicating that the provided credentials are not valid for the requested resource. If you encounter this error, check your API token or other authentication credentials for any inaccuracies, particularly ensuring that the token is current and was entered correctly.
To resolve such issues, follow these steps:
-
Confirm the validity of the authentication credentials with the service provider. If you're not sure how to obtain or generate these credentials, refer to the individual connector documentation.
-
Double-check the credentials entered in the integration connection settings for any inaccuracies:
- Ensure that there are no leading or trailing spaces, and that the correct cases are used.
-
Re-enter the API key, access key, email, username, or password without any typos or misplaced characters.
-
Click Next to save the changes and confirm that the connection is successful.
Insufficient permissions
The integration can fail because the account associated with the provided authentication credentials does not have the necessary permissions to access the API server and return data. To resolve this, follow these steps:
-
Verify the access level of the account associated with the API key or authentication credentials. If you're not sure what permissions are required, refer to the individual connector documentation.
-
If necessary, modify the account permissions or use an account with the appropriate level of access:
-
Consult with your system administrator to adjust the account permissions.
-
Update the integration configuration with the account that has the required access.
-
-
Click Next to save your changes.
-
Run the integration again to verify that the issue is resolved.
- See how to validate your data for additional information on how to verify that the necessary permissions have been applied to retrieve the proper data.
Outdated connector version in the configuration
The data integration may not function as expected if the connector in your integration is outdated. Brinqa regularly updates connectors to introduce new functionalities and address any errors. Running an outdated version of a connector means missing out on these important updates, which can potentially lead to issues.
For example, consider you have an integration with the GitHub connector, and a recent update has been released to address a specific issue. If your integration still references an older version of the GitHub connector, the issue will persist until you update to the latest version and select the new version in the integration configuration settings for the changes to take effect:
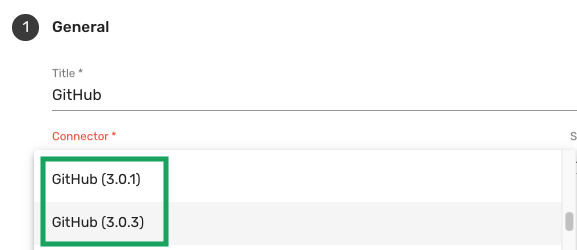
To ensure you benefit from the latest fixes and improvements, follow these steps:
-
Update the connector to the newest available version.
-
Navigate to the integration configuration.
-
Click the connector drop-down and select the most recent version.
-
Click Next to save the changes.
-
Run the integration to verify that the issue is resolved.
If you need to use a previous version of a connector, please contact Brinqa Support.
Contact Brinqa support
If you still have issues with your data integrations failing or not connecting properly after following the troubleshooting tips, consider these options:
-
Use the support portal to reach Brinqa Support specialists.
-
Email Brinqa Support at support@brinqa.com. When you do, be prepared to provide details about the issue, including which connector and version you're using, your Brinqa Platform version, and any steps you have already taken in attempting to resolve your issue. Providing more information will help Brinqa Support assist you more efficiently.