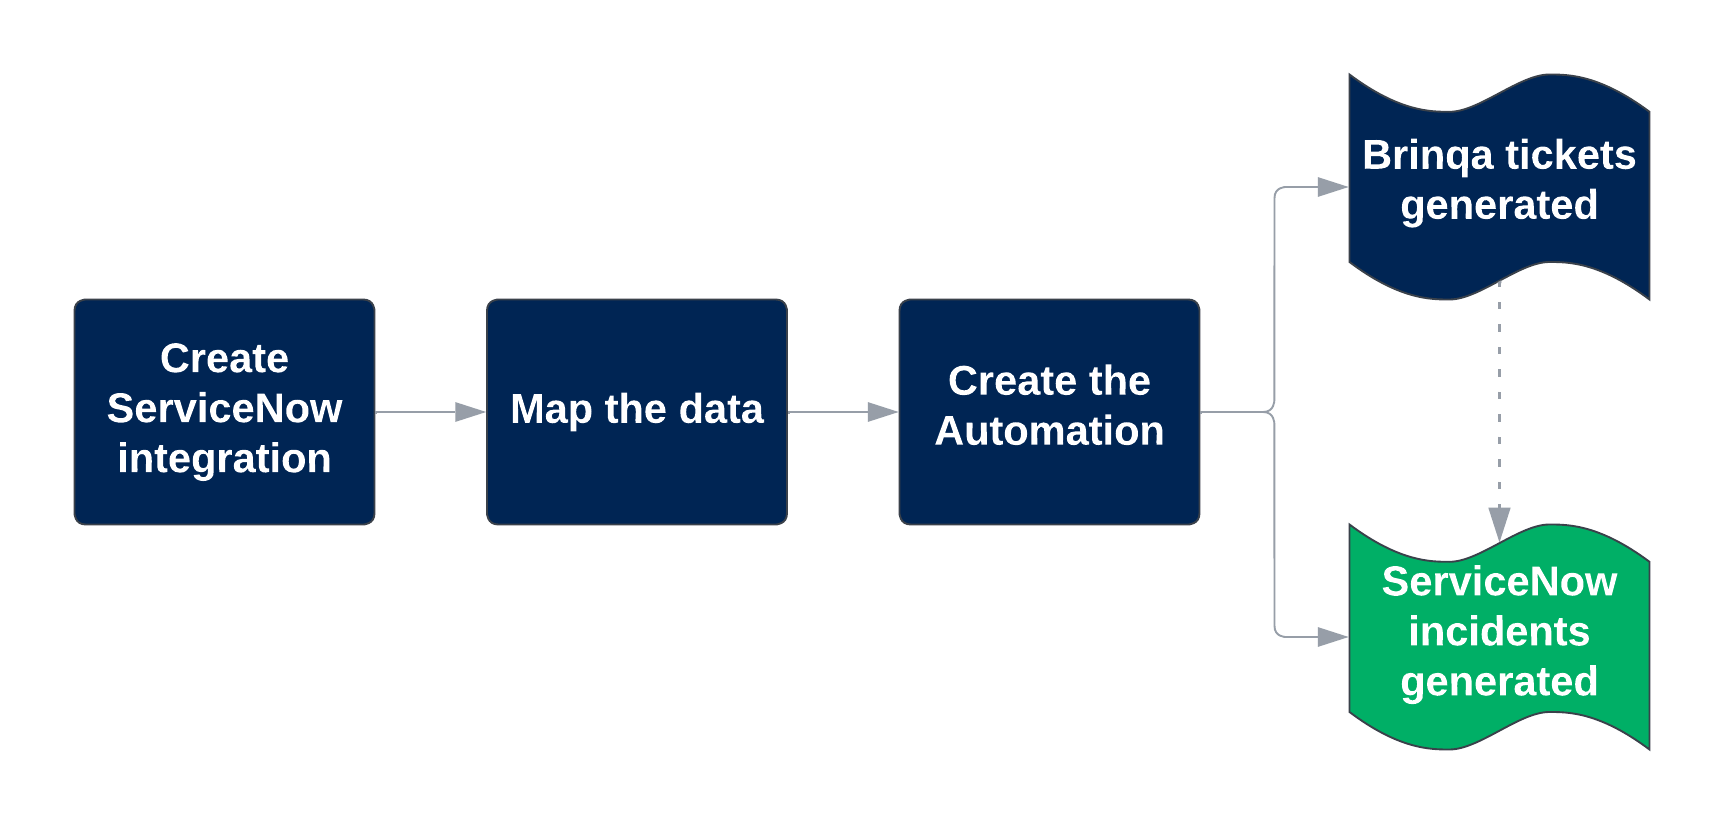
Sync Tickets with ServiceNow
You can synchronize tickets created in your Brinqa Platform with outside ticketing systems, such as ManageEngine, Jira or ServiceNow. This article details how to send tickets to your organization's ServiceNow incidents.
1.) Create data integration for ServiceNow
Before you can synchronize tickets between the Brinqa Platform and your organization's ServiceNow incidents, you need to install and use the ServiceNow connector in a data integration. Only users with the System Administrator role can create data integrations. To do so, follow these steps:
-
Navigate to Integrations > Connectors.
-
Locate the ServiceNow connector and click Install.
-
Click Use. The Create data integration screen displays.
-
Fill out the General information.
-
Title: Provide a title for the data integration. For example, "ServiceNow Ticketing."
-
Connector: The Connector field is filled in with the ServiceNow connector.
-
Server: The server to process the data integration. Local Server is selected by default for cloud data sources. You can also create your own data servers for on-premises data sources.
infoIn Brinqa Platform version 12, a Version field appears between Connector and Server, allowing you to select the connector version. Additionally, the default server is named Cloud Server instead of Local Server.
-
Description: Provide a description for the data integration. For example, "ServiceNow data integration to push Brinqa tickets to ServiceNow."
-
-
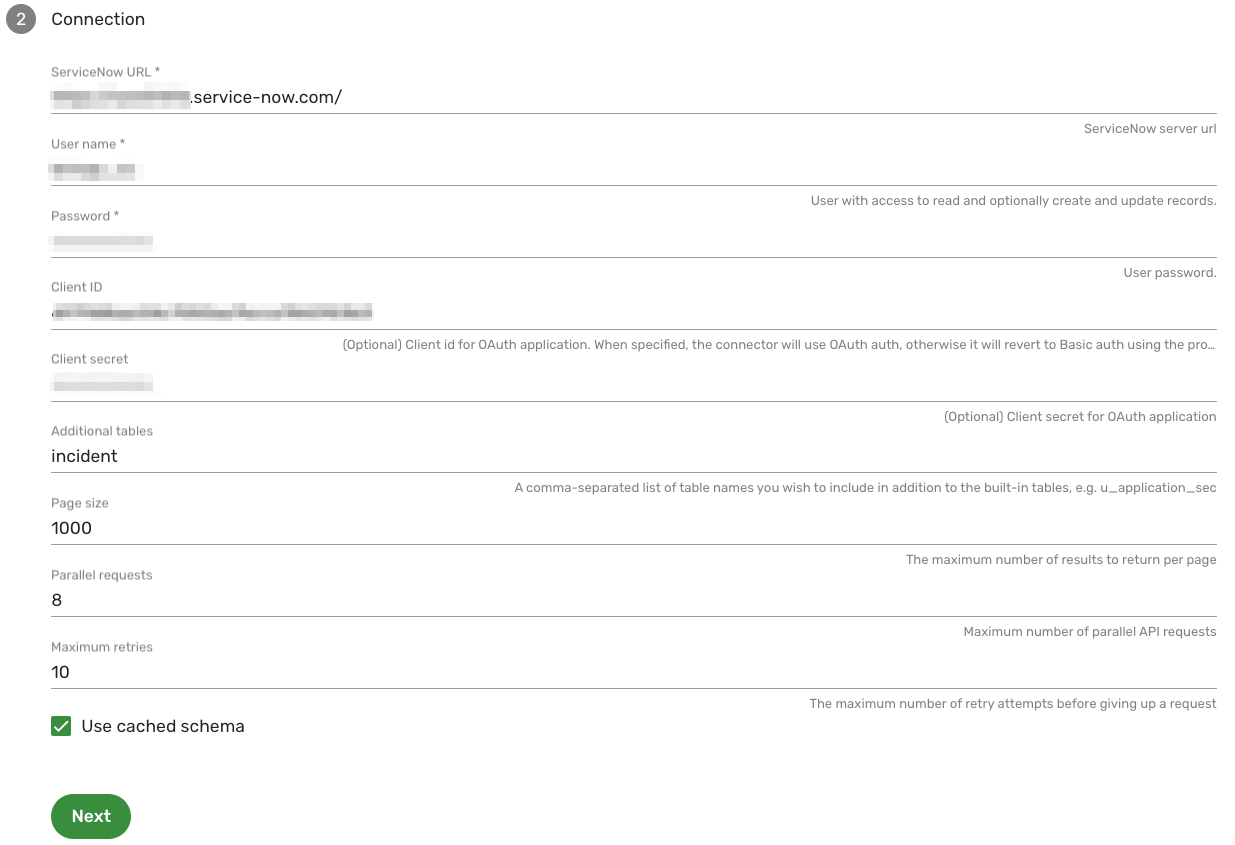
Fill out the Connection information for the ServiceNow connector.
-
ServiceNow URL: Your organization's ServiceNow Server URL. The default format is
https://<ServiceNowServerName>.service-now.com/. -
Username and Password: The username and password associated with the ServiceNow user account, which must have permissions to your ServiceNow incidents and return data. For information about how to create a ServiceNow user with the necessary roles, see Create a ServiceNow user and Assign the required roles and permissions.
-
Client ID and Client secret: The client ID and client secret for OAuth2 access to ServiceNow. When specified, the ServiceNow connector uses OAuth2 authorization. If not specified, the ServiceNow connector reverts to basic authorization using the ServiceNow username and password provided. For information about how to generate these credentials, see Obtain the client ID and client secret for 0Auth2 authentication.
-
Additional tables: Type incident. The incident table in ServiceNow is the corresponding table that is mapped to the Ticket data model in the Brinqa Platform. This ensures that your ServiceNow incidents are retrieved by the ServiceNow connector.
-
Leave Page size, Parallel requests, and Maximum retries as is.
-
Use cached schema: Select this option to allow Brinqa to use a previously stored version of the ServiceNow schema when connecting to ServiceNow. This can speed up the connection process and reduce the load on ServiceNow.
Your connection settings may resemble the following:
-
-
Click Next.
-
For Types, choose Incident. This is the ServiceNow
incidenttable you added earlier in the steps. -
For Sync Interval, choose how far back you want to sync your data. By default, the beginning of time is selected, which means when the ticket is created in your Brinqa Platform. You can leave this field as is.
-
For Data lifecycle, specify the number of days of inactivity after which the data retrieved by the ServiceNow integration is marked as inactive and then removed from the Brinqa Platform. The default is 30 days. See Data lifecycle management for additional information.
-
Click Create.
If you have completed the fields correctly, the page reloads and you should see the ServiceNow data integration listed. If you do not see it, click Refresh ![]() .
.
The ServiceNow data integration syncs when the data orchestration runs.
2.) Configure data mapping for ServiceNow
After creating the ServiceNow data integration, you need to create a data mapping to sync the tickets created in the Brinqa Platform to your ServiceNow incidents. To do so, follow these steps:
-
Navigate to Integrations > Sources.
-
Hold your pointer over the ServiceNow data integration, click the kebab (three vertical dots) menu, and then click Mappings.
-
Click Create and fill in the following fields:
-
Title: Provide a title for the data mapping. For example, "Brinqa Ticket to ServiceNow Incident."
-
Source: The data model containing the data you want to push. Select Vulnerability ticket.
-
Target: The ServiceNow table specified for Types in the ServiceNow data integration. Click the dropdown and select Incident.
-
Active: Select Active if not already selected.
-
-
Click Map attributes. Mapping source attributes to targets lets you match aspects of the Brinqa tickets that are pushed to your ServiceNow incidents.
-
Click the desired source attribute, use Search if needed, and then click the target attribute. A line displays linking the mapped attributes.
For the best compatibility and consistency between tickets created in the Brinqa Platform and ServiceNow, the following mappings are highly recommended:
Source Target Assigned Assigned to Description Description Name Short description Due date Due date Status Incident state -
Click Preview to ensure that the source attributes and targets align.
-
Click Create.
3.) Create ticket sync automation
You must create an automation to generate tickets in your Brinqa Platform and then push those tickets to your organization's ServiceNow account. Only users with the Configurator or System Administrator role can create automations. To create an automation that generates tickets for critical vulnerabilities and pushes them to ServiceNow, follow these steps:
-
Navigate to Automation.
-
Click Create and fill in the following fields:
-
Title: Provide a title for the automation. For example, type "ServiceNow Ticket Sync."
-
Description: Provide a description for the automation. For example, type "Push tickets created in Brinqa to ServiceNow."
-
-
Type the following Brinqa Query Language (BQL) query to retrieve all critical vulnerabilities in your data:
FIND Vulnerability AS v WHERE v.riskRating = "Critical"warningAvoid using "Finding" in the BQL query. Instead, choose a data model that extends the "Finding" model, such as Alert, Manual finding, Pentest finding, Violation, Vulnerability, etc. If you create an automation for generating tickets and use "Finding" in the BQL query, it will not work as intended and will result in tickets being created with empty counts.
-
Click Test to ensure your query is valid and returns data.
-
In Actions, there are different ticket types and methods in which you can generate tickets:
-
Create ticket without sprints: Use this option if you don't want to associate the ticket with a sprint. More options display, excluding sprint settings. See Create tickets without sprints for additional information on setting that up.
-
Create ticket with sprints: Use this option if you want to associate the tickets with a sprint. More options display for sprint settings. See Create tickets with sprints for additional information on setting that up.
-
-
Click Add action and select Push vulnerability tickets. More options display.
- For Data integration mapping, select the mapping created for ServiceNow incidents in the configure data mapping for ServiceNow section.
-
For Run, choose the method in which the automation runs.
-
Manual: Manually launch the automation from the Automation page.
-
Schedule: Specify a schedule for the automation to run (for example, once per day, every day at a specified time).
-
Orchestration: Set the automation to run as part of the data orchestration
-
-
Click Create.
4.) Launch the ticket sync automation and view tickets
The final step in pushing tickets from your Brinqa Platform to your ServiceNow incidents is to launch the ticket sync automation. To do so, follow these steps:
-
Navigate to Automation.
-
Hold your pointer over the ServiceNow ticket sync automation and click Run.
-
Click Confirm when prompted.
-
After a successful run of the automation, navigate to Remediation > Tickets > All.
-
To view the tickets generated by the automation, click the Sources filter, select ServiceNow, and then click Apply.
- If you do not see the Sources filter, click More, select Sources, and then click Apply.
-
Hold your pointer over one of the tickets and click Details to view the details. These details include a summary and description of the vulnerability, recommendations on how to address it, risk and SLA information, and more.
-
Log in to your ServiceNow account and navigate to your incidents to view the tickets created from the ticket sync automation in your Brinqa Platform.
Troubleshooting
If your ticket sync automation fails, you can view information on what has caused a step in the automation process to fail. To do so, follow these steps:
-
Navigate to the Automation page and select the automation you want to view the logs for.
-
Copy the Transaction ID of the failed automation.
-
Navigate to Administration
 on the upper-right corner and under System, select Logs.
 -
Paste the Transaction ID into the search bar and press Enter or Return on your keyboard.
-
If you click the link in the Message column, you can see what has caused the automation to fail. The error message is included in the Detail section.