Manual Entry
This article details the manual entry feature in the Brinqa Platform, how to modify existing records, and how to create a new manual record for a given dataset.
What is manual entry?
Typically, data is ingested into the Brinqa Platform through automated processes involving data integration and connectors. This process allows for automated, seamless integration of data from various sources, effectively consolidating, standardizing, and analyzing data to support risk management and decision-making. However, there are instances where automated data ingestion may not completely meet specific needs, or when you need to input data that is not tracked by any data source. This is where manual entry comes into play.
Manual entry refers to the process of creating new records or modifying existing records directly within the Brinqa Platform, such as findings from a manual penetration test (pentest) or internal applications. This process bypasses the usual automated integration and can be used to augment, correct, or fill gaps in the data gathered from your external sources. Manual entry can be particularly useful in situations where:
-
External data sources provide inaccurate or incomplete data: For instance, your Application Security (AppSec) team, which manages the Brinqa Platform, might rely on data from a source owned by the Threat Vulnerability Management (TVM) team. If the data from this source is unreliable, and the TVM team cannot make necessary adjustments, the AppSec team can manually correct the data within the Brinqa Platform.
-
You need to add a unique, one-off record not tracked elsewhere: For example, if there is a specific host or vulnerability not monitored by any data source, you can manually create a record for that dataset in the Brinqa Platform.
-
Existing data entries need modification: You can modify both records, ingested through data integration and manual records, as needed to ensure that your data remains up-to-date and accurate.
In essence, manual records can provide flexibility and control of your data by allowing direct, user-controlled data entry and modification, acting as an extension of the standard automated data integration process.
Create a new manual record
Users with the System Administrator role can create new manual records. To do so, follow these steps:
-
Navigate to a dataset that supports manual entry, such as Hosts (Inventory > Assets > Hosts).
-
Click Add.
The default form view for the chosen dataset slides out from the right-hand side of the page.
-
Fill in the fields as accurately as possible, and then click Create.
The new record appears in the list view of the dataset. If you do not see the new manual record in the list view, click ![]() .
.
When you create a record with manual entry, that record integrates into your existing data is automatically assigned a unique identifier (UID). A manual record automatically updates if it can be linked to an external data source through identifiable keys such as a MAC address or serial number. During data orchestration, the platform recognizes these links and updates the record to mirror changes from the source, like operating system or network setup updates. This process eliminates the need for subsequent manual updates to records created with manual entry.
On the other hand, if a manual record was created without a unique identifier, and it can't be linked to an external data source, you will need to manually update the record to reflect any changes.
Modify existing records
Users with the System Administrator role can modify existing records. To do so, follow these steps:
-
Navigate to the list view of the dataset that contains the record you want to modify. For instance, if you want to modify a container image record, navigate to Inventory > Cloud > Container images.
-
Hold the pointer over the record that you want to modify, and then click Edit. This loads the default form view for the selected dataset.
-
You can also click the Name of the record in the list view and then click Edit on the details page to load the default form view for the selected dataset.
-
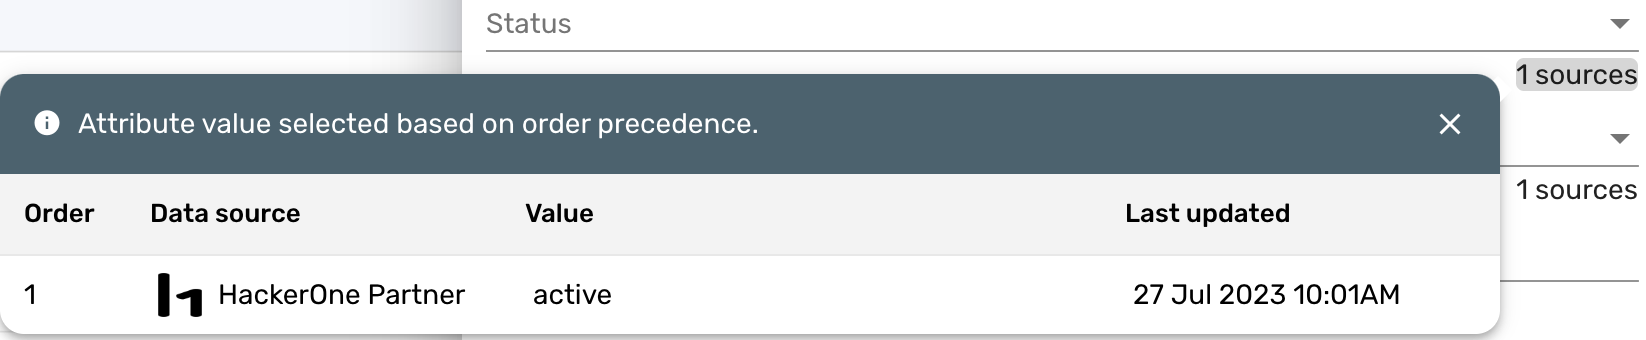
The default form view does not show external source values. You can click "x sources" under each attribute field to view the values from external sources. The values on display when modifying the existing record are the values from manual entry. For example, when modifying an existing pentest finding record from HackerOne, the Status field displays "1 source" underneath it, indicating that the status of the pentest finding has come from the HackerOne source:
-
-
Make the necessary adjustments in the fields and click Update.
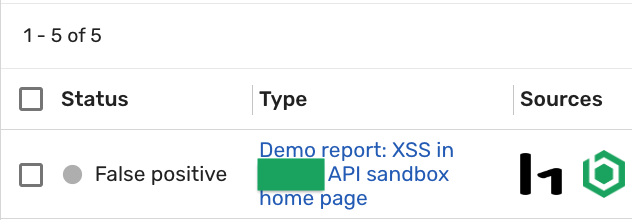
As shown in the screenshot below, the status of the HackerOne pentest finding has been updated from "active" to "False positive". Records modified through manual entry are categorized under the "Brinqa Manual Entry" source, as indicated by the Brinqa logo, and their original integration source — in this instance, the original source being HackerOne.
Repeat these steps for each record you want to modify.
When you modify an existing record, the manual entries take precedence over other sources. This means that if there's a conflict or discrepancy between a manual entry and data pulled from an external source, the manual entry always prevails.
Finding manual records
When you create manual records or modify existing records in the Brinqa Platform, they are categorized under the "Brinqa Manual Entry" source. Whether you've created a new record or modified an existing one through manual entry, you might need to locate these records later. To locate records created or modified through manual entry, follow these steps:
-
Navigate to the list view of the dataset where you added the new record or modified the record.
-
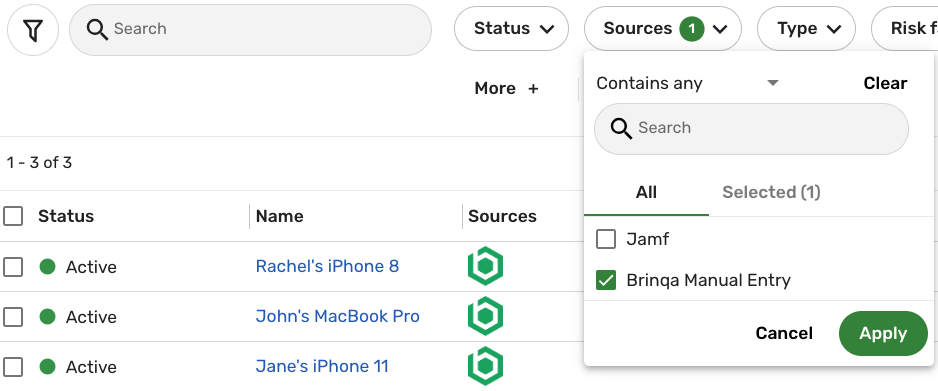
Click the Sources filter.
- If a record has been created or modified with manual entry, you should see "Brinqa Manual Entry" as one of the sources you can choose from.
-
Click Brinqa Manual Entry, and then click Apply.
The list view refreshes with the records that have been created or modified through manual entry. You can also use the Brinqa Query Language (BQL) to locate this same information on the Explorer graph. To do so, follow these steps:
-
Navigate to Explorer.
-
Type the following BQL query:
FIND Host AS hWHERE h.dataIntegrationTitles CONTAINS "Brinqa Manual Entry"
Any Host records created or modified through manual entry appear on the graph.
Replace Host with the dataset you want to locate the manual entries for. For instance, if you are searching for pentest findings created or modified through manual entry, the query would read: FIND PentestFinding AS p WHERE p.dataIntegrationTitles CONTAINS "Brinqa Manual Entry"
Data models that support manual entry
Manual entry in the Brinqa Platform is designed to provide flexibility for various use cases. To facilitate this, several default data models support manual entry by default and do not need to be enabled. The following data models allow for manual entry out of the box:
-
Data models extending Asset: Account, Application, Certification, Cloud resource, Code project, Code repository, Container, Container image, Device, Host, Host image, IP range, Network segment, Package, Service, Site, Site certificate, and Subnet.
-
Data models extending Finding: Dynamic code finding, Manual finding, Open source finding, Pentest finding, Static code finding, Violation, and Vulnerability data models.
-
Data models extending Finding Definition: Dynamic code finding definition, Manual finding definition, Open source finding definition, Pentest finding definition, Static code finding definition, Violation definition, and Vulnerability definition data models.
-
Data models extending Ticket: Dynamic code ticket, Manual ticket, Open source ticket, Pentest ticket, Static code ticket, Violation ticket, and Vulnerability ticket.
Additionally, the Business service, Business unit, and Company data models also support manual entry.
Parent data models, such as Asset, Finding, Finding Definition, or Ticket, are not computed during consolidation and therefore do not support manual entry.
Tutorial: Create a device record for an Apple MacBook
This tutorial guides you through the process of manually adding a new Apple MacBook to your existing device records. While this tutorial focuses on creating a manual record for an Apple MacBook, you can follow these same steps to add a different device. To create a manual record for an Apple MacBook, follow these steps:
-
Navigate to Inventory > Assets > Devices.
-
Click Add.
The Host form slides out from the right-hand side of the page.
-
Fill in the following fields:
-
MAC address: The MAC address of the MacBook.
-
Operating system: The operating system version of the MacBook. For example, type "Ventura 13.4.1".
-
OS Platform: The operating system platform as a whole. Type "macOS".
-
Serial number: The serial number of the MacBook. The serial number is typically a 12-digit alphanumeric value.
-
Model: The model of the MacBook. For example, type "2020 MacBook Pro".
-
Manufacturer: The manufacturer of the MacBook. Type "Apple".
-
Status: Click the dropdown and select Active.
-
Tags: Type "Manual entry", "Apple", and "MacBook". These tags are optional but can make updating the record easier when you need to search for it in your data.
-
UID: A UID is automatically generated for the MacBook, or any device, once you create the record.
-
Name: Provide a name for the MacBook. The name of the MacBook appears in the devices list view.
-
Description: Provide a description for the MacBook.
tipAny field not mentioned above can be left as is. The First seen, Last seen, Last inventory update, Last enrollment, and Last assessed fields fill in automatically when the record is generated and continuously update when your data orchestration runs.
-
-
Click Create.
A message displays on the bottom left-hand side of the page indicating that the device has been successfully created.
-
Click Refresh or refresh your browser if the new MacBook device does not appear in your list view.
There are several ways to verify that the new MacBook has been successfully integrated into your data:
-
Navigate to Inventory > Assets > Hosts.
-
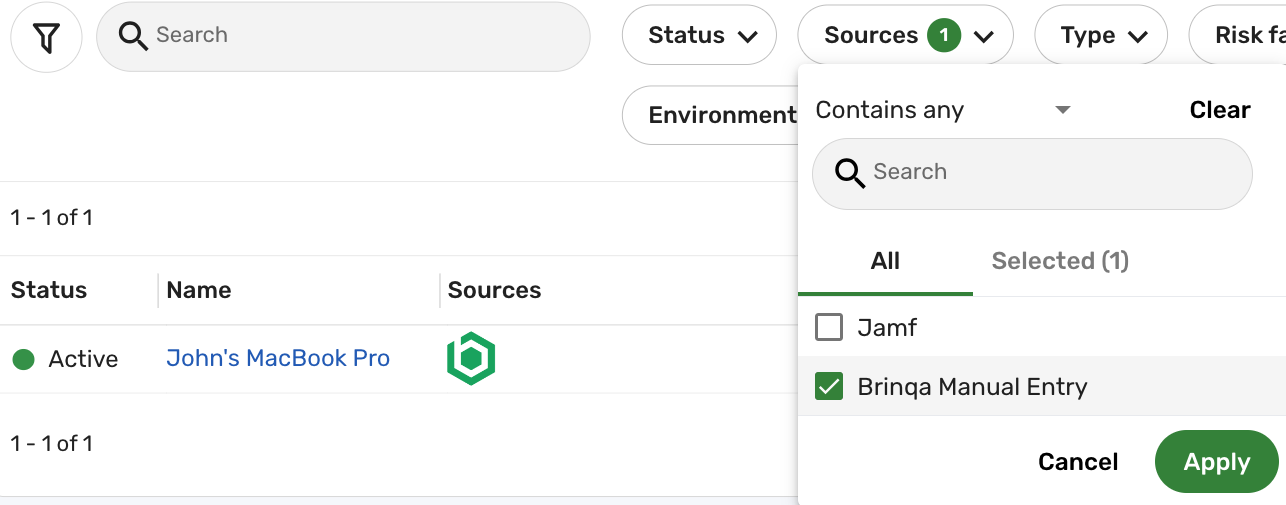
Click the Sources filter, select Brinqa Manual Entry, and then click Apply.
The list view refreshes and the MacBook you added through manual entry displays:
You can also navigate to Explorer and type the following BQL query to locate the manually added MacBook on the graph:
FIND Device AS d WHERE d.name CONTAINS "MacBook"

Tutorial: Create a pentest finding record
This tutorial guides you through the process of manually adding a pentest finding record to your existing pentest records. You may want to manually add a pentest finding record to your existing records for various reasons:
Include findings from a manual pentest: If a pentest is performed manually or by a third-party security company, the findings from the pentest might need to be manually entered into the Brinqa Platform.
Add additional context or missing details: Automated vulnerability scanning might not capture the full context or details of a vulnerability. A team member who performed the pentest could provide additional insights or notes that can be manually added to the record.
Track and manage remediation efforts: By adding the pentest findings into the Brinqa Platform, it can allow for better tracking and management of your remediation efforts. You can use Brinqa's capabilities to assign tasks, monitor progress, and generate dashboards.
While this tutorial focuses on creating a manual record for a pentest, you can follow these same steps to add manual entries for different types of findings, such as a dynamic code finding, static code finding, or vulnerability. To create a manual record for a pentest finding, follow these steps:
-
Navigate to Findings > PenTest.
If you do not see the PenTest option because your navigation menu is customized, go directly to the
/caasm/pentestFindingsURL. -
Click Add.
The Create pentest finding form slides out from the right-hand side of the page.
-
Fill in the following fields:
-
Assessment: The assessment associated with the pentest finding. By default, this field is populated with scan data ingested from a source integration. Click the magnifier icon to search for an assessment.
-
Categories: Free-text categories for classifying the finding. You can enter any value, up to 1024 characters, and you can add more than one.
-
Confidence: The confidence level of the pentest finding as rated by the penetration tester or testing team. Options include: Unknown, None, Low, Medium, or High.
-
Description: A detailed description of the pentest finding. How the finding was discovered, its potential impact, and any other relevant details.
-
First found, last fixed, last found: Track the timelines of the pentest finding: when it was first discovered, when it was last fixed, and when it was last found in a test.
-
Name: Provide a name for the pentest finding.
-
Remediation SLA: Specify the number of days in which the pentest finding should be addressed. The due date and compliance status are calculated from this value (see the note below).
-
Results: The outcomes from the pentest.
-
Severity: Indicate the severity of the pentest finding. Options include: None, Low, Medium, High, or Critical.
-
Summary: A brief summary of the finding.
-
Targets: The specific systems, applications, or other assets that were the subject of the pentest and where the pentest finding was found. Click the dropdown to choose from a list of hosts, sites, applications, or other assets in your Brinqa Platform.
-
Type: The type of pentest finding. Click the magnifier icon to search for a pentest finding definition.
tipAny field not mentioned above can be left as is.
Some values are calculated automaticallyThe Status and Status category of a finding are calculated by the platform through status configuration rather than entered manually, so they do not appear on this form. For a manually created finding, the status may initially appear as Assumed fixed until the platform calculates it.
The compliance status and due date are also calculated automatically. They are not set when you create the finding. The platform calculates them the next time it runs computation, or on its daily schedule, based on the Remediation SLA value relative to the First found date.
-
-
Click Create.
A message displays on the bottom left-hand side of the page indicating that the pentest finding has been successfully created.
-
Click Refresh or refresh your browser if the new pentest finding record does not appear in your list view.