Views
This article offers an overview of views and provides instructions on how to customize them.
Introduction to views
Views are the different page layouts you see throughout the Brinqa Platform, and they are associated with data models. Each data model includes several predefined views. For example, the Default host list view displays a table of all the host records, the Default vulnerability detail view displays a single vulnerability record with its associated attributes, and the Default user form view displays the fields you can change when creating or modifying a user account. The following table describes the type of views you can find in the Brinqa Platform:
| View Type | Description | Example |
|---|---|---|
| COMPACT | Compact views refer to panes that display a concise list of attributes. The pane is displayed when you hold the pointer over a cell on a table. They provide a quick and convenient way to view relevant information without navigating away from the table. | When you navigate to the Host list view and hold the pointer over a cell in the Type column, the resulting pane represents a compact view. |
| DETAIL | Detail views refer to pages that display information for one record within your dataset. | When you navigate to a particular host to review its contents, that page represents a detail view. |
| FORM | Form views refer to pages where you have the ability to create or modify a dataset associated with attributes. The attributes display as fields on the form. | The Create user page represents a form view. |
| LIST | List views refer to pages that display all records of your data in a list and allow you to sort, filter, and delete those records. | The Findings page represents a list view. |
| LOOKUP | Lookup views refer to tables that sometimes appear within form views. They provide a quick and convenient way to browse, search, and select multiple items to populate the form. | When editing a form, click an active magnifying glass icon, the resulting page represents a lookup view. |
| SHOW | Show views refer to slide-out panes that display vital information for one record of your data. They typically include a link for you to navigate to the detail view for more comprehensive information. The show view conveniently showcases the pertinent information related to the selected record without navigating away from the current page. | When you navigate to the Findings page and click on a finding, the resulting pane on the right-hand side of the page represents a show view. |
Customize views
The primary purpose of views is to tailor the displayed information to match your team's specific requirements. Customizing views within the Brinqa Platform offers several benefits:
- Increase relevance: Customized views ensure that the displayed information is relevant and aligned with your organization's specific needs. You can prioritize essential data, highlight critical fields, and arrange information in a way that is most useful to your team.
- Enhance adaptability: As your organization evolves and your requirements change, you can easily adjust the customized views to accommodate new attributes or dashboard needs. This adaptability ensures that the views remain relevant and useful over time.
Overall, customizing views empowers you to optimize the Brinqa Platform to align with your unique business processes, improving usability, efficiency, and the ability to derive meaningful insights from your data.
Identify the data model
When customizing views, the initial step involves selecting the appropriate data model to modify, as views are linked to specific data models. This decision is particularly crucial for detail views, as their corresponding data model might vary from the one associated with the list view where they are listed.
For example, when you navigate to a particular finding from the Findings list view, the resulting detail view corresponds to a data model that extends the Finding data model, such as dynamic code finding, static code finding, violation, or vulnerability.
Similarly, when you navigate to a particular asset from the All assets list view, the resulting detail view corresponds to a data model that extends the Asset data model, such as application, account, person, or software.
It's important to consider this distinction when customizing views to ensure that the modifications align with the relevant data model and accurately reflect the desired information and functionalities.
To find out the data model of a particular record, follow these steps:
-
Navigate to Findings or Inventory > All assets.
-
Click the
 icon and search for "Data model name".
 -
Select Data model name and click Apply.
The page reloads displaying the Data model name column. Identify the record for which you want to customize views and take note of its corresponding data model name. This is the data model you need to modify to customize the views for that record and other similar records of the same data model.
Create customized views
You cannot modify any of the predefined views in the Brinqa Platform. However, users with the Configurator or System Administrator role can create customized views by cloning the predefined views. These cloned views can then be modified to align with your team's specific requirements. Once the necessary modifications are made, the customized views can be enabled, allowing you to leverage them within the platform.
To create and customize views, follow these steps:
-
Navigate to Administration
 > Data > Models.
 -
Locate the data model to which you want to create customized views.
-
Click Views.
-
Hold the pointer over the type of view you want to create and click Clone.
-
Modify the title, description, or order of the view as needed. By default, the word "Clone" is appended to both the title and description.
The Order field determines the sequence in which the Brinqa Platform applies the views. Predefined views are assigned an order of 99, while customized views are assigned a smaller number. By assigning customized views a lower order number, you have control over the view hierarchy and can ensure that your customized views are prioritized and applied as intended within the Brinqa Platform.
-
Click Create.
The page reloads, and your cloned view appears at the bottom of the list. The view is inactive at this stage.
-
Hold the pointer over your cloned view and click Edit.
The information of the view displays.
-
Click Explore.
The template of the view displays, showing the layout and default fields included in the view.
-
Click Edit.
The Edit mode slides out from the right-hand side of the page, displaying the settings that you can modify.
-
Click the section that you want to modify and use the settings on the Customize tab to make the desired changes.
The detail settings may vary based on the section type, but they generally remain consistent throughout various sections:
-
Size and position: Modify the width, height, or both of your section. You can also enable Auto height or Auto position. To update the padding, select Override padding and specify new values.
-
Background and border: Modify the background or border color, border width, border radius, or add a border shadow to your section.
-
Text: Modify the text color, font size, or text alignment in your section.
-
Hint: Leave a hint for the section, which displays an information icon
 next to the section title. The hint displays when you hold your pointer over the icon.
 -
Rows: Define the grouping or sorting criteria for the rows or make adjustments to the page size.
-
Columns: Add or remove columns that are displayed within the section, while individually adjusting their width as needed.
-
Section layout: If the section consists of sub-sections, you can modify each sub-section by selecting it and clicking the pencil icon. From there, you can add or remove fields within the sub-section. You can also add new sub-sections or remove existing ones.
-
Actions: Select the actions that users can perform on the section and decide whether to position the corresponding action icons in the section's header or footer. The actions can include options such as Fullscreen, Download, Refresh, as well as Add, Details, Edit, or Delete.
-
Options: General options for displaying the section.
-
Conditional display: If needed, you can define a condition and opt to only display the section when the condition is met.
noteIf you try to modify any of the charts shown at the top of a list view but cannot find the relevant setting mentioned here, see Customize section appearance in dashboards for further guidance.
-
-
After you have completed making the necessary changes, click Update.
The page reloads and displays the template with your changes applied.
-
Click Views to display the list of views again. Your new view is still inactive at this stage.
-
Hold the pointer over your new view and click Activate.
-
Click Confirm at the prompt.
The page reloads and your new view is now active.
To ensure that your customized view has been successfully applied, navigate to the corresponding page where you anticipate the changes to take effect. Review the page and verify that the expected modifications are visible.
Tutorial: Add attributes to the host show view
This tutorial demonstrates how you can add additional attributes to the host show view.
The Default host show view displays essential information of the host, such as status, type, operating system, manufacturer, MAC addresses, and IP addresses. While some of these attributes may hold significance to you, others may not. Additionally, there might be other attributes that you consider more important and wish to include in this view.
Consider a scenario where you have introduced two new attributes in the Host data model. The first attribute, named Locale, represents the host's location, while the second attribute, named Business unit, indicates the responsible business unit. You can add both attributes to the show view.
By customizing the host show view, you can prioritize and highlight the most important information for your workflow or decision-making process. This helps you focus on the data that matters most to you and eliminates unnecessary clutter.
To add other attributes to the host show view, follow these steps:
-
Navigate to Administration
> Data > Models. -
Search for the Host data model and navigate to the page.
-
Click Views.
-
Hold the pointer over the SHOW view and click Clone.
-
Update the title to make it unique and click Create.
The page reloads, and your cloned view appears at the bottom of the list. The view is inactive at this stage.
noteIf you receive an error with this message:
There is already a view for that data model and view type with the same order number; dataModelName=Host; viewType=SHOW; order=1, it's because the Host data model already has a customized view with the same order number. To resolve this error, change the order to a number less than 99, ensuring that it's applied before the predefined view. -
Hold the pointer over your cloned view and click Edit.
The information of the view displays.
-
Click Explore.
The template of the show view displays, showing the layout and default fields included in the view.
-
Click Edit.
The Edit mode slides out from the right-hand side of the page, displaying the settings that you can modify.
-
Click the section to highlight it and click the Customize tab.
-
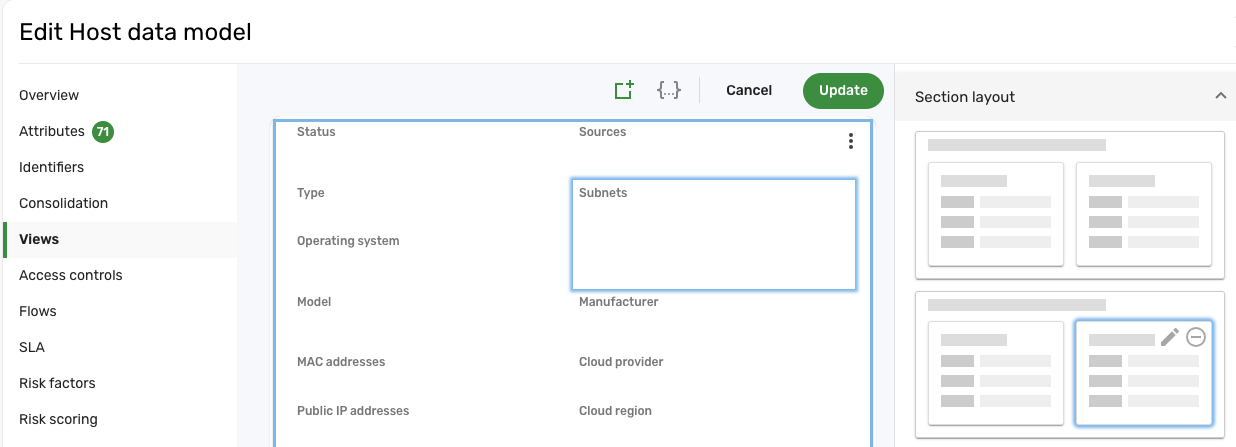
Click Section layout and select the desired placement for the attributes. For this tutorial, we will put the attributes below "Subnets".
-
Select the sub-section where the "Subnets" attribute is located, as shown in the following screenshot:
-
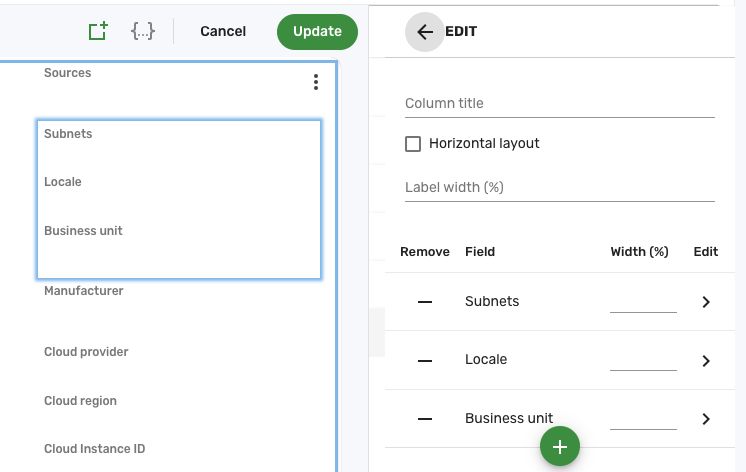
Click the pencil icon to open the edit pane for the sub-section.
-
Click Add field, search for "Locale", select it from the search results, and then click Add.
-
Repeat the previous step to add "Business unit" in the same manner. Your page may now resemble the following:
-
After you have completed making the necessary changes, click Update.
The page reloads displaying the template with the added attributes.
-
Click Views to display the list of views again.
-
Hold the pointer over your new view and click Activate.
-
Click Confirm at the prompt.
The page reloads and your new view is now active.
-
Navigate to Inventory > Hosts. When you click on a host, you should see the two newly added attributes added in the show view.
Tutorial: Modify default filters and columns on the host list view
This tutorial demonstrates how you can add or remove filters and columns on the host list view so that they are displayed by default for all users from your organization.
The Default host list view includes some filters and columns for the host data, such as sources, type, risk factors, risk score, compliance status, first seen, and last seen. While some of these filters are useful to you, others may not. Additionally, there might be other filters or columns that you consider more important and wish to include in this view.
While you can add more filters and columns to the default list view, these modifications are specific to the logged-in user. Therefore, each user must replicate these changes individually. By customizing the host list view, you can uniformly implement these changes across the Brinqa Platform, ensuring that all your users have a consistent view and saving them time.
To change the default filters and columns on the host list view, follow these steps:
-
Navigate to Administration
> Data > Models. -
Search for the Host data model and navigate to the page.
-
Click Views.
-
Hold the pointer over the LIST view and click Clone.
-
Update the title to make it unique and click Create.
The page reloads, and your cloned view appears at the bottom of the list. The view is inactive at this stage.
noteIf you receive an error with this message:
There is already a view for that data model and view type with the same order number; dataModelName=Host; viewType=LIST; order=1, it's because the Host data model already has a customized view with the same order number. To resolve this error, change the order to a number less than 99, ensuring that it's applied before the predefined view. -
Hold the pointer over your cloned view and click Edit.
The information of the view displays.
-
Click Explore.
The template of the list view displays, showing the layout of sections included the view.
-
Click Edit.
The Edit mode slides out from the right-hand side of the page, displaying the settings that you can modify.
-
Click the table to customize this section.
The Edit mode changes to Edit section.
-
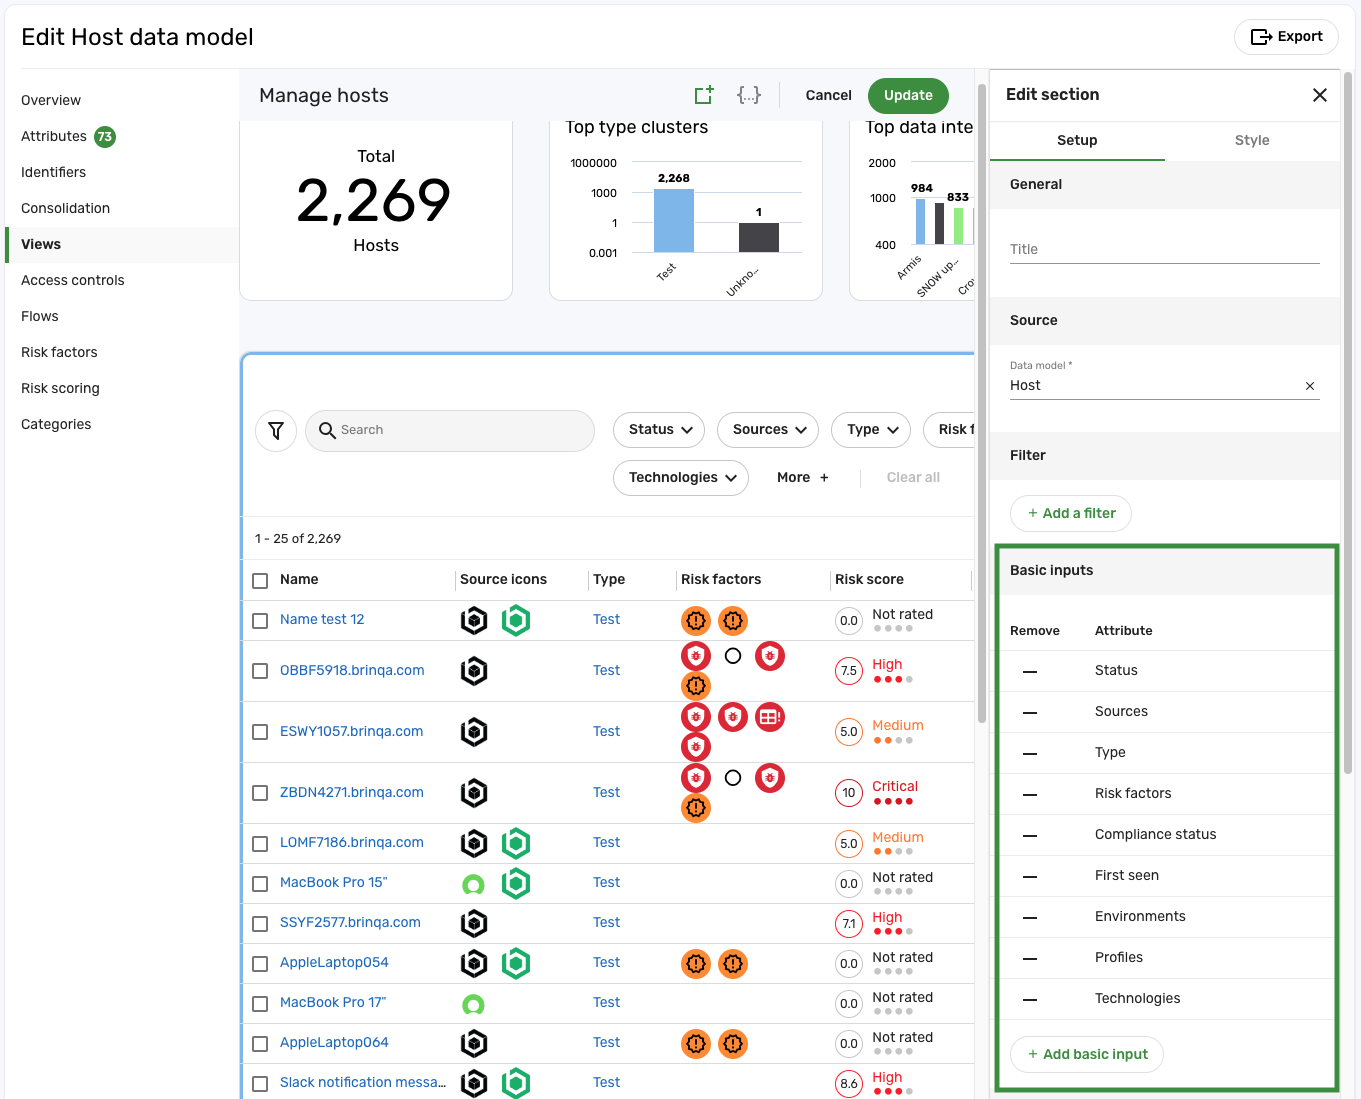
To change the list of default filters displayed next to the search bar, click the Setup tab and scroll to the Basic inputs sub-section.
-
To remove attributes that you don't need, click the – icon next to the attribute.
-
To include additional attributes, click Add basic input, select the attribute, and then click Add.
-
To change the default columns, click the Style tab and scroll to the Columns sub-section.
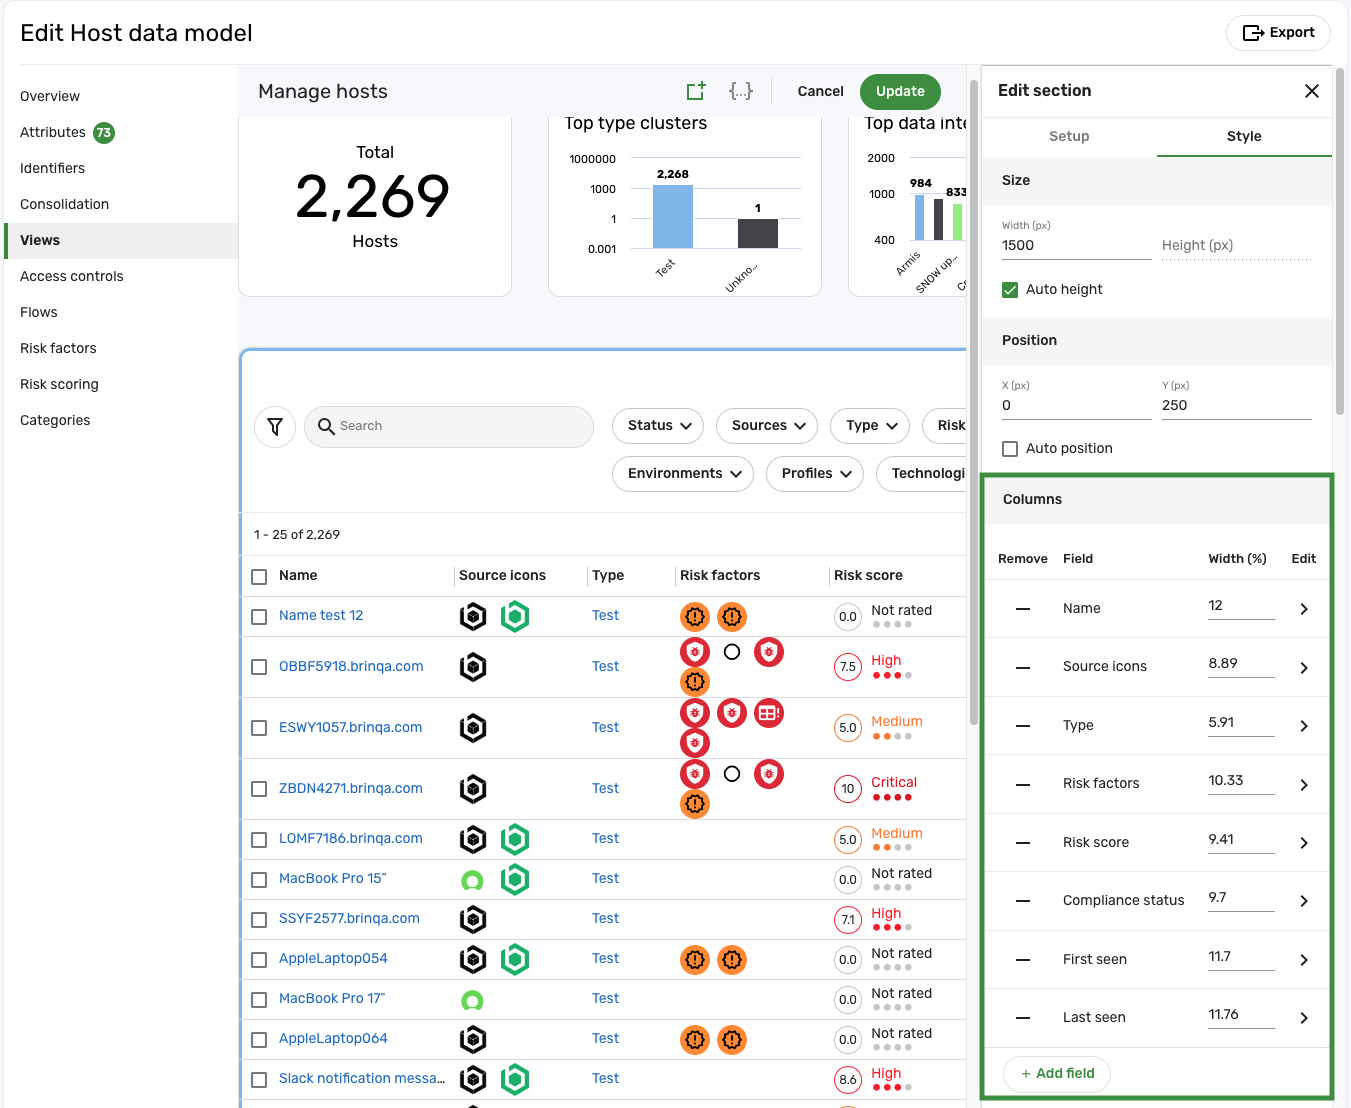
-
To remove columns that you don't need, click the – icon next to the field.
-
To include additional columns, click Add field, select the attribute, and then click Add. Adjust the width percentage if desired.
-
After you have completed making the necessary changes, click Update.
The page reloads displaying the template with your customization.
-
Click Views to display the list of views again.
-
Hold the pointer over your new view and click Activate.
-
Click Confirm at the prompt.
The page reloads and your new view is now active.
-
Navigate to Inventory > Hosts. Verify that your modifications to the filters and columns have been applied.