Remediation Campaign
This article details remediation campaigns in the Brinqa Platform, how to create them, and how to add tickets to remediation campaigns.
What are remediation campaigns?
Remediation campaigns organize remediation efforts into a structured hierarchy, giving teams the ability to align specific tasks, or tickets, under broader, strategic objectives. Each campaign embodies an overarching goal, with associated tickets representing discrete tasks that collectively advance towards achieving this goal. This structure not only promotes organized and focused remediation efforts, but also facilitates tracking progress and prioritizing actions based on the campaign’s objectives.
Comparable to Epics in Jira, epics are designed to group a set of related issues or tasks to achieve a goal. Remediation campaigns serve a similar purpose; consolidating related remediation tasks to address a comprehensive objective.
The following diagram illustrates the concept of remediation campaigns, associated tickets, and findings within those tickets:

Access controls for remediation campaigns
Before you create a remediation campaign, it's important to understand the level of access associated with remediation campaigns for each default role in the Brinqa Platform. These access controls define who can do what with remediation campaigns, ensuring that sensitive information and critical tasks are managed securely.
The following table details the access controls associated with each role in regards to remediation campaigns:
| Role | Permissions |
|---|---|
| Administrator | Read-only access to all remediation campaigns. |
| Remediation owner | Modify, read, and delete all remediation campaigns. |
| Risk analyst | Modify, read, and delete all remediation campaigns. |
| Risk owner | Modify, read, and delete all remediation campaigns. |
| System administrator | Create, delete, read, and update all remediation campaigns. |
Create a remediation campaign
Users with the Remediation owner, Risk analyst, Risk owner, and System administrator role can create remediation campaigns. To create a remediation campaign, follow these steps:
-
Navigate to Remediation > Campaigns > Remediation.
-
Click Create. The Create remediation campaign dialog page displays.
-
Fill in the following fields:
-
Name: Enter a name for the remediation campaign.
-
Description: Describe the campaign's purpose and objectives.
-
Status: Click the dropdown and select the status. Options include: Closed, In progress, or Planning.
-
Owners: Click the dropdown and assign the role responsible for overseeing the campaign.
-
Remediation plan: Summarize the strategy for addressing the tickets linked to this campaign. This might include key steps, responsible roles, and any critical resources or tools needed to complete the tasks.
-
Start date: Specify the date when the campaign begins.
-
End date: Specify the date when the campaign is scheduled to conclude.
-
-
Click Create.
The Manage remediation campaigns page refreshes and the new remediation campaign displays in the list view.
Add tickets to the remediation campaign
Once you've created a remediation campaign, the next step is to add tickets. Each ticket represents specific issues that must be addressed to achieve the campaign's overarching goal. A remediation campaign without tickets lacks actionable items, making it ineffective. Incorporating tickets ensures all aspects of the remediation effort are covered, providing a clear path to completion and success.
To add tickets to the remediation campaign, follow these steps:
-
Navigate to Remediation > Tickets > All tickets.
-
Click the checkbox next to the ticket or tickets you want to add to the remediation campaign.
-
Click the Select an action dropdown and select the Remediation campaigns data update flow option.
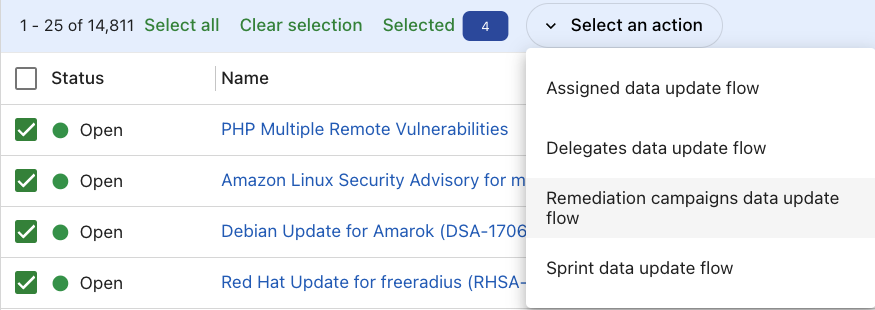
The Remediation campaigns data update flow dialog appears.
-
Click Strategy and select Add.
From this dropdown, you can also Replace or Remove tickets from the remediation campaign.
-
Click Remediation campaigns and select the remediation campaign you want to assign the tickets to.
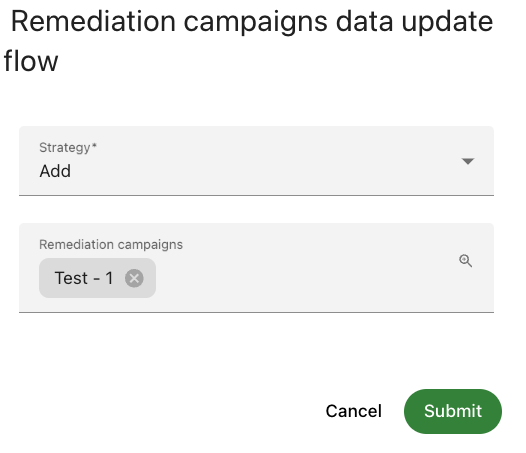
-
Click Submit.
Once successful, the tickets you've selected are added to the remediation campaign.
View the remediation campaign and associated tickets
After you've created the remediation campaign and assigned tickets to it, you can now view the tickets within the campaign. To do so, follow these steps:
-
Navigate to Remediation > Campaigns > Remediation.
-
Click the Remediation campaign name from the list view.
As shown in the screenshot below, the tickets associated with the remediation campaign in the earlier steps display here:
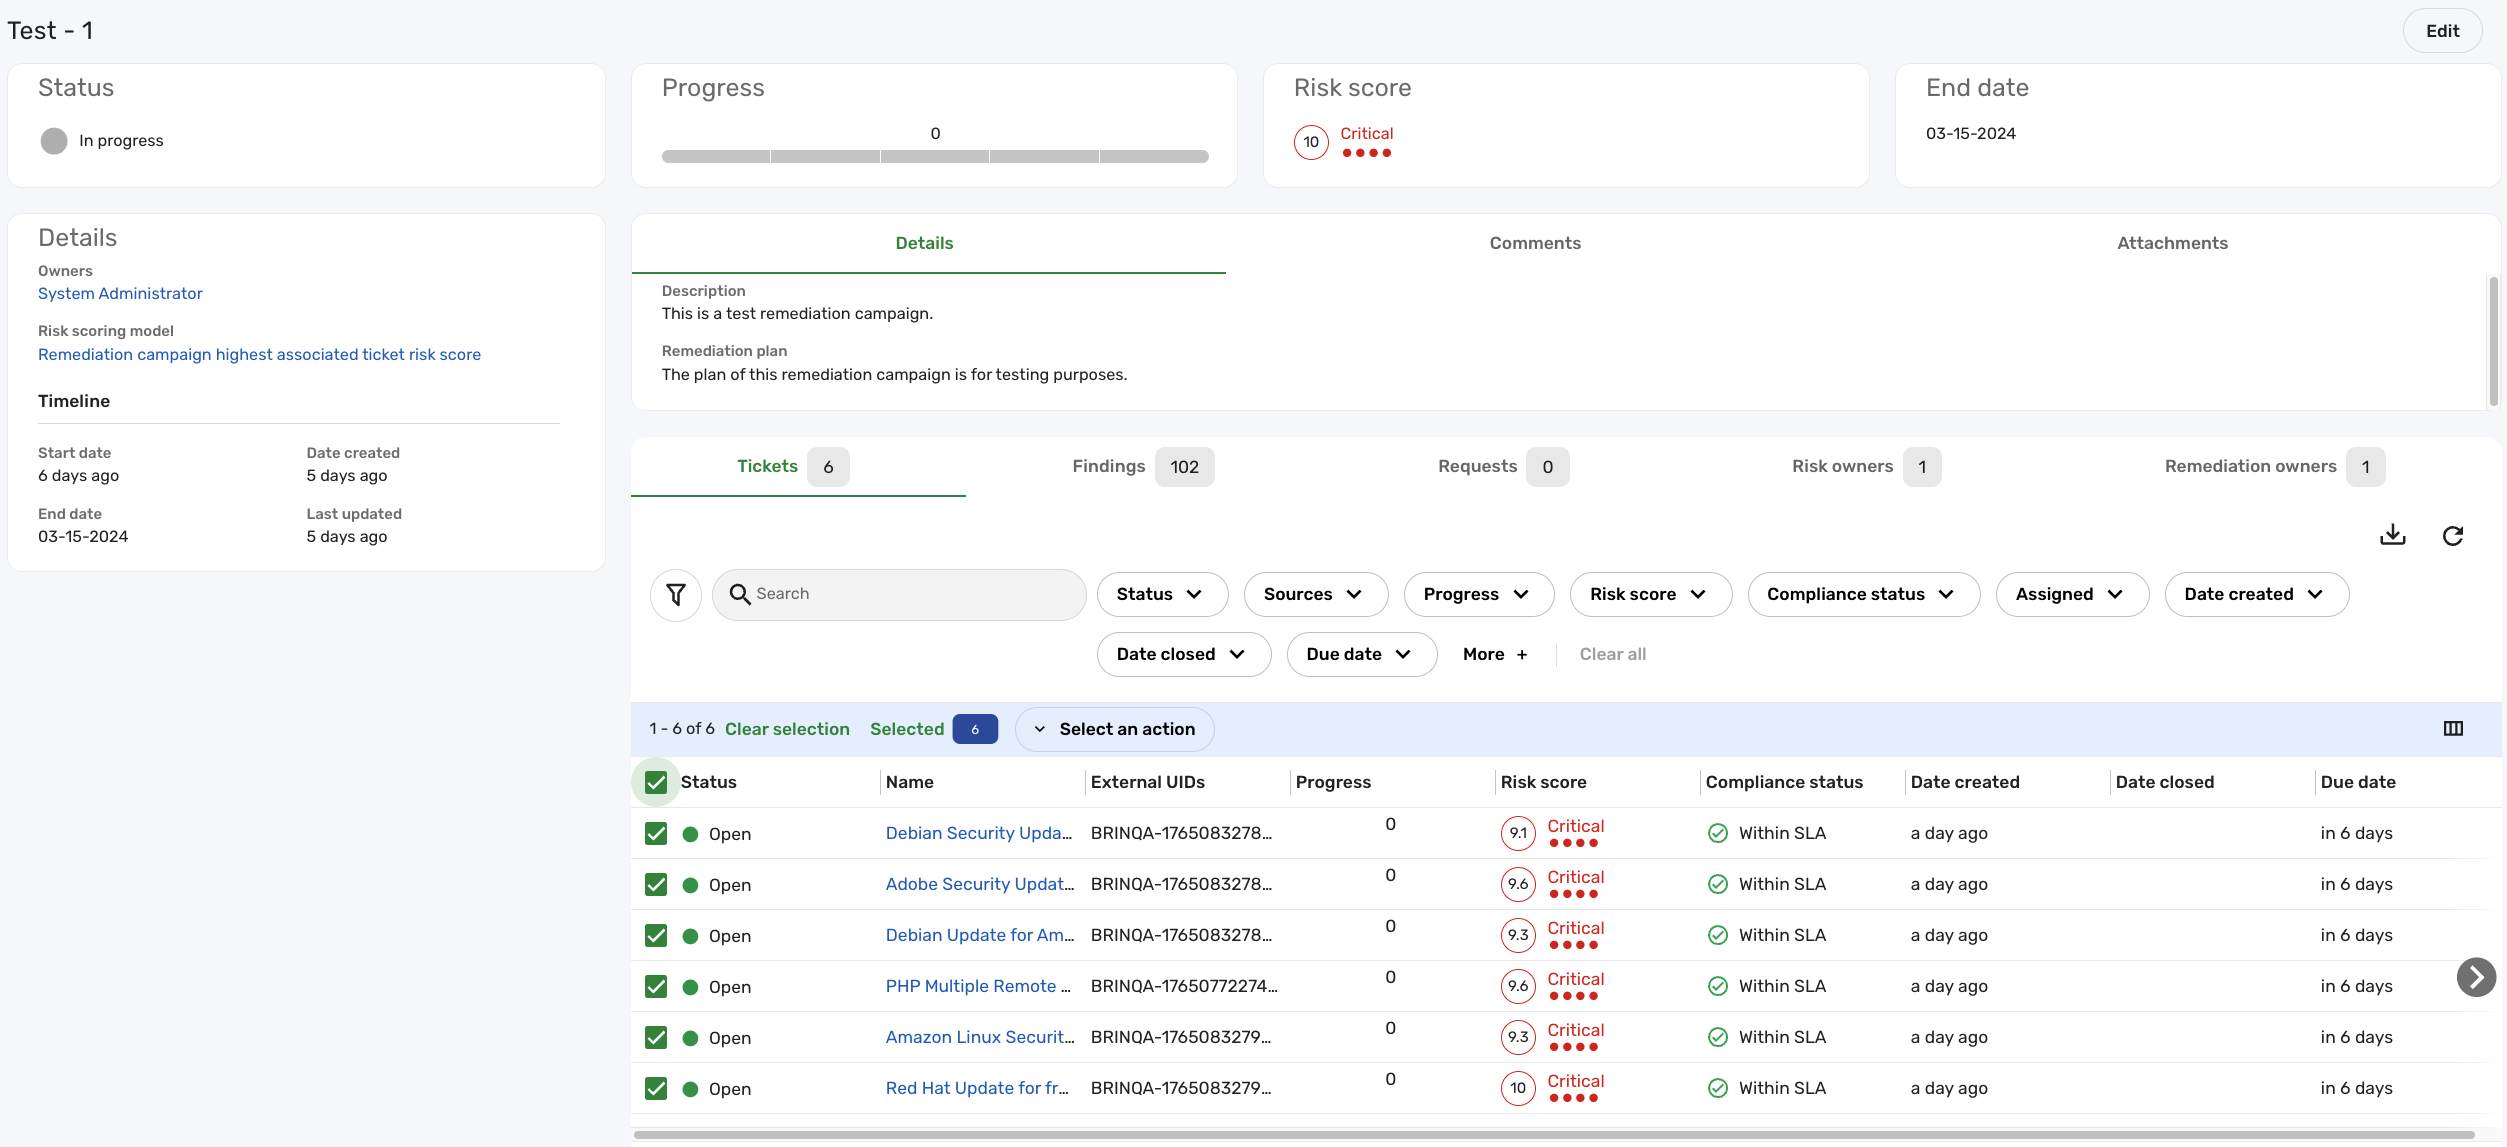
From this page, you can view the findings associated with the tickets and requests associated with the findings, add comments to the campaign, or upload attachments for others to view.
The Progress of a remediation campaign is calculated as the average progress of all associated tickets. This measure of progress for each ticket is determined based on the status categories of the findings it contains. As findings within a ticket are addressed and their statuses updated, the ticket's progress changes accordingly.
Update a remediation campaign
To accurately reflect the current phase of your remediation efforts, the status of a remediation campaign must be manually updated. Even if all tickets within a campaign have been addressed, the campaign’s status—be it Closed, In progress, or Planning—requires a manual edit to mirror its actual state to ensure that the campaign status is in sync with the completion of its associated tasks.
To update a remediation campaign, follow these steps:
-
Navigate to Remediation > Campaigns > Remediation.
-
Point the cursor over the campaign you want to update and click Edit.
-
Update the desired fields. For example, if the status of the campaign needs to change from In progress to Closed, click the Status dropdown and select Closed.
-
Click Update.
The Manage remediation campaigns page refreshes and any changes you've made to the campaign display in the list view.
Remediation campaign risk score
After tickets have been added to the remediation campaign, a risk score is calculated to prioritize the campaign based on the severity of its associated tickets. The risk score for a remediation campaign is determined by the highest risk score among all tickets associated with that campaign. This approach ensures that the campaign's priority aligns with the most critical issue it addresses.
Updates to the risk score might not be immediate upon adding or updating tickets within the campaign. While automatic updates occur during data orchestration, you can also manually trigger the compute flow, ensuring that the risk score reflects the most current information without any delay.
To manually update the risk score, follow these steps:
-
Navigate to Administration
 > Automation > Flows.
 -
Click View All next to Recent folders or Recent flows.
-
In the search bar under All flows, type Remediation campaign compute flow.
-
Click the Remediation campaign compute flow in the list view, click Launch, and then click Launch again in the confirmation dialog.
The Remediation campaign compute flow runs and computes the risk score for your remediation campaign based on the highest risk score among all associated tickets. Upon completion, check the campaign’s details page to verify the updated risk score, ensuring that it accurately represents the current risk level of your campaign.
Push remediation campaigns to external sources
You have the ability to push remediation campaigns to external sources, such as your organization's Jira boards as an Epic or ServiceNow as a Task. While the process shares similarities with pushing tickets to Jira and pushing tickets to ServiceNow, there are important differences due to the complexity of managing the entire remediation campaign and its associated tickets.
Each external system has unique configurations, and mapping those to remediation campaigns can require detailed customization. Due to the complexities involved, we recommend contacting your Brinqa Account Manager for assistance with setting up and configuring this feature.