Service-level Agreements
This article details the service-level agreements (SLAs) data model and how to create or adjust service levels in your Brinqa Platform.
What is an SLA?
An SLA is a concept commonly used in service and support management. SLA establishes response times and due dates for incidents, tickets, or issues based on their severity or priority.
For example, you may define an SLA for vulnerabilities detected on assets with a compliance requirement:
- Critical vulnerabilities must be resolved within 30 days from the time they are initially identified.
- High vulnerabilities must be resolved within 60 days from the time they are initially identified.
- Medium vulnerabilities must be resolved within 90 days from the time they are initially identified.
- Low vulnerabilities must be resolved within 120 days from the time they are initially identified.
On the other hand, since SLA is not one-size-fits-all, you can define another SLA for vulnerabilities detected on assets without a compliance requirement:
- Critical vulnerabilities must be resolved within 90 days from the time they are initially identified.
- High vulnerabilities must be resolved within 120 days from the time they are initially identified.
- Medium vulnerabilities must be resolved within 365 days from the time they are initially identified.
With the Brinqa Platform, you can establish and oversee SLA definitions to ensure that your organization complies with specific requirements.
Brinqa built-in SLA definitions
The Brinqa Platform includes two SLA definitions out of the box. Users with the Configurator or System Administrator role can view the definitions by navigating to Administration ![]() and under Configuration, select SLA definitions.
and under Configuration, select SLA definitions.
-
Default finding SLA definition: This SLA applies to all data models that extend the Finding data model. It defines service levels based on risk scores and calculates the due dates from the date that the findings are initially identified.
-
Default ticket SLA definition: This SLA applies to all data models that extend the Ticket data model. It defines service levels based on risk scores and calculates the due dates from the date that the tickets are opened.
Both SLA definitions implement the following service levels:
| Service levels | Risk scores | Due in |
|---|---|---|
| L1 | 9-10.1 | 7 days |
| L2 | 7-9 | 30 days |
| L3 | 4-7 | 90 days |
| L4 | 0-4 | 365 days |
The risk score ranges are exclusive, so '7-9' covers risk scores from 7 to 9 but excludes 9.
Create your own SLA definitions
Users with the Configurator or System Administrator role can create new SLA definitions in your Brinqa Platform to help ensure that your organization is meeting certain compliance requirements. You can create multiple SLA definitions for a single data model or create a single SLA definition that applies to multiple data models.
To create a new SLA definition, follow these steps:
-
Navigate to Administration
 > Configuration > SLA definitions.
 -
Click Create and fill in the following information:
-
Name: Enter a name for your SLA.
-
Description: Provide a description for your SLA.
-
Calendar policy: Specify how to count the days for your SLA. Options include: Consecutive days or Business days. Business days include Monday through Friday.
-
Conditions: Click + to add criteria for each data model to which the SLA applies.
-
Target data model: Click the dropdown and select a data model that extends Finding or Ticket.
ImportantAvoid selecting a parent data model (such as Finding or Ticket) as the target. For example, instead of Ticket, select a data model that extends Ticket, such as Dynamic code ticket, Manual ticket, Vulnerability ticket, and so on. This is because parent data models are not computed during consolidation and choosing a parent data model can result in inaccurate SLA calculations or issues with SLA tracking.
-
Measure attribute: Select the attribute to determine the levels of the SLA. Measured attribute is the numerical field that the service levels are based on.
- For example, the Default finding SLA definition uses Risk score as the measure attribute. This implies that the service levels are determined by the risk score of the finding, where level 1 is from 9 to 10, level 2 is from 7 to 9, and so on.
-
Start: Select the attribute to be used as the starting point of the due date computation.
- Options include all the Date Time attributes and calculated attributes that return a Date Time value. Attributes of the target data model and its direct one-to-one referenced data models are supported. For example, if you have selected the Vulnerability data model as the target, all Date Time attributes of Vulnerability and Vulnerability definition are available options for the Start field.
-
Active: Keep as is. You can click the toggle to inactivate this condition when it's no longer needed.
-
Order: Specify the condition evaluation order for the target data model.
-
This field is important because it signifies the order that the Brinqa Platform follows to evaluate the conditions specified for the same dataset. The evaluation stops after a match is found, ensuring that each record is subject to only one SLA. Therefore, it is logical to prioritize the most specific conditions first.
-
On the other hand, if your SLA applies to multiple data models, the order you specify for each data model is independent of the others. Therefore, if you change the order in one data model after the SLA has been applied, the order of the same SLA in the other data models remains unchanged.
-
-
Condition: Type your query to target and retrieve your data. The supported syntax is Brinqa Condition Language (BCL). For example:
firstFound EXISTSorstatus = "Confirmed active". You cannot create the SLA if the syntax is invalid.
-
-
-
Click Test to test the condition to ensure that it retrieves the expected data.
-
In the Service levels section, fill in the following information:
-
Name: The name of the service level.
-
From and To: The range of measure attribute values for the service level. For example, if you choose Risk score as the measure attribute, you can set the Critical level to span from 8 to 10. This range is inclusive, which means that risk scores from 8 to 10, which include 8 and 10, belong in the Critical level.
-
Due in: The amount of time (in days or hours) before the findings or tickets are considered out of SLA.
noteYou can create service levels without specific due dates by inputting a negative number as the "Due in" value. Findings that fall under these service levels are labeled as "No SLA Required" in their compliance status.
-
Time unit: The time unit for the service level. Options include: Day or Hour.
-
-
Click + to add another service level or - to delete a service level.
-
Select Active. Inactive SLA's are effectively archived.
-
Click Create.
Repeat these steps for each SLA definition you want to create.
Clone an existing SLA definition
Rather than creating a new SLA definition from scratch, you can clone a built-in one and modify it to better fit your needs. Cloning not only allows you to keep the built-in SLA definition intact but also ensures that your modifications won't be overwritten during release updates. This way, you get a duplicated version to tailor as you like without unintentionally altering important default settings.
-
Navigate to Administration
> Configuration > SLA definitions. -
Hold the pointer over the SLA definition that you want to modify and click Clone.
-
Make any necessary changes.
noteFor each target data model associated with the cloned SLA definition, you must modify the Order attribute. Failing to do so results in an error message when you attempt to create the clone.
The Order attribute signifies the sequence in which the Brinqa Platform evaluates the conditions specified for the target data model. Therefore, the same data model cannot share the same order in both the built-in and cloned SLA definition.
-
Select Active to activate the cloned SLA definition, and then click Create.
The page reloads, and the cloned SLA definition displays in the list view.
noteIf the cloned SLA definition conditions include multiple target data models, your changes apply to all of them. For instance, if you clone an SLA definition that applies to the Violation ticket and Vulnerability ticket data models, the cloned SLA definition displays on the respective data model pages.
Activate or deactivate an SLA definition
If you want to activate a SLA definition, whether built-in or cloned, do the following:
-
Hold the pointer over the SLA definition in the list view.
-
Click Activate.
If you want to deactivate a SLA definition, whether built-in or cloned, do the following:
-
Hold the pointer over the SLA definition in the list view.
-
Click Deactivate.
This prevents any overlapping conditions from being applied twice.
Launch SLA definitions
Your new SLA definition applies when the data orchestration runs, which is once a day by default. If you want the new SLA to take effect immediately, follow these steps:
-
Navigate to Administration
> Data > Models. -
Navigate to the data model you've specified as the target data model in the SLA definition, and click Flows.
-
Click the compute flow for your data model. For example, if you have added a new SLA to the Vulnerability data model, click Vulnerability compute flow.
-
Click Launch, and then click Launch again in the confirmation dialog.
-
Repeat steps 2-4 for each target data model you've selected in your SLA definition.
-
Navigate to the SLA definition data model page and click Flows.
-
Click SLA definition compute flow, then Launch, and click Launch again.
- The SLA definition compute flow updates the total number of findings or tickets that are impacted by the new SLA definition.
During the compute flow, a due date is calculated for each finding or ticket that matches your SLA conditions. The calculation is based on the attribute selected in the Start field of your SLA definition and the service levels you have specified. Then a comparison is made between the due date and the current date. Your finding or ticket can be assigned the following compliance status:
-
Exceeded SLA: The finding or ticket is resolved after the due date has passed.
-
Met SLA: The finding or ticket is resolved before the due date has passed.
-
No SLA Required: The finding or ticket does not fall under any service levels.
-
Out of SLA: The finding or ticket is still open after the due date has passed.
-
Within SLA: The finding or ticket is open and the due date has not passed.
Although findings and tickets both use the Compliance status attribute, their meanings are different. For findings, the default SLA definition uses the First found attribute to calculate the due dates. Meeting SLA indicates that the findings are resolved timely, minimizing your risk exposure. For tickets, the default SLA definition uses the First created attribute to calculate the due dates. Meeting SLA indicates that the tickets are resolved within the required time frame.
To confirm that your new SLA has been applied, follow these steps:
-
Navigate to Findings or Remediation.
-
Click More to add the SLA definition filter if not done already.
-
Click the
 icon to add SLA definition, SLA level, and any attribute related to the SLA that you want to see.
 -
Click the SLA definition filter and select your SLA.
The page reloads displaying findings with your SLA applied. You can verify the compliance status against the due date and SLA levels.
View and manage SLA definitions
Users with the Configurator or System Administrator role can view, manage, or add conditions for other data models to existing SLA definitions.
To view or modify your SLA, follow these steps:
-
Navigate to Administration
> Configuration > SLA definitions. Your SLA definitions display in a list view. -
Hold your pointer over the SLA and click Details. Your definition of the SLA displays along with the records that the SLA has applied to.
-
To modify the SLA, point your cursor over the SLA and click Edit.
-
Modify the fields as needed or add conditions for other data models. These are the same fields as in creating the SLA.
-
Click Update.
Tutorial: Create an SLA for vulnerabilities detected on PCI-compliant assets
This tutorial demonstrates how you can create an SLA for vulnerabilities detected on assets that must meet Payment Card Industry (PCI) compliance standards. You may want to create such an SLA for the following reasons:
-
Prioritize remediation efforts: By setting an SLA for the identified vulnerabilities, you can prioritize remediation efforts based on the level of risk associated with each vulnerability.
-
Ensure timely remediation: SLAs provide a deadline for addressing vulnerabilities, which helps ensure that they are remediated in a timely manner before they can be exploited by attackers.
-
Maintain compliance: SLAs can help you meet compliance requirements related to vulnerability management.
To create an SLA for vulnerabilities detected on assets required to comply with PCI requirements, follow these steps:
-
Navigate to Administration
> Data > Models. -
Locate the Vulnerability data model.
-
Click SLA.
-
Click Create and fill in the following information:
-
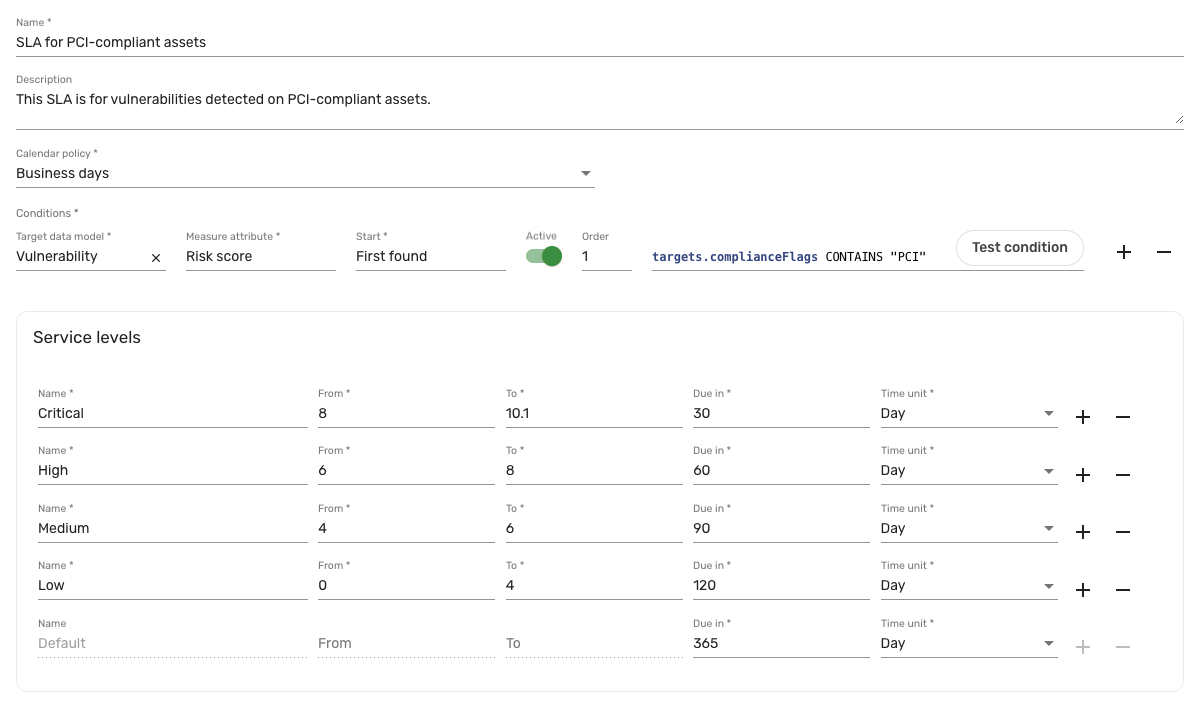
Name: Type "SLA for PCI-compliant assets."
-
(Optional) Description: Provide a description for the SLA, e.g.: "This SLA is for vulnerabilities detected on PCI-compliant assets."
-
Calendar policy: Select Business days.
-
Conditions: Click + to add the criteria for this SLA.
-
Target data model: Click the dropdown and select Vulnerability.
-
Measure attribute: Select Risk score as the field that the service levels are based on.
-
Start: Select First found as the attribute to be used as the starting point of the due date computation.
-
Active: Keep as is.
-
Order: Keep as is.
-
Condition: Enter
targets.complianceFlags CONTAINS "PCI". This condition targets vulnerabilities detected on PCI-compliant assets.
-
-
-
Click Test to test the condition to ensure that it retrieves the expected data.
-
In the Service levels section, fill in the following information:
-
Name: Type "Critical".
-
From and To: Type "8" and "10.1" respectively. This specifies that vulnerabilities with risk score 8 to 10 are considered critical.
-
Due in and Time unit: Type "30" and select Day respectively. This specifies that critical vulnerabilities should be resolved within 30 days.
-
-
Click + to add service levels for high, medium, and low respectively, as shown in the following screenshot:
-
Select Active. Inactive SLA's are effectively archived.
-
Click Create.
noteIf you receive an error with this message:
There is already a condition on an 'SLADefinition' targeting a 'Vulnerability' with order '1', it's because the Vulnerability data model already exists in another SLA definition with the same order number. To resolve this error, change the order to a different number.