Create Ad hoc Tickets
This article details ad hoc tickets in the Brinqa Platform. Ad hoc ticketing enables you to create tickets directly from any findings page without relying on automation. You can group findings into a single ticket, define ownership, assign SLAs (service-level agreements), and optionally link the ticket to a remediation campaign or sprint.
Create an ad hoc ticket
Users with the Risk analyst, Risk owner, or System administrator role can create ad hoc tickets from any findings page in the Brinqa Platform, such as Findings > Vulnerability or Findings > Violations. Ad hoc ticketing is not supported on the Findings > All findings page because that page includes multiple finding types, and multiple finding types can't be attached to a single ticket type. In other words, each type of finding is associated with a specific type of ticket. For instance, vulnerabilities to vulnerability tickets and violations to violation tickets.
To create an ad hoc ticket, follow these steps:
-
Navigate to a findings page, such as Findings > Vulnerability.
-
Click the checkbox next to the findings you want to include in the ticket.
You can identify the findings you want to include by using the Brinqa Query Language (BQL) to filter the findings list. For example, the following BQL query filters vulnerabilities that are not currently associated with a ticket:
FIND Vulnerability AS v THAT NOT HAS Ticket AS t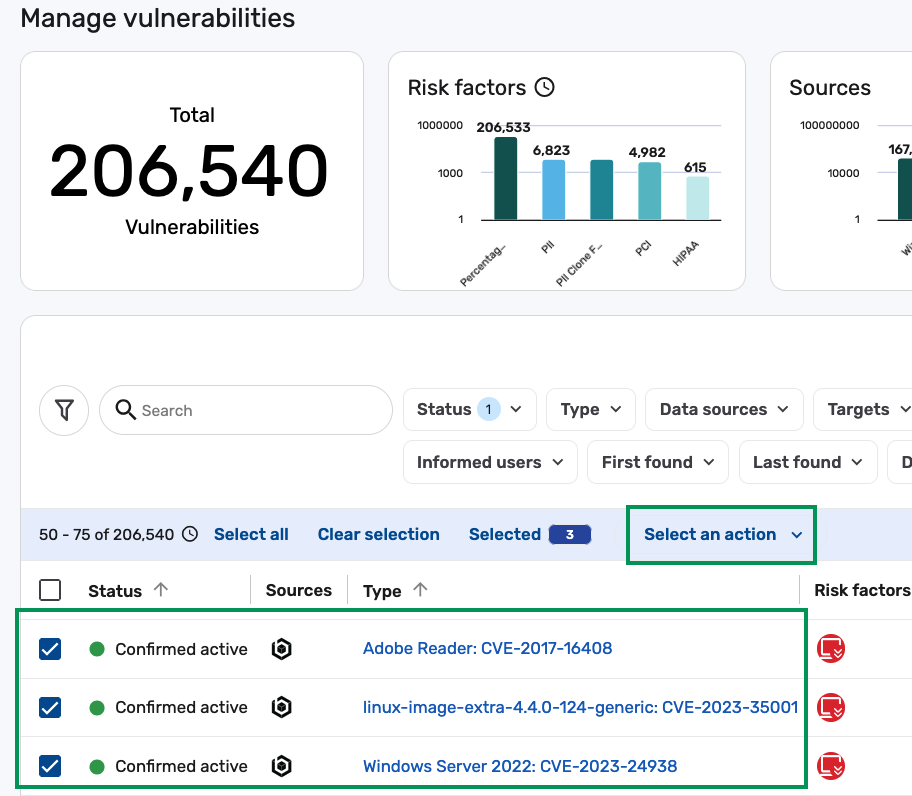
-
Click the Select an action dropdown and select Create [type] ticket. The ticket type shown depends on the current findings page. For example, if you are on the Vulnerability findings page, the action displays as Create a vulnerability ticket.
noteThe Select an action option doesn't display until you select at least one finding.
-
The Create [type] ticket dialog displays. Complete the following fields:
-
Name: Provide a name for the ticket.
-
Summary: Provide a short, high-level statement that identifies the purpose of the ticket. Think of the summary as the "name" of the ticket. It is the main label used to identify it in the UI and third-party systems, such as Jira.
-
SLA: Click the dropdown and select the SLA definition for the ticket. By default, ad hoc ticketing uses a system-defined SLA, but you can also create and apply your own SLA definitions. For additional information, see Create a new ad hoc ticket SLA definition.
- Ad hoc tickets default selection SLA: This SLA is calculated using the
dateCreatedattribute of the ticket and theriskScoreattribute of the riskiest finding in the ticket. For more information, see Service-level agreements.
- Ad hoc tickets default selection SLA: This SLA is calculated using the
-
Description: (Optional) Provide additional details about the ticket. This can include remediation context, design notes, or any relevant background information that supports the summary.
-
Remediation campaign (Optional) Click the dropdown and assign the ticket to an existing remediation campaign. For additional information, see Remediation campaigns.
-
Assigned: (Optional) Click the dropdown and select a user to assign ownership of the ticket to. This user is considered the ticket owner and is responsible for driving remediation.
-
Delegates: (Optional) Click the dropdown and select one or more users who can also take action on the ticket. Delegates are not the primary assignee, but they can help manage or remediate the findings included in the ticket.
-
Sprint: (Optional) Click the dropdown and link the ticket to an active sprint. For additional information, see Generate tickets with sprints.
-
-
Click Submit.
If you encounter any issues, please refer to the Troubleshooting section for common error messages and how to resolve them.
View the generated ad hoc tickets
A confirmation message appears when the ticket has been successfully created. After that, follow these steps to view and verify the ticket:
-
Navigate to Remediation > All tickets, or to the ticket type you created.
For example, if you created a Vulnerability ticket, go to Remediation > Vulnerability.
-
Locate the ticket you just created. You can search by the ticket name or use the basic search filters.
-
Click the ticket name to open the ticket details page.
-
Click the Findings tab to confirm that the selected vulnerabilities appear in the ticket.
Review ticket details
After you open the ticket, the ticket details page provides a complete view of everything associated with the ticket, including assignment, progress, SLA, risk, findings, and more.
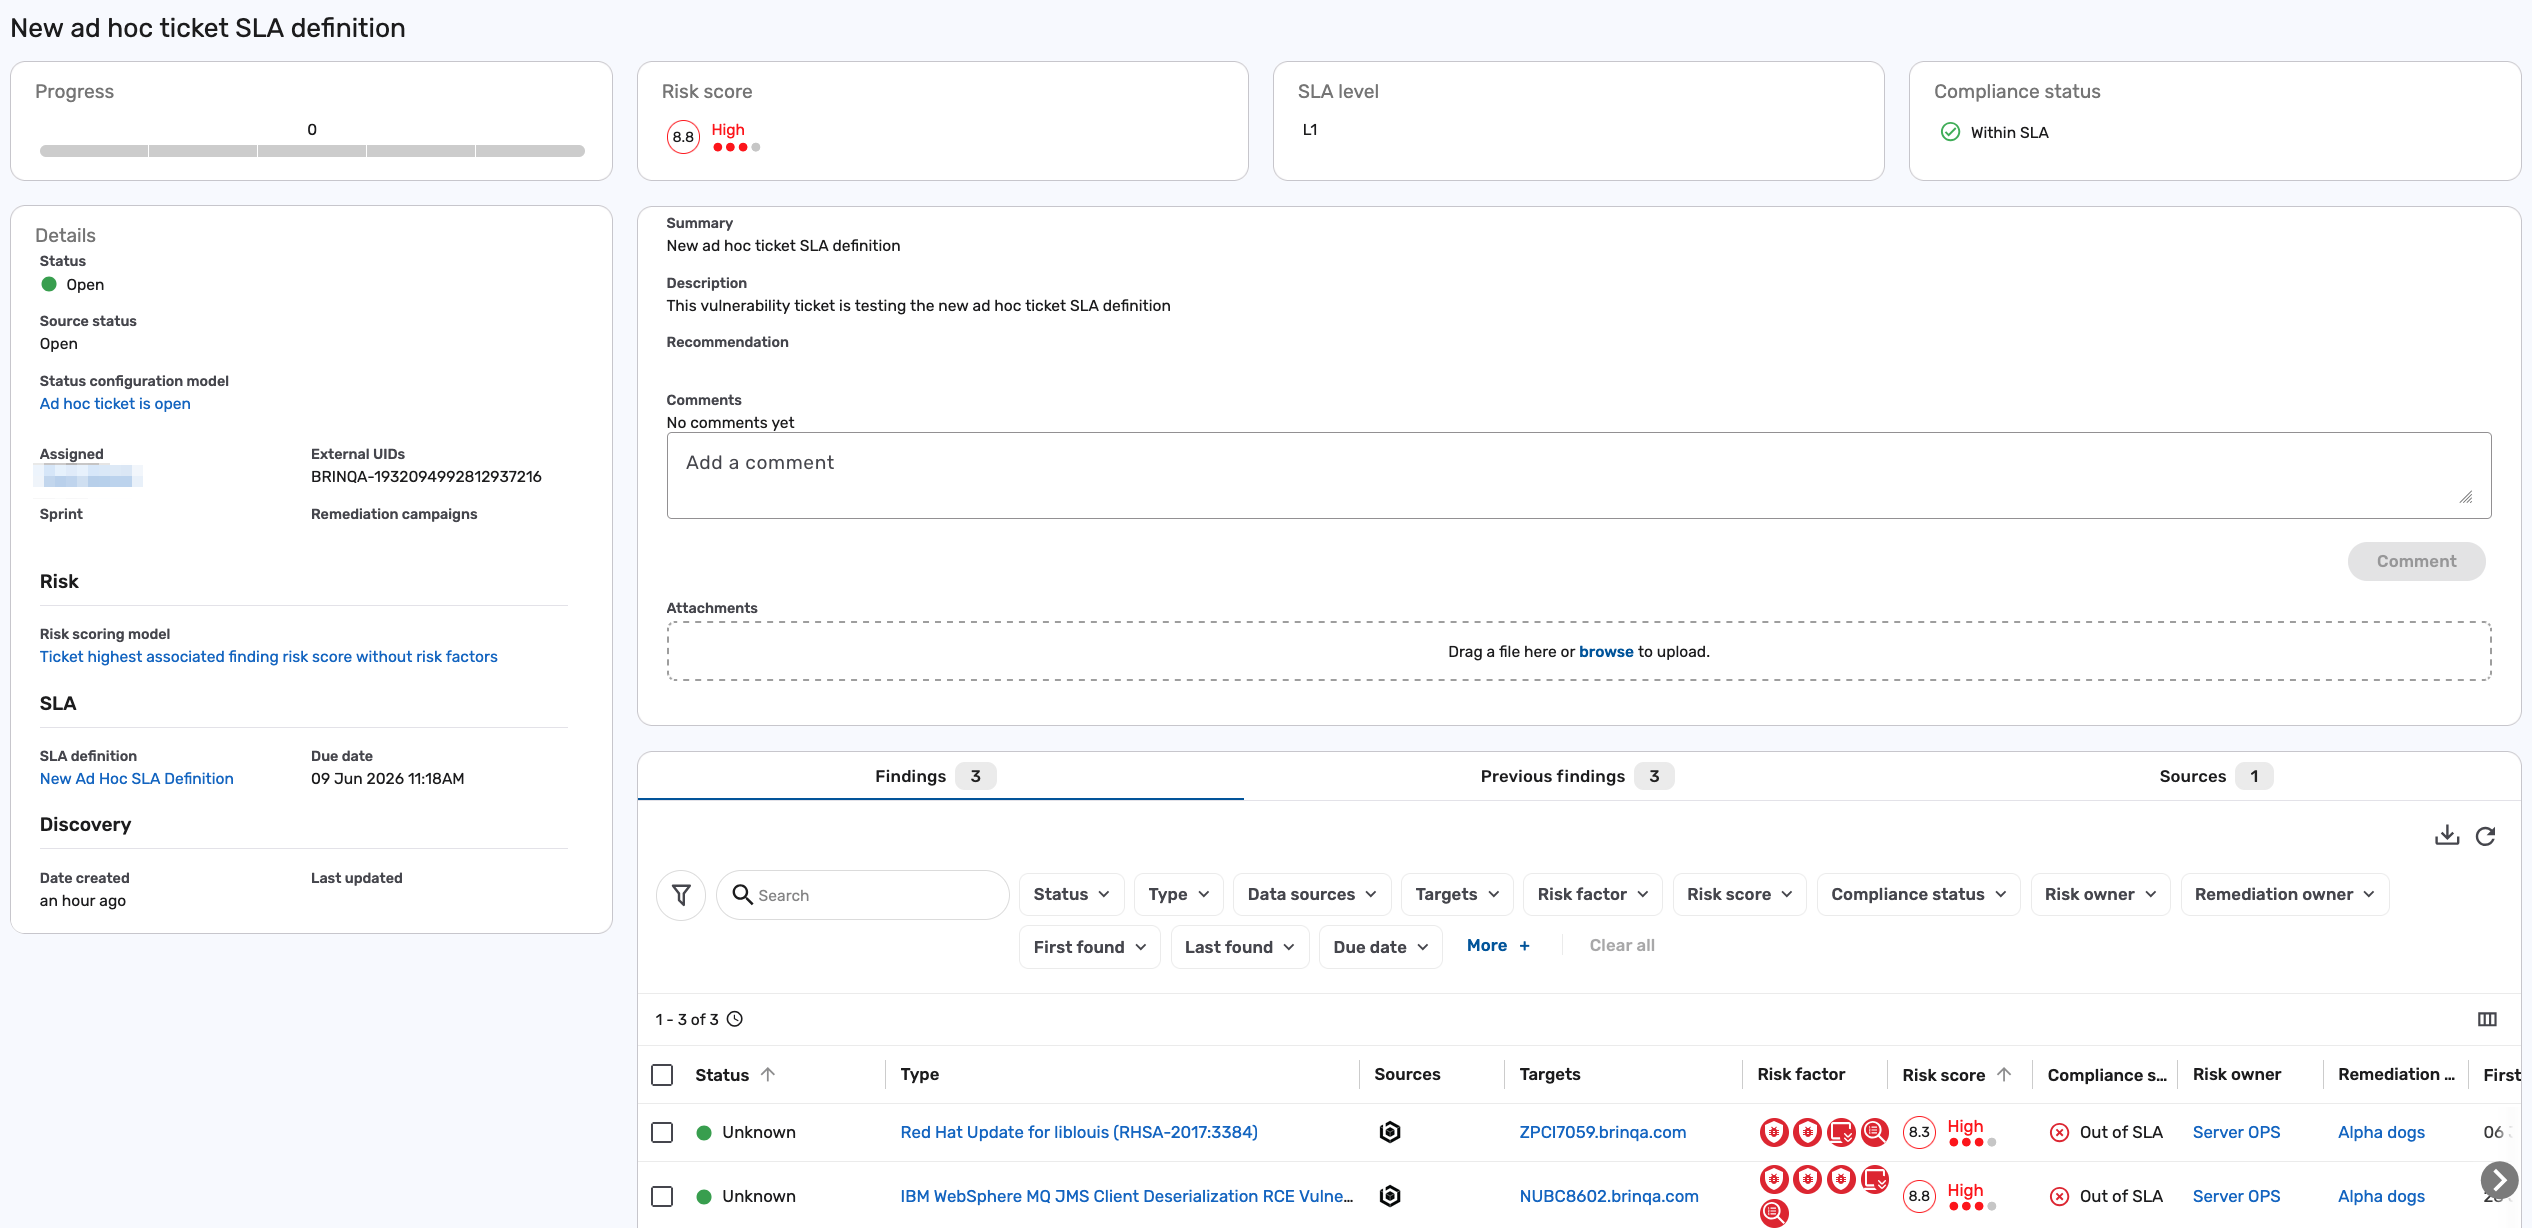
Below is a breakdown of each section:
| Section | Description |
|---|---|
| Progress | Displays remediation progress as a percentage. Calculated as the number of closed findings divided by the total number of findings in the ticket. |
| Risk score | Displays the risk score of the riskiest finding in the ticket. For example, if the ticket includes findings with risk scores of 5, 6, and 7, the ticket’s risk score is 7. |
| SLA | Displays the SLA definition and due date applied to the ticket. |
| Compliance status | Indicates whether the ticket is within SLA. |
| Summary | Shows the ticket summary you entered when creating the ticket. |
| Description | Lists any additional context or notes entered during ticket creation. |
| Comments | Users can leave comments for collaboration or internal notes. |
| Attachments | Add documentation or screenshots by dragging a file into the upload area or clicking browse. |
| Assigned | Shows the user assigned as the owner of the ticket. |
| Sprint | (If applicable) Displays the remediation sprint linked to the ticket. |
| Remediation campaign | (If applicable) Displays the remediation campaign associated with the ticket. |
| Risk scoring model | Describes the method used to calculate the ticket’s overall risk score. |
| External UIDs | Identifiers used when tickets are synchronized with external systems. |
| Discovery | Shows the ticket creation date and last updated time. |
| Findings | Lists all currently active findings associated with the ticket. This is where you can filter and analyze findings based on their attributes. |
| Previous findings | Shows all findings that have ever been associated with the ticket. Acts as a historical record. |
Remove findings from ad hoc tickets
You can only remove findings from ad hoc tickets, not tickets generated by automations. If you need to remove one or more findings from an ad hoc ticket, follow these steps:
-
Navigate to the ticket and click the Findings tab.
-
Click the checkbox next to the finding(s) you want to remove.
-
Click the Select an action dropdown and select Remove vulnerabilities. (or the appropriate finding type label, such as Remove violations).
-
Review the confirmation dialog and click Submit to confirm and remove the findings from the ticket.
The following screenshot illustrates the findings from the previous example ticket being removed from the Findings tab, and now displayed in the Previous findings tab:
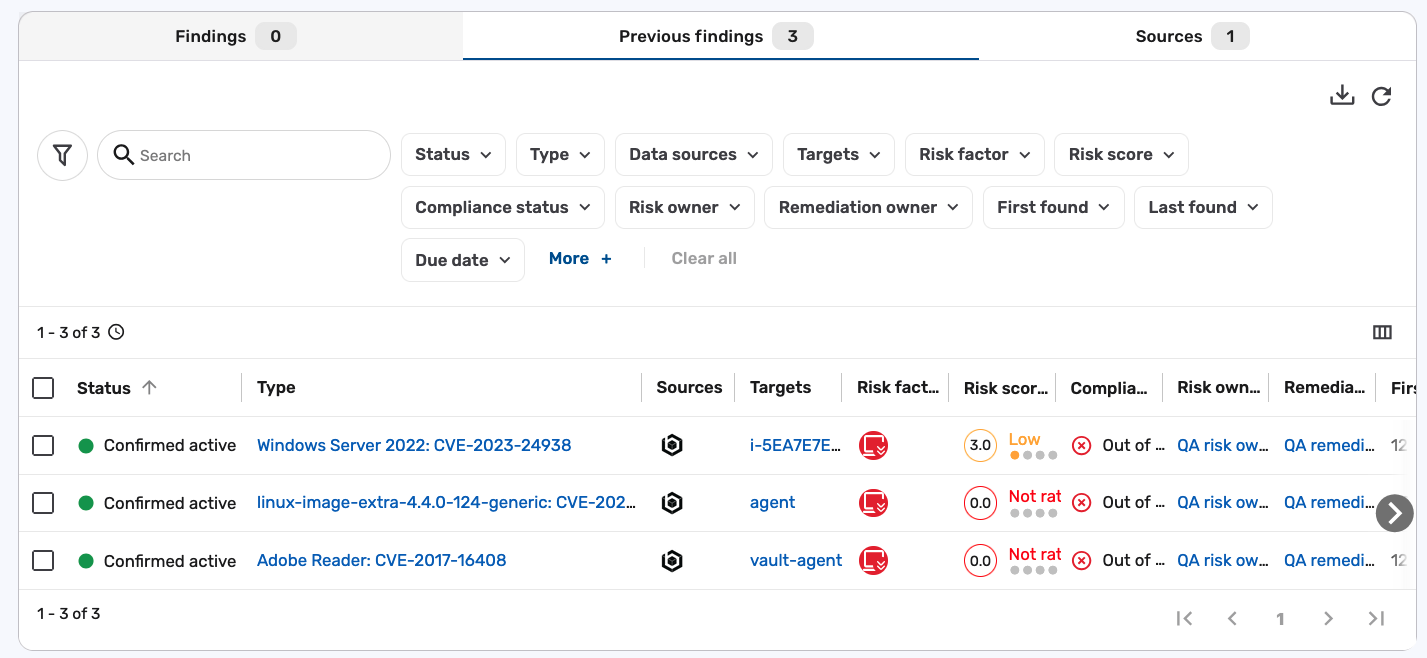
Removing a finding from a ticket does not mark it as resolved or progress the ticket to completion. If an automation is configured and the finding matches the criteria, it may be added to a new ticket.
Ad hoc ticket status
The Brinqa Platform automatically updates the status of an ad hoc ticket based on the current state of its associated findings. The diagram below illustrates how a ticket moves between different states as findings are resolved, reopened, or removed:
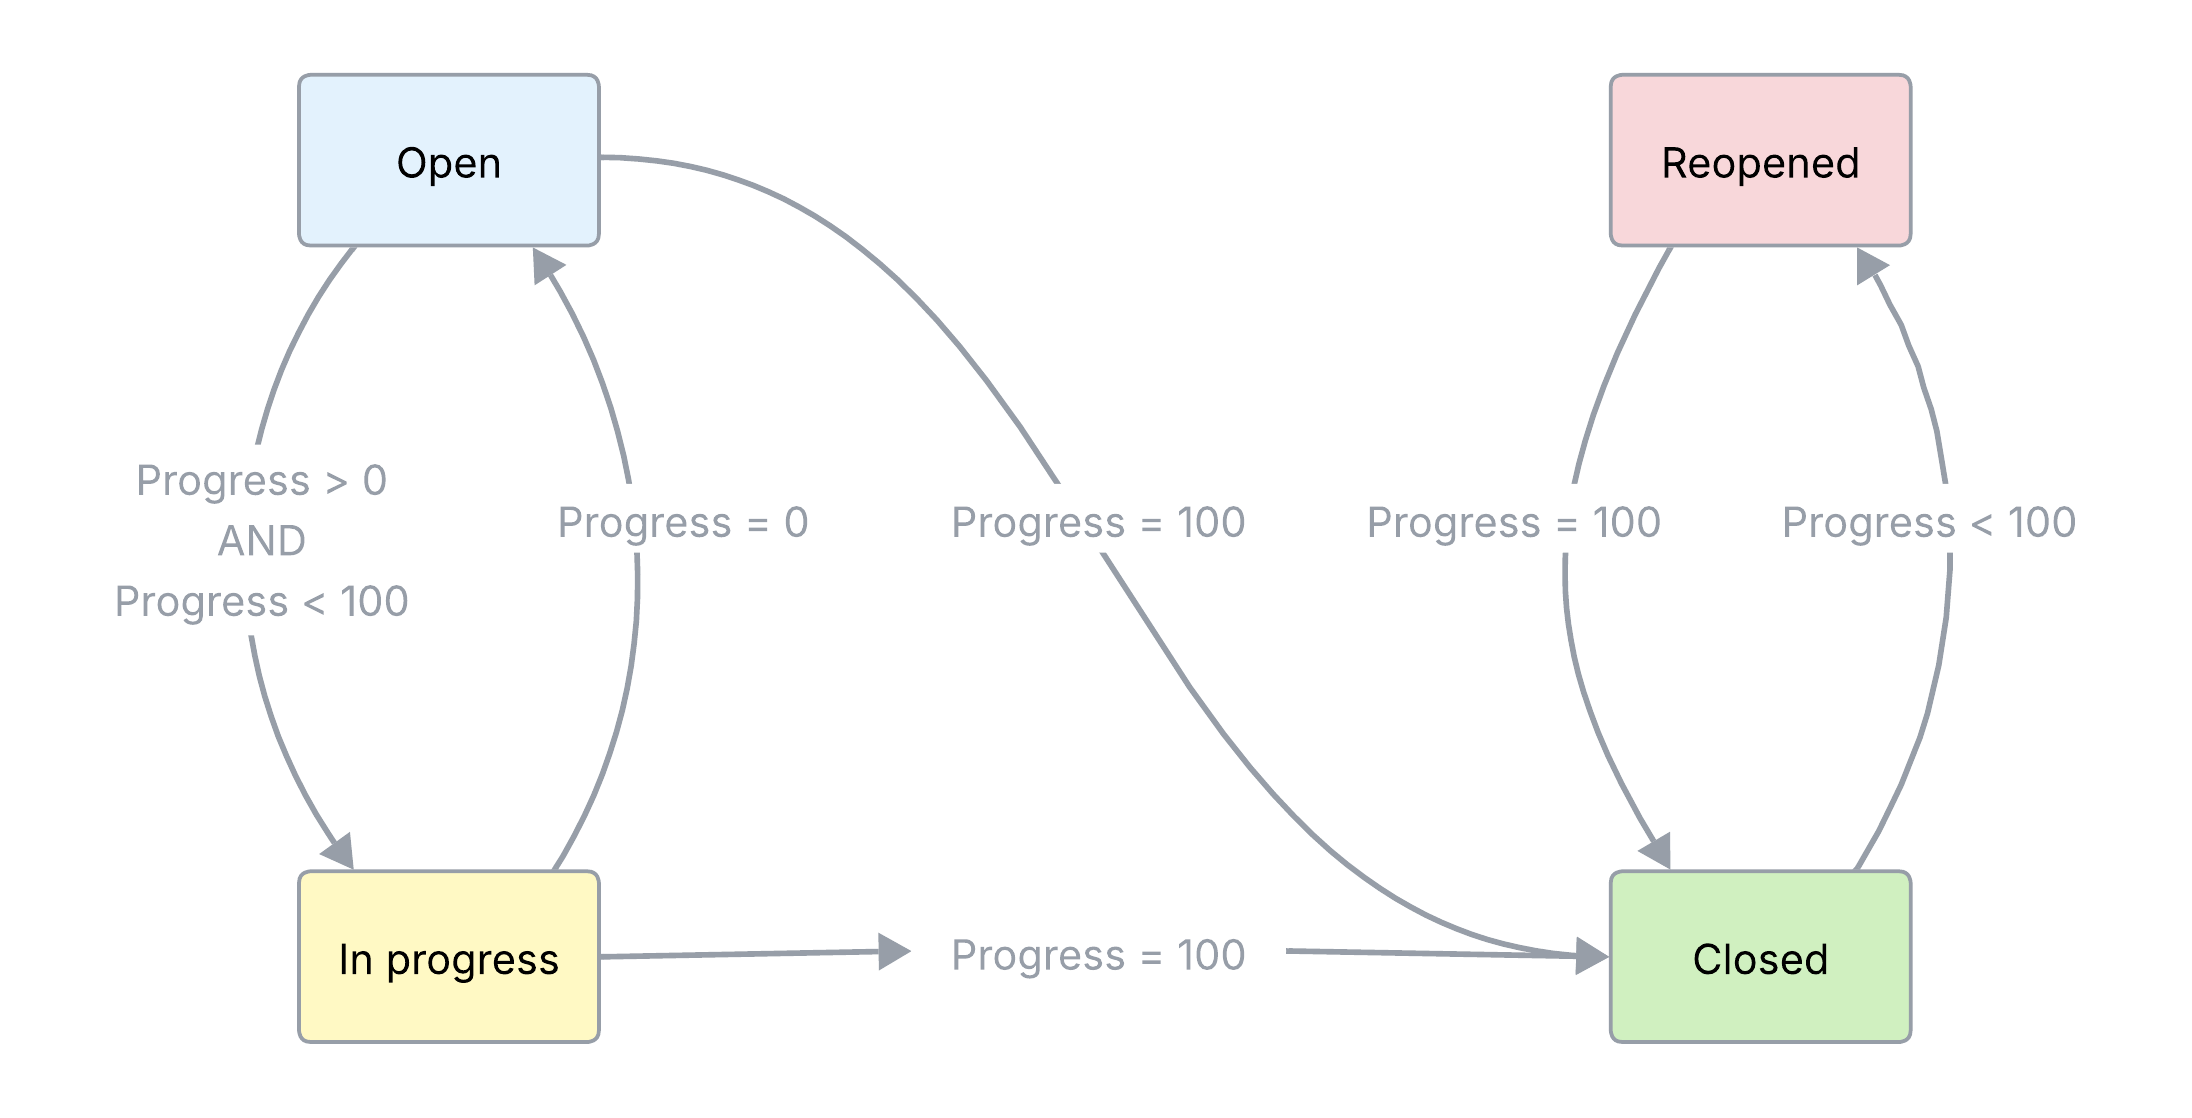
Each ticket status corresponds to the ticket’s progress, which is calculated as the percentage of resolved findings over the total number of findings in the ticket:
-
Progress = 0: No findings are resolved.
-
Progress = 100: All findings are resolved or removed.
-
Progress > 0 AND < 100: Some findings are resolved.
Status definitions
Each ticket status reflects the current state of its associated findings based on how many have been resolved or removed:
-
Open: The ticket starts in this status when all associated findings are unresolved (
progress = 0). -
In progress: The ticket enters this status when at least one finding is resolved, but others remain unresolved (
progress > 0 AND progress < 100). -
Closed: The ticket moves to this status when all findings are resolved or removed (
progress = 100). -
Reopened: The ticket reopens if one or more previously resolved findings is reopened (
progress < 100after being100).
What happens if you remove findings?
Removing findings affects the ticket’s progress but does not count those findings as resolved. For example:
-
If a ticket starts with 3 unresolved findings (
progress = 0) and you remove one, the ticket now has 2 unresolved findings and the progress remains at 0. -
If a ticket has 3 findings, and 1 is resolved, progress is 33%. If you remove an unresolved finding, the progress increases to 50% because now 1 out of 2 findings is resolved.
If you remove all findings from a ticket, it reaches progress = 100, and the platform automatically moves the ticket to the Closed status.
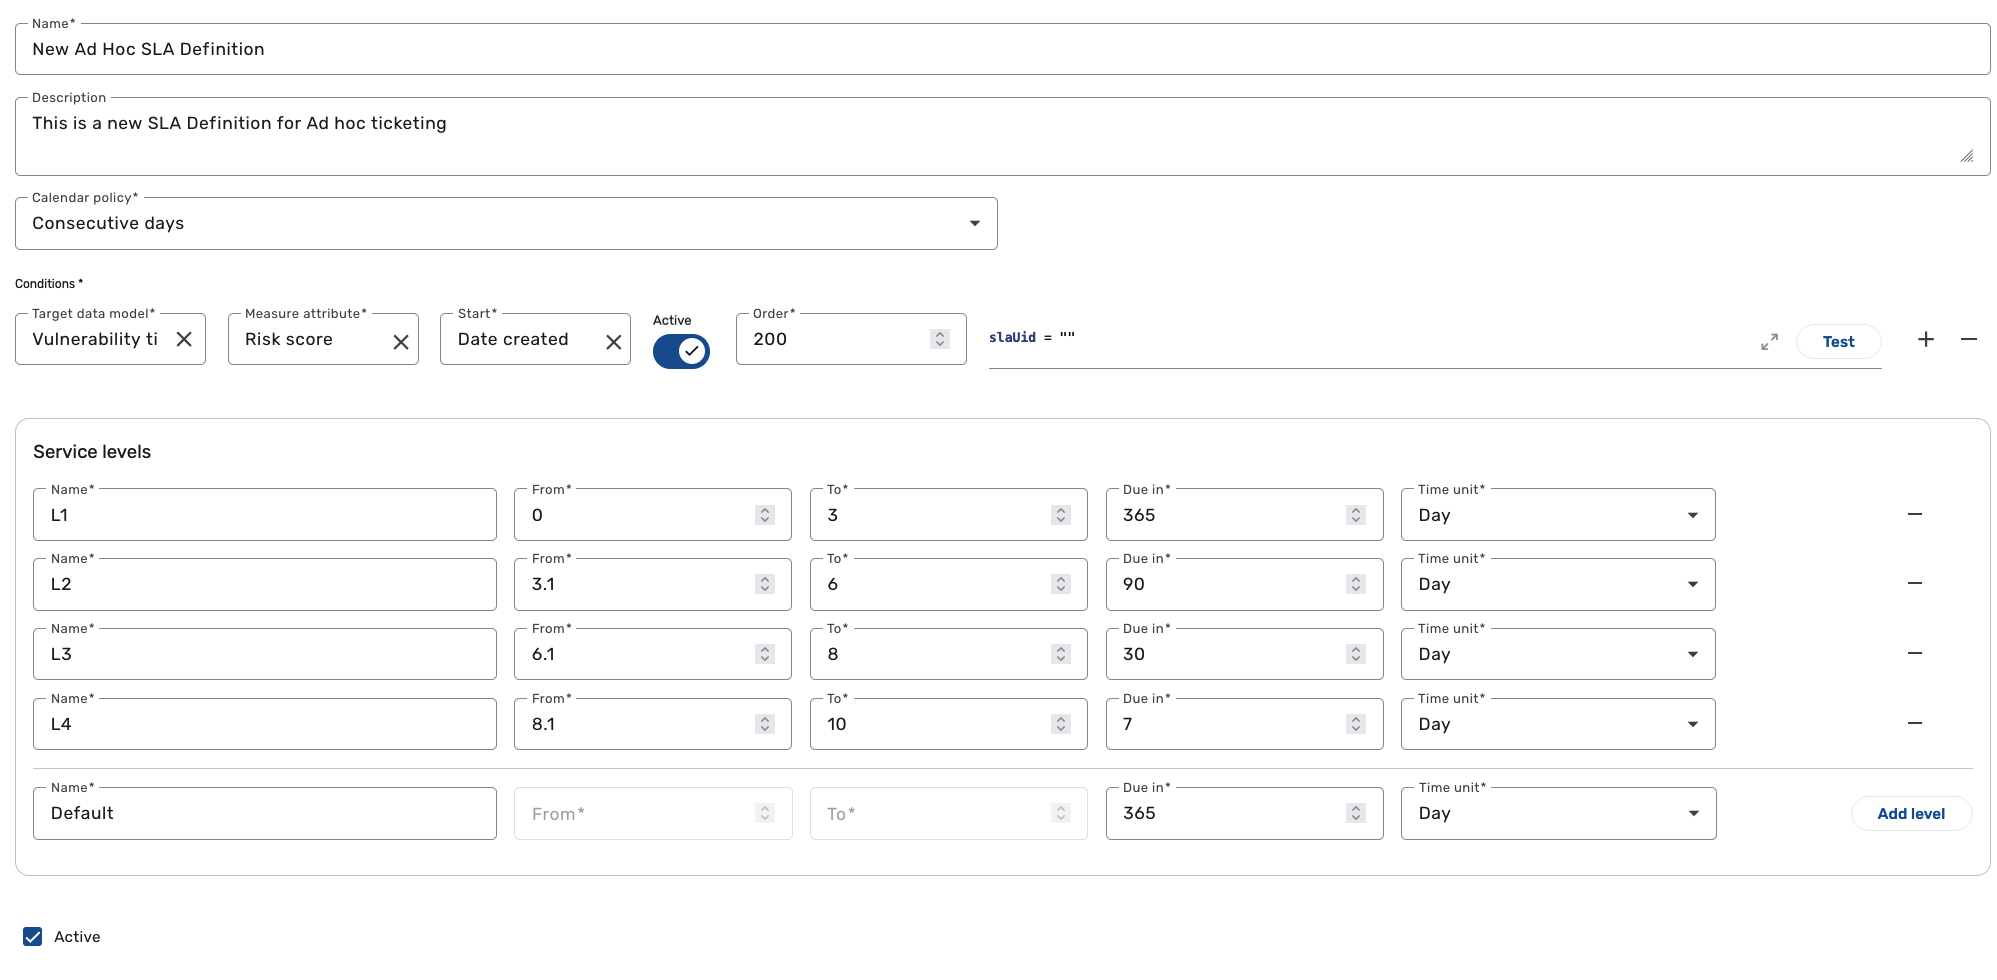
Create a new ad hoc ticket SLA definition
Users with the Configurator or System administrator role can create a custom SLA definition for ad hoc tickets to better reflect your organization’s enforcement policies. This can be useful if you want to define your own risk score thresholds, SLA durations, or calendar policies. To create a new SLA definition for ad hoc tickets, follow these steps:
-
Navigate to Administration > Configuration > SLA definitions.
-
Click Add and complete the following fields:
-
Name: Enter a name for your SLA.
-
Description: (Optional) Add context or notes about the purpose of the SLA.
-
Calendar policy: Click the dropdown and specify how to count days for your SLA. Options include: Consecutive days or Business days. Business days include Monday through Friday.
-
-
In the Conditions section, click + and complete the following fields:
-
Target data model: Click the dropdown and select the type of ticket you want to apply the SLA to. For example, Vulnerability ticket.
-
Measure attribute: Click the dropdown and select the attribute that will be used to measure the SLA. For example, Risk score.
-
Start: Click the dropdown and select the attribute that will be used to start the SLA. For example, Date created starts the SLA countdown from the moment the ticket is created.
-
Active: Click the toggle to enable the SLA. When enabled, the SLA is applied to ad hoc tickets that meet the defined conditions.
-
Order: Specify the condition evaluation order for the target data model.
-
Condition: Enter a condition to save the SLA. For ad hoc ticketing, use
slaUid = ""as a placeholder. After saving the SLA, replace the empty string with the actualslaUidvalue for this SLA definition.noteThis condition ensures that the SLA applies only to tickets explicitly assigned this SLA, rather than being applied to all tickets, including those generated through automation.
To make your new SLA definition appear in the SLA dropdown when creating an ad hoc ticket, your condition must include a validslaUid, and your Target data model must match the ticket type (e.g., Vulnerability ticket).
-
-
In the Service levels section, fill in the following information:
-
Name: The name of the service level.
-
From and To: The range of measure attribute values for the service level. For example, if you choose Risk score as the measure attribute, you can set the Critical level to span from 8.1 to 10. This range is inclusive, which means that risk scores 8.1, 9.3, and 10 belong in the Critical level.
-
Due in: The amount of time (in days or hours) before the findings or tickets are considered out of SLA.
noteYou can create service levels without specific due dates by inputting a negative number as the "Due in" value. Findings that fall under these service levels are labeled as "No SLA Required" in their compliance status.
-
Time unit: The time unit for the service level. Options include: Day or Hour.
-
-
Click Create.
The screenshot below illustrates an example of a newly configured SLA definition for ad hoc ticketing:
After the SLA definition is created, return to the Administration > Manage SLA definitions page to obtain the UID of the SLA definition. To do so, follow these steps:
-
Click the Select columns
 menu.
menu. -
Select UID and click Apply.
-
Copy the UID of the newly created SLA definition.
-
Point the cursor over your new SLA definition and click Edit.
-
In the BCL condition, paste the UID you copied earlier, replacing the placeholder text. For example:
slaUid = "891bac6a-d346-4e2c-7ca4-9b4b23e647e2"
-
Click Update.
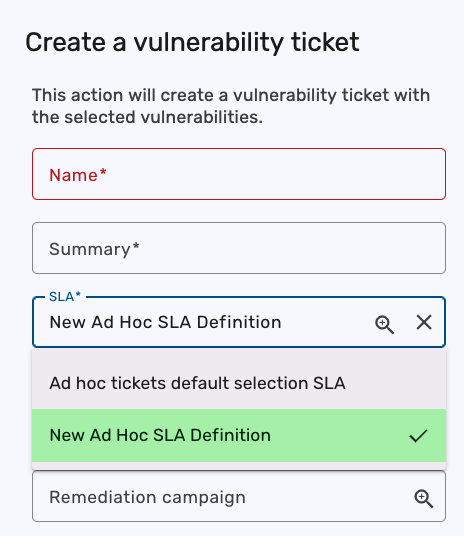
Your new SLA definition now meets the criteria for ad hoc ticketing and can be selected when creating an ad hoc ticket:
Troubleshooting
When creating ad hoc tickets, you may encounter conditions that prevent the ticket from being created. In other cases, the ticket may be created, but one or more of the selected findings cannot be included. These warnings appear when the selected findings do not meet the platform's ticketing requirements.
All findings are already included in other tickets
If all selected findings are already attached to other tickets, the following message appears and you cannot continue:
Findings cannot already be attached to a ticket.
None of the items met the condition.
This means none of the selected findings are eligible to be added to a new ticket. You must cancel the process and adjust your selections.
Some findings are eligible but others are not
If some of the selected findings are already attached to other tickets, you’ll see a confirmation dialog:
Findings cannot already be attached to a ticket.
The following items did not meet the condition.
Would you like to proceed without them?
In this case, you can continue with just the eligible findings. Clicking Proceed will exclude the ineligible ones and create a ticket using the rest of your findings.
Finding limit reached
Ad hoc ticketing supports up to 1,000 findings per ticket. If you select more than 1,000 findings, the platform still allows you to fill out the ticket creation form and click Submit, but no ticket is created. Instead, the following error message appears in the app event log:
Error message='Number of findings to remediate exceeds the max limit; maxLimit=1000'
To stay within the limit, reduce the number of selected findings, break them into multiple tickets, or generate tickets using automation if you're working with large datasets. If you need to exceed the 1,000 limit for a specific use case, contact your Brinqa Support team for assistance.
Cached findings included in your ticket
If you see a message that some findings are already attached to a ticket, even when your query excludes them, you may have leftover selections cached from a previous search.
The Brinqa Platform retains selected findings even if they no longer appear in the current results. One indication of this is when the Selected count is higher than the number of findings shown in your current search. To avoid this, click Clear selection before running a new query or changing filters, then reselect the findings you want.
This ensures that your ticket includes only the findings currently visible in your search.