Generate Tickets with Sprints
This article details how to use sprints in the Brinqa Platform, specifically, how you can generate tickets tied to sprints. This article walks you through how to define your sprint's criteria, locate the generated tickets, and interpret crucial ticket details including the summary of the findings, remediation recommendations, risk and SLA (Service-level agreement) information, and more. With the ticketing sprint model, you can ensure structured, efficient tracking and management of vulnerabilities within your defined sprint scope.
What is a sprint?
A sprint in the Brinqa Platform refers to a set timeframe during which particular tasks are planned and carried out. It's a designated period designed to help you organize work, manage tasks, and track progress more effectively. These tasks are represented by tickets that are created and assigned for resolution within the sprint's timeframe. Sprints offer a structured way to manage, track, and prioritize identified vulnerabilities efficiently. You can use the Sprint model and automations in the Brinqa Platform to not only manage and track vulnerabilities within your defined sprint scope, but also to streamline the creation and assignment of tickets that represent specific vulnerabilities within each sprint.
Sprint life cycle
The life cycle of a sprint is as follows:
-
Start of a sprint: Outline the tasks or goals to accomplish in the sprint timeframe. These tasks or goals are organized into tickets, forming a clear plan for the sprint. Any tasks not in the current scope of the sprint are compiled into a backlog. After planning, the sprint starts and work on the tickets begins.
-
Middle of a sprint: The owner of the tickets works on resolving the findings specified in them. If new findings that match the sprint parameters are discovered during the sprint, the system automatically generates tickets for them. These tickets are added to the backlog ticket rather than the active sprint.
-
Ending of a sprint: At the end of the sprint, the system moves any unresolved tickets from the active sprint to the backlog ticket. The remaining tickets from the current sprint are then closed, marking the official end of the sprint.
-
Subsequent sprints: As a new sprint begins, the entire backlog, including any unresolved findings and newly discovered findings from the previous sprint, are added to the new sprint. The resolved findings are removed from their original tickets and placed in new tickets for the current sprint.
This cycle continues with each subsequent sprint, ensuring that all issues are tracked and managed in a structured and efficient manner.
Sprint example
To better understand the sprint lifecycle, let's take a look at Figure 1:
-
Start of Sprint 1: Three vulnerabilities (Vulnerability 001, 002, and 003) are assigned to Vulnerability Ticket 001. A backlog ticket (Backlog Ticket 001) is also created at the start of Sprint 1 to catch any new vulnerabilities that match the BQL query defined in the sprint.
-
Middle of Sprint 1: Two new vulnerabilities are found (Vulnerability 004 and Vulnerability 005) and placed in Backlog Ticket 001.
-
End of Sprint 1: Vulnerability 002 and 003 are resolved and closed before the end of Sprint 1. Vulnerability 001 was not resolved and as a result, is moved to Backlog Ticket 001 to be worked on in the next sprint.
-
Subsequent sprint: At the start of the next sprint (Sprint 2), Vulnerability Ticket 001 from Sprint 1 is closed, and a new Vulnerability Ticket (Vulnerability Ticket 002) is opened. Vulnerabilities from Backlog Ticket 001 are carried over into Vulnerability Ticket 002.
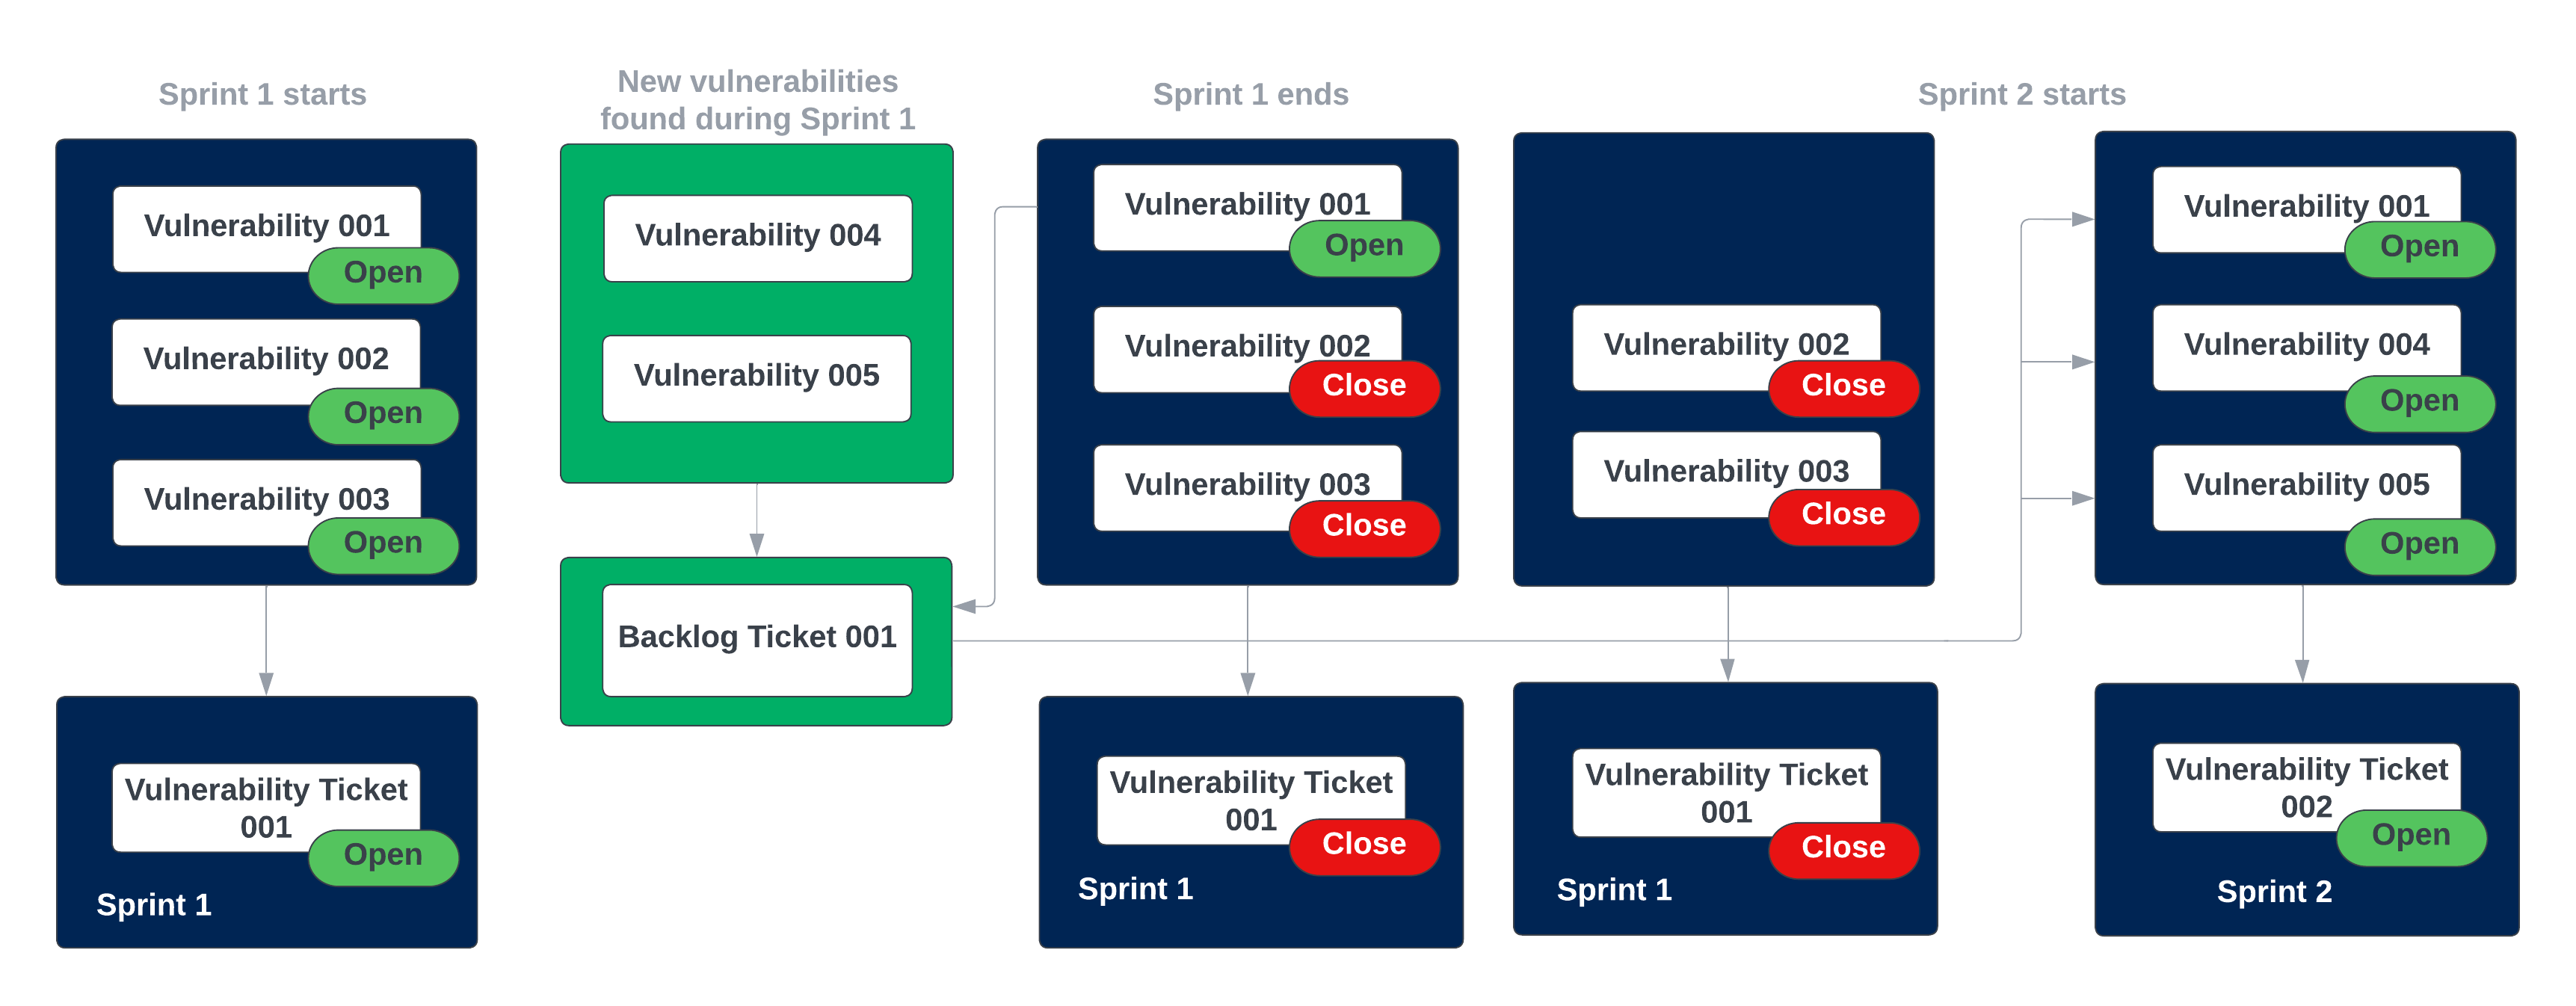
Figure 1. Ticketing sprint model
Create tickets with sprints
Users with the Configurator or System Administrator role can create new tickets with sprints using automations. To do so, follow these steps:
-
Navigate to Automation.
-
Click Create and fill in the following fields:
-
Title: The title of the automation.
-
Description: The description of what the automation accomplishes.
-
BQL query: The Brinqa Query Language (BQL) query that determines the findings that are included in the ticket. Click Test to check if your query is valid and returns any data.
warningAvoid using "Finding" in the BQL query. Instead, choose a data model that extends the "Finding" model, such as Alert, Manual finding, Pentest finding, Violation, Vulnerability, etc. If you create an automation for generating tickets and use "Finding" in the BQL query, it will not work as intended and will result in tickets being created with empty counts.
-
Actions: The action that the automation performs. For example, create a vulnerability ticket, push vulnerability tickets, create vulnerability ticket with sprints, and more.
-
Sprint prefix: The alphanumeric value that helps to uniquely identify and organize your sprints. The sprint prefix is the name that displays in your ticket and sprint list views.
- The naming convention for sprints uses the following format:
SprintPrefix-YYYY-MM-DD, whereSprintPrefixis the alphanumeric value you specify andYYYY-MM-DDrepresents the start date of the sprint. For example, if you typeSPR1as your sprint prefix and the sprint starts on May 16, 2023, the name of your sprint would beSPR1-2023-05-16. This naming convention ensures that each sprint has a unique, identifiable name and includes the start date for quick reference.
- The naming convention for sprints uses the following format:
-
Sprint start date: The date when your sprint begins.
-
Sprint duration: The duration of your sprint. It indicates how long each sprint lasts. Options include: 1 week or 2 weeks.
-
SLA: The SLA definition to associate with the ticket. Click the dropdown and select Default ticket SLA definition. This means that the SLA starts when the ticket is created. See Service-level agreements for additional information.
-
Grouping: Grouping consolidates tickets by grouping similar findings into a single, all-inclusive ticket. This means that each group of similar findings, as determined by the BQL query and grouping criteria, results in one ticket, as opposed to generating individual tickets for every separate finding returned by the query. This approach is beneficial when the same solution can be applied across multiple assets. Click the dropdown and indicate how you want the findings to be grouped. Figure 2 illustrates some of the common uses of groupings.
-
Vulnerabilities with the same solution (Type): This grouping is often used when dealing with multiple vulnerabilities that share the same solution. These are grouped by a specific Type, such as Type > CVE IDs, Type > Name, or Type > Risk rating.
-
Vulnerabilities discovered on the same asset (Target): This grouping is often used when numerous vulnerabilities are found on the same asset, such as a specific laptop or server. These are grouped by specific Target, such as Targets > Categories, Targets > Name, or Targets > Owners > Name.
cautionWhen selecting grouping criteria, avoid choosing a top-level attribute such as Type or Targets. Instead, expand the field and select a specific sub-attribute. For example, choose Type > Name or Targets > Categories instead of just Type or Targets. If you select only the top-level attribute, the automation will fail when it runs.
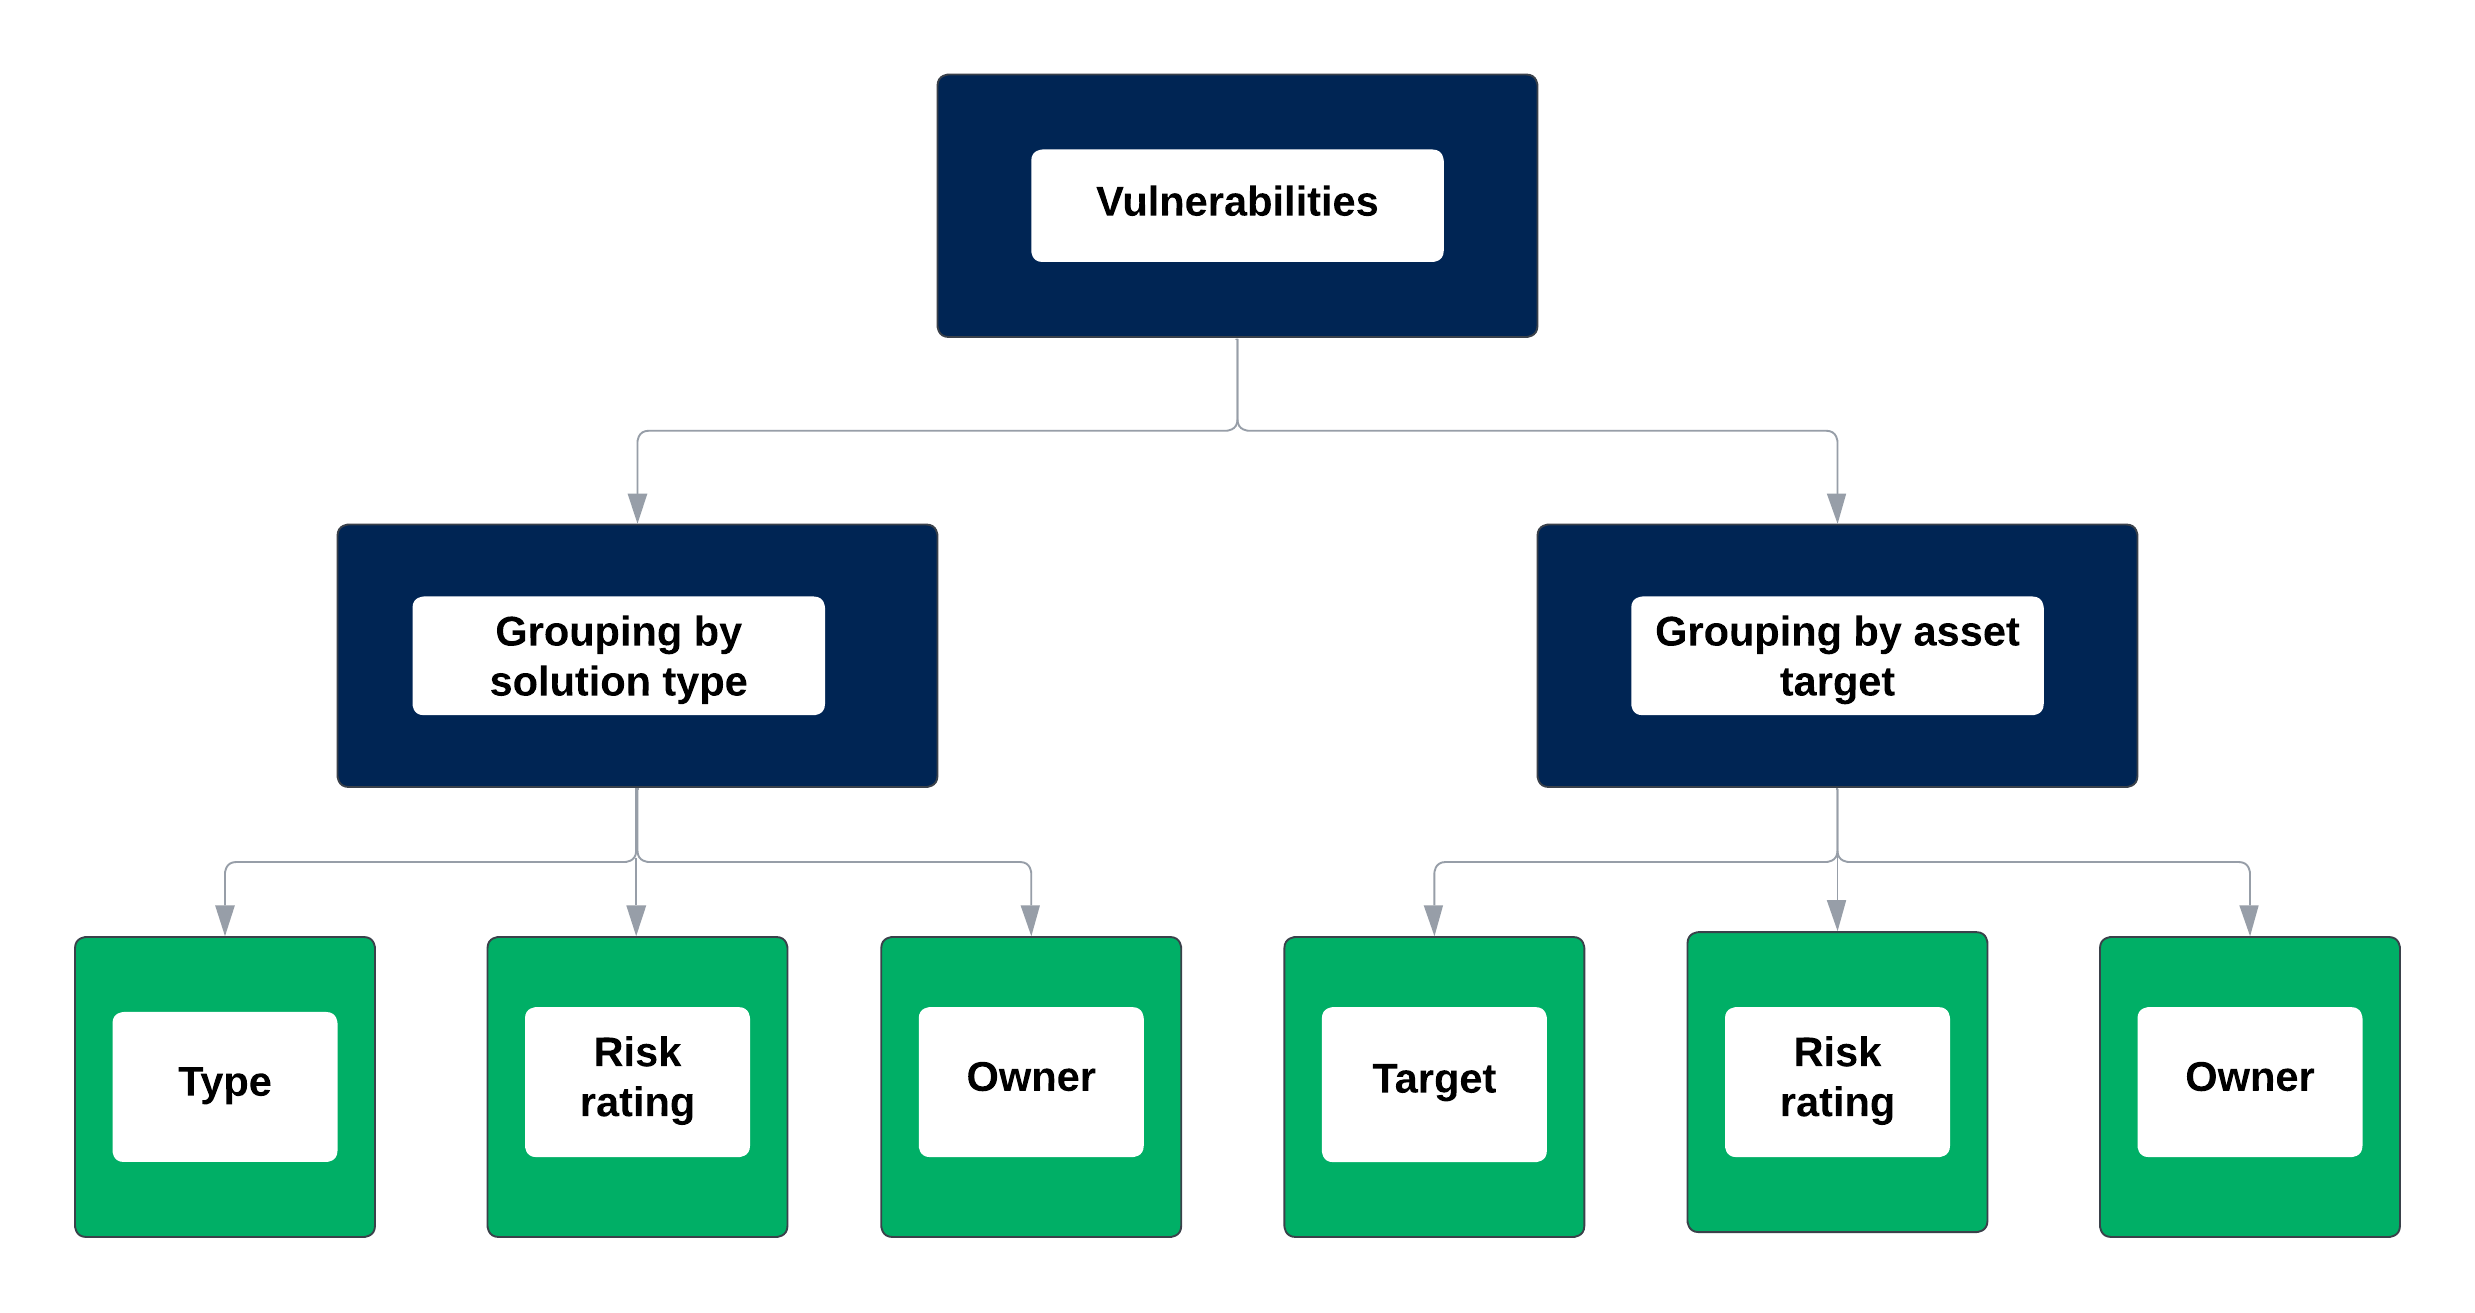
Figure 2. Common ticket groupings
-
-
Assignment policy: Select a default owner. You can assign it to a specific user, assign it based on an attribute, or leave it unassigned.
-
Run: Choose a method for the automation to run. You can run the automation manually, set a schedule for the automation to run, or you can set it to run when your data orchestration runs
-
-
Click Create.
The Automations page reloads and the new automation appears in the list view. See launch the automation and view the generated tickets for details on running the automation and viewing tickets generated by the automation.
Launch the automation
Once you've created your automation, you can run the automation and view the tickets generated by it. Running the automation uses your BQL query to identify the vulnerabilities or findings that should be included in the tickets, and then allocates these tickets to the specified sprint. To launch the automation, follow these steps
-
Navigate to Automation.
-
Hold the pointer over the automation you want to run, and then click Run.
-
Click Confirm when prompted.
Upon confirmation, the automation initiates the ticket generation process. It uses your BQL query to identify matching findings and depending on your specified grouping settings, these findings are categorized and grouped into tickets within the defined sprint parameters.
View the generated tickets
After your automation runs successfully, you can then view the tickets generated by the automation. To do so, follow these steps:
-
Navigate to Remediation > Tickets > All.
- You can also navigate to Remediation > Sprint > Sprints, hold the pointer over the sprint specified when you created the automation, and then click Details to view the tickets defined in the sprint.
-
Click the Sprint filter, select the sprint specified in your automation, and then click Apply.
- The list view refreshes and only displays the tickets generated for the specified sprint.
-
Hold the pointer over one of the tickets and click Details to view information about a specific ticket. These details may include a summary and description of the vulnerability, recommendations on how to address the vulnerability, open and closed vulnerabilities, assignment information, risk and SLA information, and more.
Tutorial: Generate tickets for critical and patchable vulnerabilities using sprints
This tutorial demonstrates the process of creating an automation for generating tickets with sprints, from defining your BQL query, to assigning tickets, and setting the automation run schedule. While this guide specifically focuses on generating vulnerability tickets, you can also generate tickets for other findings, such as dynamic code findings, open source findings, pentest findings, and more.
To generate tickets for active, critical vulnerabilities with patches available in a defined sprint, follow these steps:
-
Navigate to Automation.
-
Click Create and fill in the following fields:
-
Title: Type "Ticketing sprint model for active, critical vulnerabilities with patches available".
-
Description: Type "Generate vulnerability tickets with patches available to be defined in sprints".
-
BQL query: Type the following BQL query to retrieve all active, critical vulnerabilities with an available patch in your data. Click Test to ensure that the query is valid and returns the expected data:
FIND Vulnerability AS vTHAT IS VulnerabilityDefinition AS vdWHERE v.status = "Confirmed active"AND v.severity = "Critical"AND vd.patchAvailable = True -
Actions: Click the Select an action dropdown, type "Sprints", and then select Create vulnerability ticket with sprints since we used "Vulnerability" in our BQL query. More options appear.
-
Sprint prefix: An alphanumeric value that helps to uniquely identify and organize your sprints. For example, type "Critical vulnerabilities with patches".
-
Sprint start date: Click the dropdown and select the start date for the sprint. You can select a date in the past, the current day, or any future date.
-
Sprint duration: Click the dropdown and indicate how long each sprint lasts. Select "1 Week".
-
SLA: Select an SLA definition to associate with the tickets. For example, Default ticket SLA definition, where the SLA starts when the ticket is created. See Service-level agreements for additional information.
-
Grouping: Click the dropdown and select Type > Name and Type > Severity, which groups the findings by their name and severity levels.
-
Assignment policy: Click the dropdown and select a default owner. You can assign it to a specific user, assign it based on an attribute, or leave it unassigned.
-
Run: Choose a method for the automation to run. You can run the automation manually, set a schedule for the automation to run, or you can set it to run when your data orchestration runs.
-
-
Click Create.
The Automations page reloads and the new automation appears in the list view. See launch the automation and view the generated tickets for details on running the ticket automation and viewing tickets generated by the automation.