Individual User Provisioning
This article details the manual process of creating users and configuring their access permissions.
Process overview
The process of manual access provisioning begins with deciding the level of access a user needs within the Brinqa Platform. If limited access is necessary, you must assign the Risk analyst role to this user and add them to the appropriate ownership cluster as a member. For full access to the Brinqa Platform, you can assign the System administrator role. The following diagram illustrates this process.
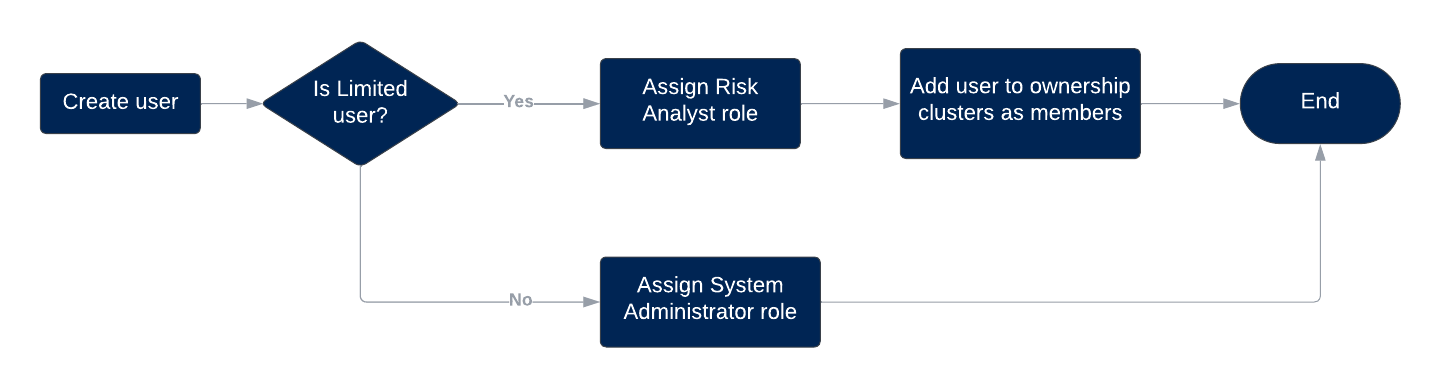
Figure 1. Individual user access provisioning process
The remaining sections of this article guide you through the entire manual access provisioning process within the Brinqa Platform, providing you with detailed step-by-step instructions.
Create a new user and assign the appropriate role
To initiate the individual user provisioning process, follow these steps to create or update a user and assign the appropriate role:
-
Navigate to Administration
 > Security > Users.
 -
Click Create and fill in the fields:
-
Username: Enter a username for the user to log in.
-
First name: Enter the first name of the user.
-
Last name: Enter the last name of the user.
-
Email: Enter an email address for the user. Brinqa Platform notifications will be sent to this email address.
-
Auth method: Select Brinqa as the authentication method, indicating the use of a username and password for login.
-
Password: Enter an initial password for the user.
-
Roles: Select Risk analyst for limited access or System administrator for full access.
-
Default app: Keep as is.
-
-
Select Active to indicate that the user is active.
-
Click Create.
Create ownership clusters and add users as members
The purpose of the ownership clusters within the Brinqa Platform is to provide access control to the datasets. For example, you can give users permission to access certain assets, findings, or both through the ownership clusters. You can create a new Risk owners cluster or Remediation owners cluster, or use the built-in clusters. In both cases, the user must have the Risk analyst role assigned and you must add the designated user as a member to the relevant cluster.
Users with the Configurator or System Administrator role can create or edit clusters. To create a new risk owner cluster, follow these steps:
-
Navigate to Clusters and click Risk owners.
-
Click Create and fill in the following fields:
-
Name: Enter a name for the cluster.
-
Description: Provide a description for the cluster.
-
Members: Select the user you've created to be members of the cluster, who will have access to the datasets defined by the conditions.
-
Conditions: Click + to add criteria for each data model. At the minimum, risk owners should have access to a set of hosts and vulnerabilities. For example:
-
Target data model: Click the dropdown and select Host.
-
Order: Specify the condition evaluation order for the target data model.
This field is important because it signifies the order that the Brinqa Platform follows to evaluate the conditions specified in this cluster and other clusters defined for the same dataset. The evaluation stops after a match is found, ensuring that each record is subject to only one ownership cluster. Therefore, it is logical to prioritize the most specific conditions first.
-
Condition: Specify the condition to define the hosts you want this cluster to view. The supported syntax is Brinqa Condition Language(BCL).
For example, if the
os CONTAINS "Windows"condition is met, users in this cluster can view hosts running the Windows operating system. -
Click Test condition to see the results retrieved by the condition. This ensures that your cluster groups the expected hosts.
-
-
Click + to add a condition for Vulnerability.
-
Target data model: Click the dropdown and select Vulnerability.
-
Order: Specify the condition evaluation order for the target data model.
-
Condition: Specify the condition to define the vulnerabilities you want this cluster to view.
For example, if the
targets.os CONTAINS "Windows"condition is met, users in this cluster can view vulnerabilities detected on machines running the Windows operating system. -
Click Test condition to see the results retrieved by the condition. This ensures that your cluster groups the expected vulnerabilities.
-
-
-
Click Create.
Clusters are synced through data computation. However, if you want the new clusters to go into effect immediately, follow these steps:
-
Navigate to Administration
> Data > Models. -
Locate the data model that you have defined in the cluster. For example, Host or Vulnerability.
-
Click Flows.
-
Click the compute flow of your data model. For example, for the Host data model, click Host compute flow.
-
Click Launch, and then click Launch again in the confirmation dialog.
-
Repeat the steps for all the data models defined in your clusters.
-
Navigate to the Risk owner data model and click Flows.
-
Click Risk owner compute flow, then Launch, and then click Launch again in the confirmation dialog.
After the flows have run successfully, navigate to Clusters > Risk owners and click the cluster that you have created. Verify that the datasets defined by the conditions are viewable in the cluster. Alternatively, log in as a member of your clusters and verify that they can view the selected datasets.