Clusters
This article details data model clusters, default cluster types, and how to create and modify clusters.
What are clusters?
Brinqa aggregates, consolidates, and enriches data from various external data sources, and maps them to the corresponding data models. There are basic filters, such as compliance status, targets, CVE IDs, and more, to facilitate searching and grouping your data after being collected. But if you want to classify your data further, Brinqa also provides a feature called clusters, where you can add your own grouping based on the characteristics of your data.
Clustering is a method of grouping similar items together based on their attributes or characteristics, similar to tagging. However, clustering is an automated process that occurs after your data has been imported into Brinqa and consolidated, while tagging is a process where you must assign tags or labels to individual items before your data is imported into Brinqa. Once tags have been assigned, they can be used to organize and group items.
In the Brinqa Platform, you can use clusters to group assets, findings, or users based on your criteria specified in a query. As your data changes, clusters continue to update and apply, ensuring that grouping remains accurate and relevant over time. To help get you started with clusters, there are a few tutorials available:
Built-in cluster types
The Brinqa Platform comes with some built-in cluster types to ensure that your data is organized from the start. Click the tabs below to view the default cluster types and their supported data models:
- Assets
- Finding definitions
- Ownership
To view the following asset clusters, navigate to Clusters > Assets > Environments, or Clusters > Assets > Profiles, etc.
-
Environments: The environment where an asset belongs, such as internally, externally, or at a corporate office. The environments defined within this cluster type include:
-
Certification: Assets designated for certification processes to ensure that they meet organizational standards before deployment.
-
Development: Assets used within development environments, where new or updated applications and systems are built and initially tested.
-
DMZ (Demilitarized Zone): Assets located in the DMZ, a secure area that helps protect the organization's local area network (LAN) from untrusted traffic.
-
External facing: Assets that are exposed to the external internet.
-
Internal facing: Assets intended for internal use only, not exposed to the external internet.
-
Production: Assets actively used in your production environment.
-
Test: Assets in environments used for testing purposes, crucial for validating functionality and security.
-
-
OS families: The operating system (OS) running on an asset, such as Linux, macOS, or Windows. Additionally, it considers the OS manufacturers, such as Apple, IBM, or Microsoft, to provide a more detailed categorization. This cluster type covers a comprehensive number of operating systems, including:
-
Apple macOS: Includes all macOS software versions, from earlier iterations such as Sierra and High Sierra to more recent releases such as Monterey, Ventura, and Sonoma. This ensures that any assets labeled with a macOS identifier, even if not explicitly listed by version name, are captured under this cluster.
-
Linux: Covers a variety of Linux distributions, including popular versions such as Fedora, Ubuntu, Debian, and CentOS. This ensures that any assets labeled with a Linux identifier, even if not explicitly listed by version name, are captured under this cluster.
-
Windows: Includes all versions of Windows operating systems, including Windows servers and desktop versions (Standard, Professional, Ultimate, and Enterprise). This ensures that any assets labeled with a Windows identifier, even if not explicitly listed by version name, are captured under this cluster.
-
-
Profiles: The business profile where an asset belongs, such as assets that may not have undergone vulnerability scans, newly discovered assets not yet been inventoried, or assets associated with inactive users. The asset profiles defined in this cluster type include:
-
Assets with no vulnerability scans: Assets that are not being scanned for vulnerabilities.
-
Failed continuous monitoring: Assets that have been scanned in the past, but not in the last 14 days.
-
Inactive users linked to assets: Users who are marked as "Inactive" yet may still be able to access the asset.
-
Newly discovered: Assets that have been identified and created in the Brinqa Platform in the last 7 days.
-
Unidentified in inventory: Assets that have been detected by vulnerability scanners but are not registered in any asset management or inventory systems. These are assets for which vulnerability data may exist but lack corresponding business-level information typically entered into inventory management tools.
-
Unmanaged workstations: Workstations that do not have endpoint protection software installed on them.
-
-
Technologies: The technologies that an asset utilizes, such as AWS (Amazon Web Services), Azure or GCP (Google Cloud Platform).
-
Types: The category that classifies the asset, such as laptops, servers, phones, tablets, or mainframes. Examples of the asset types included in this cluster are:
-
Databases: Assets specifically used for storing, managing, and retrieving data.
-
Mobile Devices: Includes smartphones, tablets, and other portable devices.
-
Servers: Dedicated devices used for managing network resources and hosting applications or services.
-
Virtual Machines: Assets that are software-based simulations of physical computers.
-
All Asset cluster types cover the following data models: Account, Application, Certification, Code project, Code repository, Container, Container image, Device, Host, Host image, IP range, Network segment, Package, Person, Service, Site, Site certificate, and Subnet.
To view the following finding definitions clusters, navigate to Clusters > Finding definitions > Affected technologies, or Clusters > Finding definitions > Profiles, etc.
-
Affected technologies: Categorizes findings based on the type of technology they are affecting. Examples of the affected technologies included in this cluster type are:
-
Database: Targets findings impacting database technologies, including but not limited to SQL, MariaDB, and MongoDB.
-
Operating system: Covers findings related to operating systems, including Linux, macOS, Windows, and more.
-
Security software: Identifies findings impacting software designed to protect systems and data, such as antivirus programs, firewalls, and intrusion detection systems.
-
-
Profiles: Categorizes findings by their alignment with specific business or security profiles, ensuring that each finding is associated with relevant operational or risk contexts. Examples of the finding definition profiles included in this cluster type are:
-
CISA Exploitable: Identifies vulnerabilities associated with CISA's list of exploitable CVEs, highlighting findings critical for immediate attention.
-
Log4j: Covers findings specific to Log4j vulnerabilities, addressing concerns related to this widely used logging framework.
-
Microsoft Office: Pertains to findings within the Microsoft Office Suite, ensuring that issues within these prevalent productivity tools are systematically identified.
-
Unsupported Linux OS: Targets findings connected to Linux operating systems lacking current support, spotlighting security vulnerabilities from outdated versions.
-
Windows Patching: Relates to findings about the patching status of Windows OS, focusing on the need for timely updates to mitigate vulnerabilities.
-
-
Types: Categorizes findings based on related Common Weakness Enumerations (CWEs), ensuring that findings are grouped according to shared security vulnerabilities across tools. Many tools have their own unique classifications (e.g., Cross-Site Scripting (XSS) from one tool vs. client-side injection from another), which may vary slightly. By clustering findings according to their type, Brinqa allows for the dynamic standardization of these classifications across different tools and systems. This cluster type covers a comprehensive number of finding types, including:
-
Access of Memory Location After End of Buffer: Addresses findings related to buffer overflow conditions where software accesses memory locations after the end of a buffer. This can lead to crashes and potential data corruption.
-
Malicious Code: Focuses on findings that involve malicious code embedded within software or systems. This category highlights threats where malware is discreetly inserted to compromise data integrity or system functionality, often without the knowledge of an administrator or user.
-
Trojan Horse: Covers findings related to Trojan Horse attacks, where malicious code is hidden within seemingly harmless software or files, potentially leading to unauthorized access and system compromise.
-
All Finding definition cluster types cover the following data models: Dynamic code finding definition, Manual finding definition, Open source finding definition, Pentest finding definition, Static code finding definition, Violation definition, and Vulnerability definition.
To view the following ownerships clusters, navigate to Clusters > Ownership > Risk owners, or Clusters > Ownership > Remediation owners, etc.
-
Risk owners: The owner or owner group that manages the risk of a finding, such as the IT Security team responsible for addressing and remediating vulnerabilities, the cloud security team in charge of managing risks associated with your cloud infrastructure and services, or a third-party risk management team.
-
Remediation owners: The owner group that is responsible for mitigating the risk of a finding, such as patching teams, product developers, or DevOps.
-
Informed users: The member or group of members that have read-only access to specified datasets. Ideal for users who need to be informed about data without the responsibility for managing it. For example, if there's an asset without a single owner, you can use an informed users cluster to allow for multiple teams to have access to the same asset for oversight purposes.
All Ownership cluster types cover the following data models: Account, Application, Certification, Code project, Code repository, Container, Container image, Device, Dynamic code finding, Finding, Host, Host image, Installed package, IP range, Manual finding, Network segment, Open source finding, Package, Pentest finding, Person, Service, Site, Site certificate, Static code finding, Subnet, Violation, and Vulnerability.
Managing unknown clusters
The Unknown cluster captures assets or findings that do not currently meet the conditions for any of the built-in cluster types. Items can end up in the Unknown cluster due to missing information, outdated data, or attributes that do not align with the defined conditions of existing clusters. While there's nothing inherently wrong with data being in the Unknown cluster, its presence indicates that these items may require modifications to be properly categorized.
To effectively address data that falls into the Unknown cluster, consider the following options:
-
Create a new cluster: You can create a new cluster with conditions that capture the previously unclassified items.
-
Clone and modify an existing cluster: You can adjust the conditions of a built-in cluster to include items from the Unknown cluster.
-
Modify the record: You can directly edit certain attributes of records to ensure that they meet the specific conditions of an existing cluster.
Create a new cluster
Users with the Configurator or System Administrator role can create new clusters to better organize their data, including the grouping of previously unknown data. This ensures that even those not initially recognized can be efficiently categorized. To create a new cluster, follow these steps:
When creating a new cluster, particularly a one-to-one cluster such as Asset type or Finding definition type, you must assign an order number that dictates the sequence in which the Brinqa Platform evaluates the cluster conditions for the target data model.
Brinqa recommends assigning an order number below 10000 or above 20000 for any new clusters. The range from 10000 to 20000 is reserved exclusively for built-in clusters. Using an order number in this range can result in conflicts.
-
Navigate to Clusters and click the cluster type you want to create.
-
Click Create and fill in the fields below:
-
Name: The name of the cluster.
-
Active: Whether the cluster is active or not. This field is selected by default.
-
Default: Whether the cluster is a default cluster or not.
-
Description: The description of the cluster.
-
Conditions: Click + to add clustering criteria for each data model. You can create a cluster that applies to multiple data models.
-
Target data model: Click the dropdown and type or select the data model to which the cluster applies.
warningAvoid selecting a parent data model (such as Asset, Finding, or Ticket) as the target. For example, instead of Asset, select a data model that extends Asset, such as Account, Host, Cloud Resource, and so on. This is because parent data models are not computed during consolidation and choosing a parent data model results in empty counts in the cluster.
-
Active: Indicate whether the condition is active. This field is selected by default.
-
Condition: Specify the condition to group your data. The supported syntax is Brinqa Condition Language (BCL). For example:
firstFound EXISTSorstatus = "Confirmed active". -
Test condition: Click Test to see the results retrieved by the condition. This ensures that your cluster groups the expected data.
-
Click + to add additional conditions to the cluster.
-
-
Click Create.
Repeat these steps for each cluster you want to create.
Clone an existing cluster
Rather than creating a new cluster from scratch, you can clone a built-in one and modify it to better fit your needs. Cloning not only allows you to keep the built-in cluster intact but also ensures that your modifications won't be overwritten during release updates. This way, you get a duplicated version to tailor as you like without unintentionally altering important default settings.
-
Navigate to any of the cluster types, such as Clusters > Assets > Environments or Clusters > Finding Definitions > Types.
-
Hold the pointer over the cluster that you want to modify and click Clone.
-
Make any necessary changes.
noteIf applicable, uncheck Default. Failing to do so results in an error message when you attempt to create the clone.
If you clone the risk or remediation owner cluster type, you must modify the Order attribute. Failing to do so results in an error message when you attempt to create the clone. The Order attribute signifies the sequence in which the Brinqa Platform evaluates the conditions specified for the target data model. Therefore, the same data model cannot share the same order in both the built-in and cloned clusters.
-
Select Active to activate the cloned cluster and then click Create.
The page reloads, and the cloned cluster displays in the list view.
noteIf the cloned cluster's conditions include multiple target data models, your changes apply to all of them. For instance, if you clone an asset cluster type that applies to the Account, Application, Device, and Host data models, the cloned cluster displays on the respective data model pages.
Update a record manually
Users with the System Administrator role can manually edit attributes of records to reclassify items from the Unknown cluster into the desired built-in cluster. While this is a manual process, it is a crucial step towards ensuring that all of your data is accurately categorized.
For example, the Brinqa Platform includes some built-in Environment clusters that are designed to categorize assets based on their operational environment. In this procedure, we will demonstrate how to reclassify an asset currently in the Unknown cluster to the External facing cluster. To do so, follow these steps:
-
Navigate to the cluster type that contains the unknown record you want to address. In this example, let's use Clusters > Assets > Environments.
-
Click the External network facing cluster and in the Details section under Conditions on the left-hand side of the page, note the BCL condition:
tags CONTAINS ANY ["External", "external"].You will need this information to modify the record in later steps.
-
Click the Unknown cluster.
-
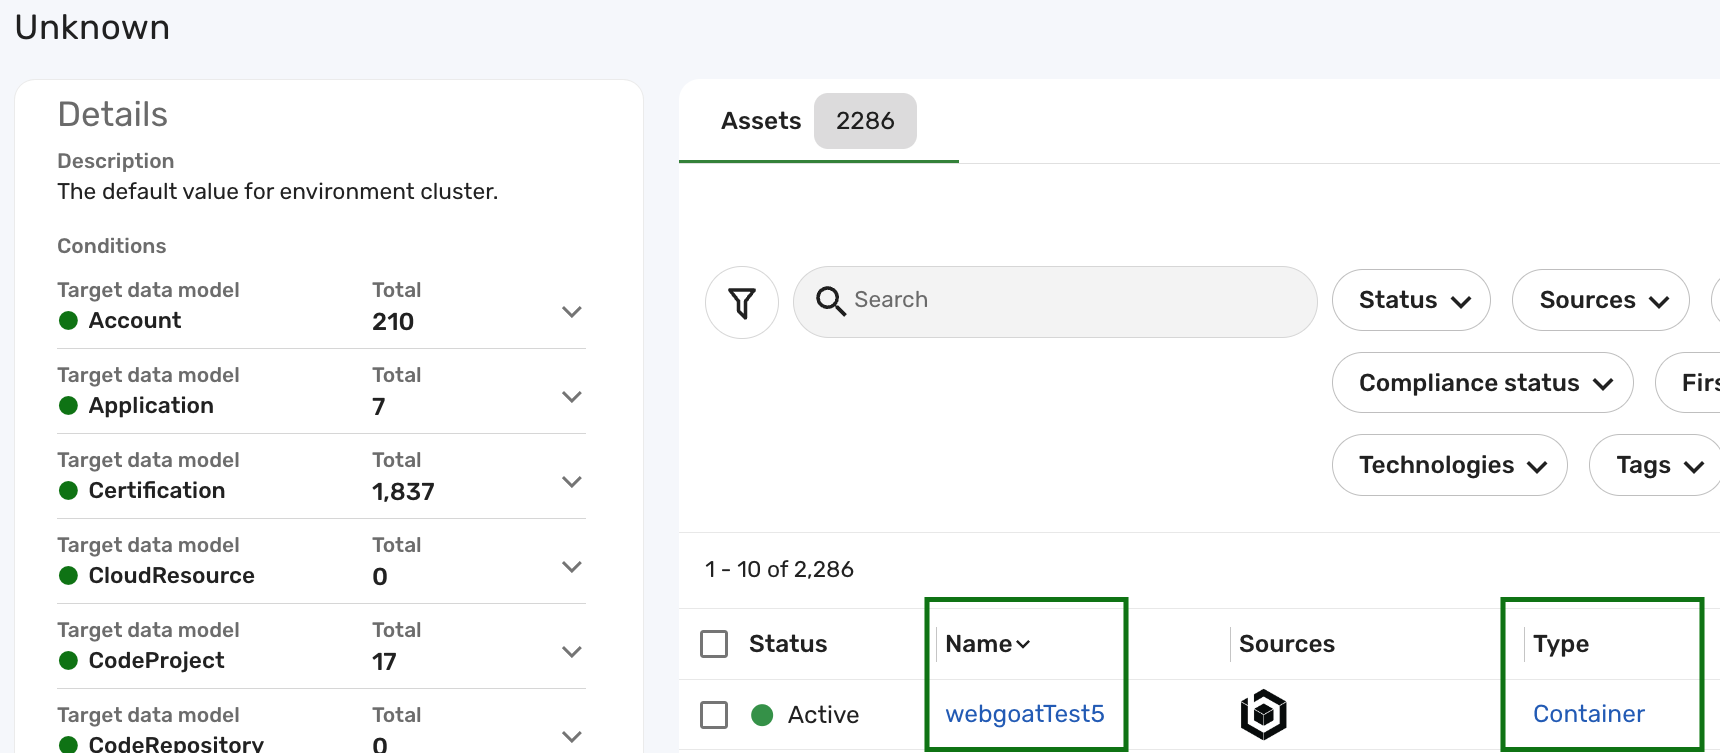
Click the Name of the record you want to modify. Make sure to note the Type attribute of the record, as you will need this information to run the specific compute flow (e.g., Container compute flow for a Container record) in later steps.
For example, as shown in the screenshot below, the Container record with the name webgoatTest5 is currently in the Unknown environment cluster:
-
Click Edit. This loads the default form view for the selected dataset.
-
Locate and update the fields that are directly related to the BCL condition of the built-in cluster.
In this example, to categorize the webgoatTest5 container as an external-facing asset, type External into the Tags field. This action aligns with the cluster's BCL condition
tags CONTAINS ANY ["External", "external"]. This ensures that the External network facing assets cluster catches this record and groups it appropriately.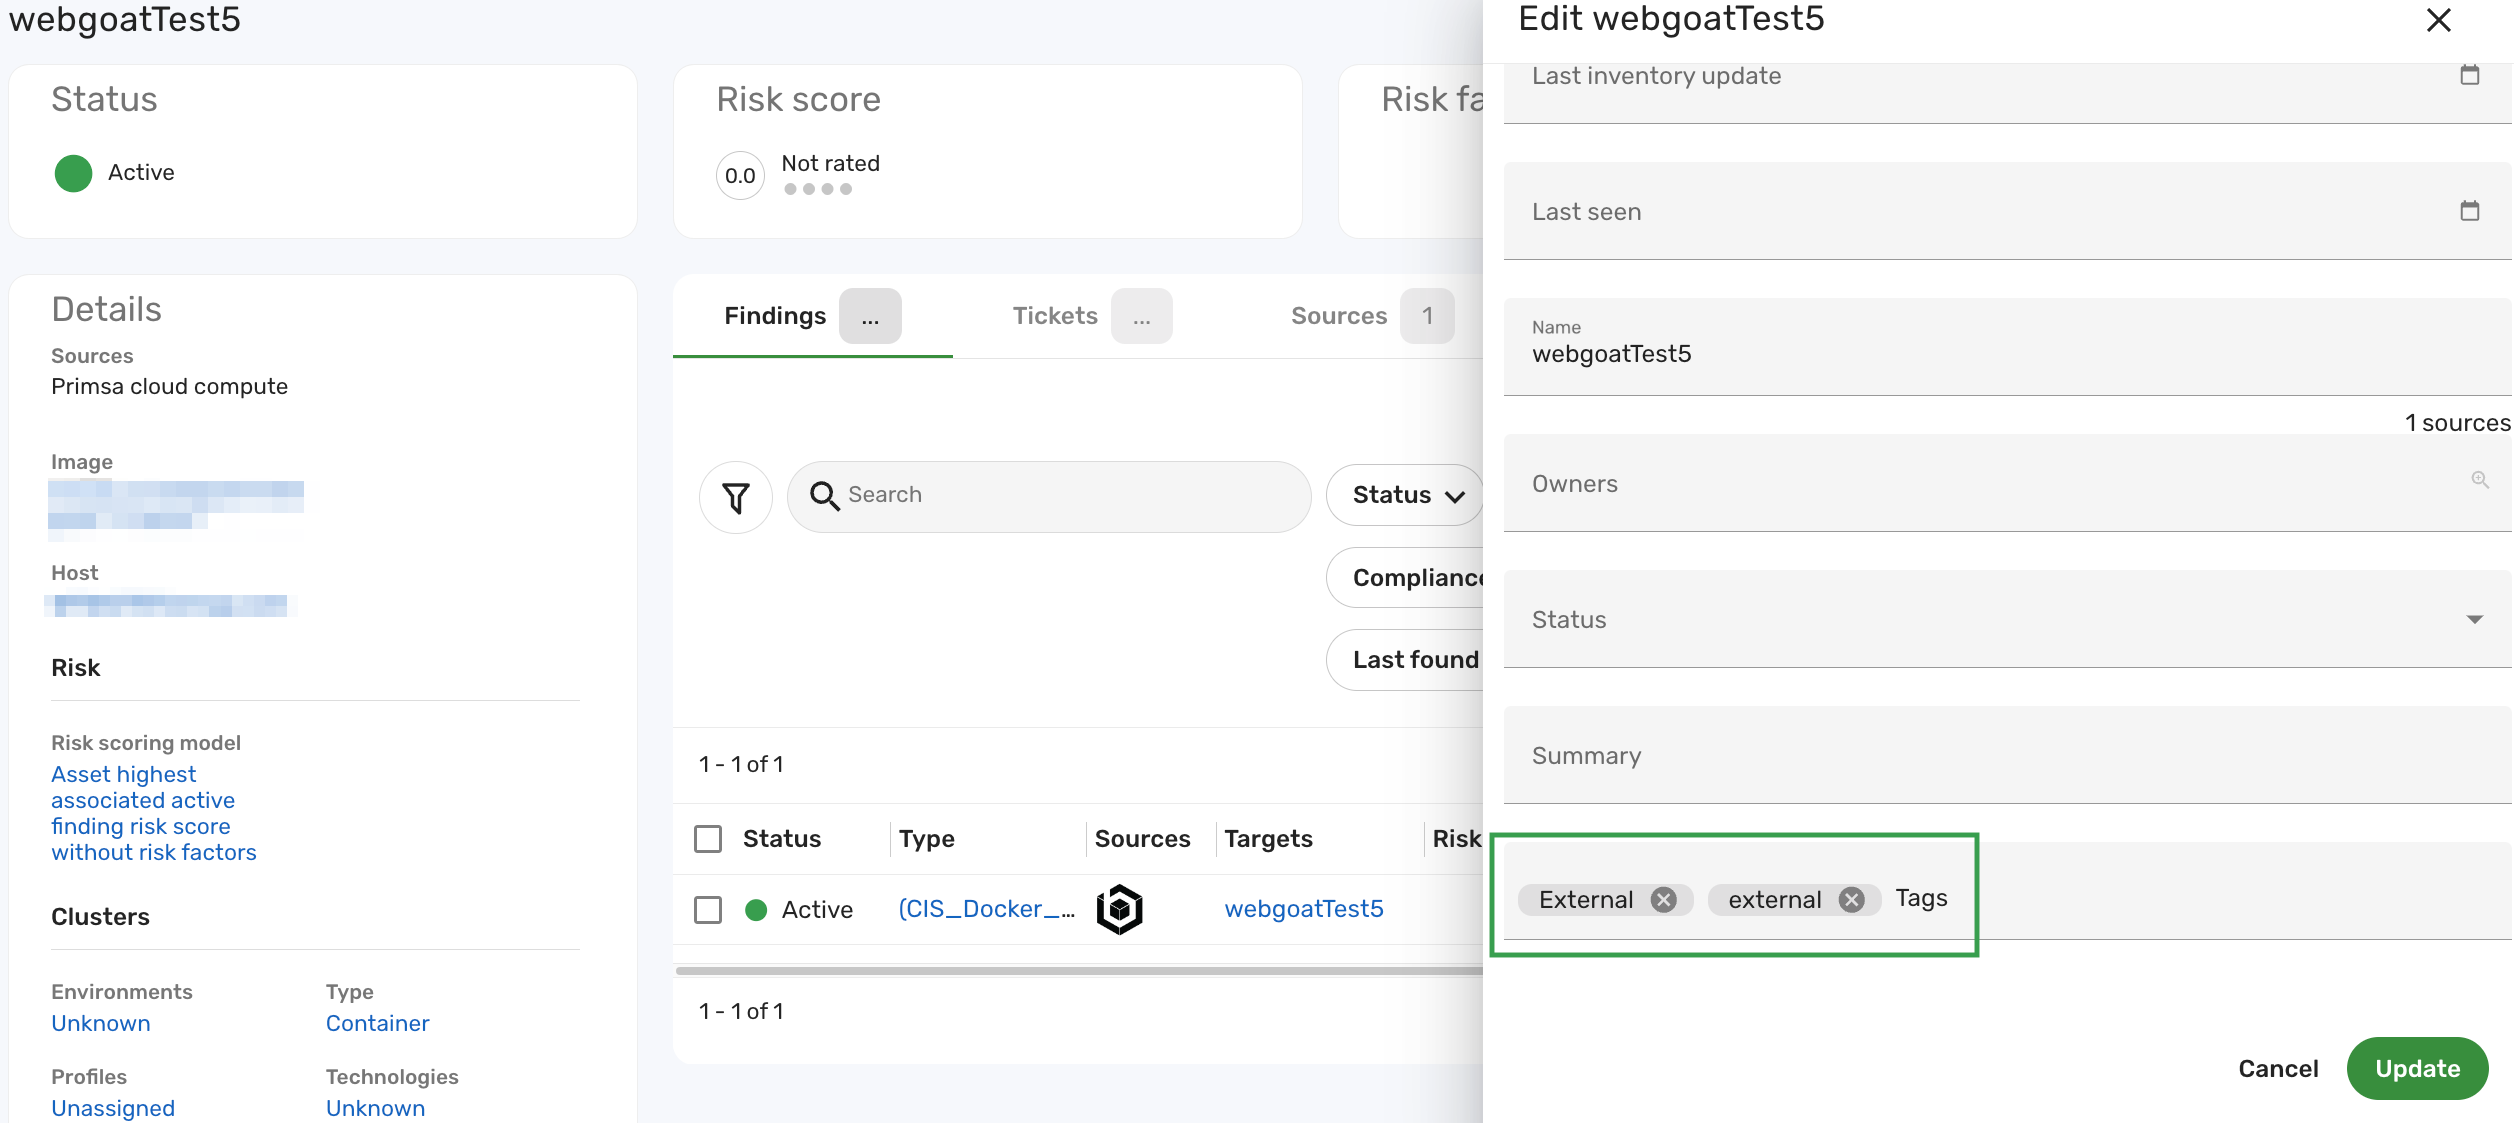
-
Click Update.
This change is applied during the next data orchestration run. To see your changes reflected immediately, you can manually trigger the relevant cluster compute flows. This ensures that the record's reclassification is processed without waiting for the scheduled orchestration. To do so, follow these steps:
-
Navigate to the data model associated with the modified record. In this example, since the record is a Container, navigate to Administration
 > Data > Models > Container.
 -
Click Flows, and then click Container compute flow.
-
Click Launch, and then click Launch again in the confirmation dialog.
-
Navigate to the data model page of the cluster type you've modified. In this example, since we have revised a record for the built-in Environment cluster type, navigate to the Environment data model page and click Flows.
-
Click Environment compute flow, then Launch, and then click Launch again in the confirmation dialog.
This step updates the total number of your data that is grouped into the cluster.
-
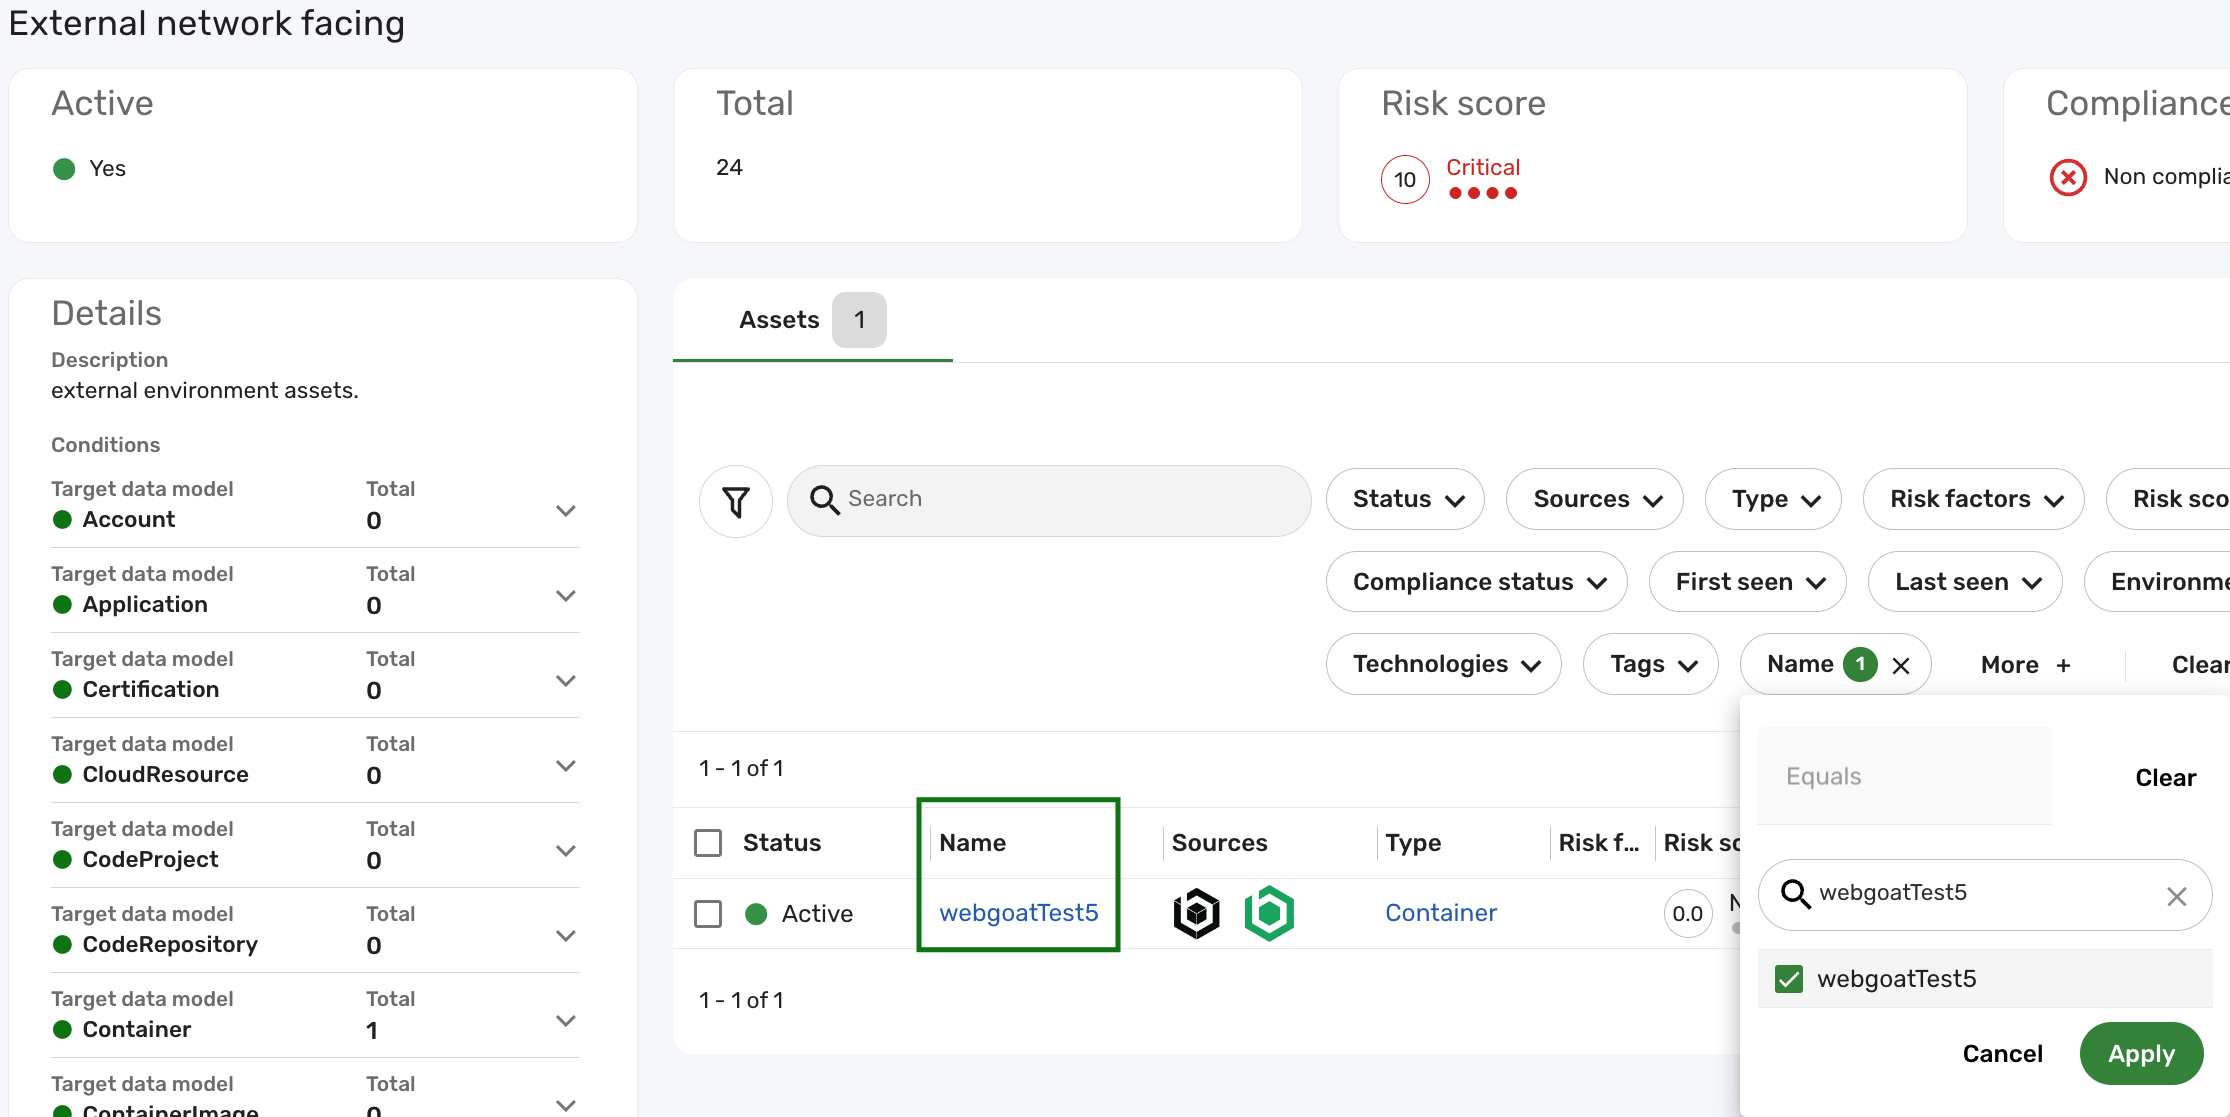
Navigate to Clusters > Assets > Environments and click the External network facing cluster.
As shown in the screenshot below, the Container record that was once Unknown is now successfully grouped into the External network facing cluster.
If you do not see the updated record in the cluster, please follow the troubleshooting steps.
Activate or deactivate a cluster
If you want to activate a cluster, whether built-in or cloned, do the following:
-
Hold the pointer over the cluster in the list view.
-
Click Activate.
If you want to deactivate a cluster, whether built-in or cloned, do the following:
-
Hold the pointer over the cluster in the list view.
-
Click Deactivate.
This prevents any overlapping conditions from being applied twice.
Launch clusters
Your new cluster applies when the data orchestration runs. However, if you want the new cluster to go into effect immediately, follow these steps:
-
Navigate to Administration
> Data > Models. -
Navigate to each data model you've selected as the target data model, and click Flows.
-
Click the compute flow for your data model. For example, if you have specified a condition for the Host data model in your cluster, click Host compute flow.
-
Click Launch, and then click Launch again in the confirmation dialog.
-
Repeat steps 2-4 for each target data model you've selected during the cluster creation process.
-
Navigate to the data model page of the cluster type you've added. For example, if you've created a new environment cluster, navigate to the Environment data model page and click Flows.
-
Click Environment compute flow, then Launch, and then click Launch again in the confirmation dialog.
This step updates the total number of your data that is grouped into the new cluster.
If you see inaccurate or outdated counts for the new cluster, you might need to clear the cache. Only System Administrators can clear caches. To do so, follow these steps:
-
Navigate to Administration
> System > Advanced. -
Select BQL Count cache and BQL Query cache.
BQL Count cache is for charts and BQL query cache is for tables and list views.
-
Click Clear data.
View and manage clusters
Users with the Configurator or System Administrator role can view, manage, or or add conditions for other data models to existing clusters. To do so, follow these steps:
-
Navigate to Clusters. Your clusters display in a list view.
-
Hold your pointer over the cluster you want to edit or examine, and click Edit.
-
Modify the fields as needed or add conditions for other data models.
-
Click Update.
Troubleshooting
Before troubleshooting your clusters, ensure that the data orchestration has successfully run. If you're still experiencing discrepancies in cluster counts, one reason could be recent modifications to the cluster haven't been applied. To resolve this, rather than waiting for the next orchestration cycle, you can manually launch the cluster to get the updated counts.
Inaccurate or outdated counts
If you see inaccurate or outdated counts for the new cluster, clearing the cache may resolve the issue. Only System Administrators can clear caches. To do so, follow these steps:
-
Navigate to Administration
> System > Advanced. -
Select BQL Count cache and BQL Query cache.
BQL Count cache is for charts and BQL query cache is for tables and list views.
-
Click Clear data.
Empty counts
If you observe that the newly created cluster shows zero counts but produces results when testing its conditions, the issue might be due to selecting a parent data model during the cluster creation process. Parent data models like Asset, Finding, or Ticket are not computed during the consolidation process. Therefore, selecting these as your target data model can result in empty counts in the cluster. To avoid this issue, make sure to select a child data model that extends one of these parent data models.