Access Controls
This article details the default access control options in the Security menu, including the access controls for each default role, how to create a new access control, and how to edit or delete an access control.
Overview
Access controls define the permissions assigned to user roles, determining which features they can access and how they can interact with them. Access controls are essential for maintaining security and ensuring that users have the appropriate level of access based on their roles and responsibilities.
The Brinqa Platform comes with default permissions for each role, but users with the System administrator or Security administrator role can modify these permissions as needed.
In most cases, you won't need to create or modify access controls in the Brinqa Platform. The built-in access controls already provide role-based permissions, and you can use ownership clusters (risk owner, remediation owner, or informed user) to control access to specific datasets. This combination of roles and ownership clusters offers both flexibility and granular control over platform access.
If you're planning to create a custom data model, it will likely extend Asset, Finding, or Ticket. In such cases, Brinqa recommends modeling your access control setup after the built-in access controls.
To manage access controls, click Administration ![]() on the upper-right corner and under Security, select Access controls. The Access controls page displays existing permissions in the Brinqa Platform.
on the upper-right corner and under Security, select Access controls. The Access controls page displays existing permissions in the Brinqa Platform.
Built-in access controls
The Brinqa Platform comes with default roles and permissions for each role.
To view the access controls for each role in the Brinqa Platform, follow these steps:
-
Navigate to Administration > Security > Access controls.
-
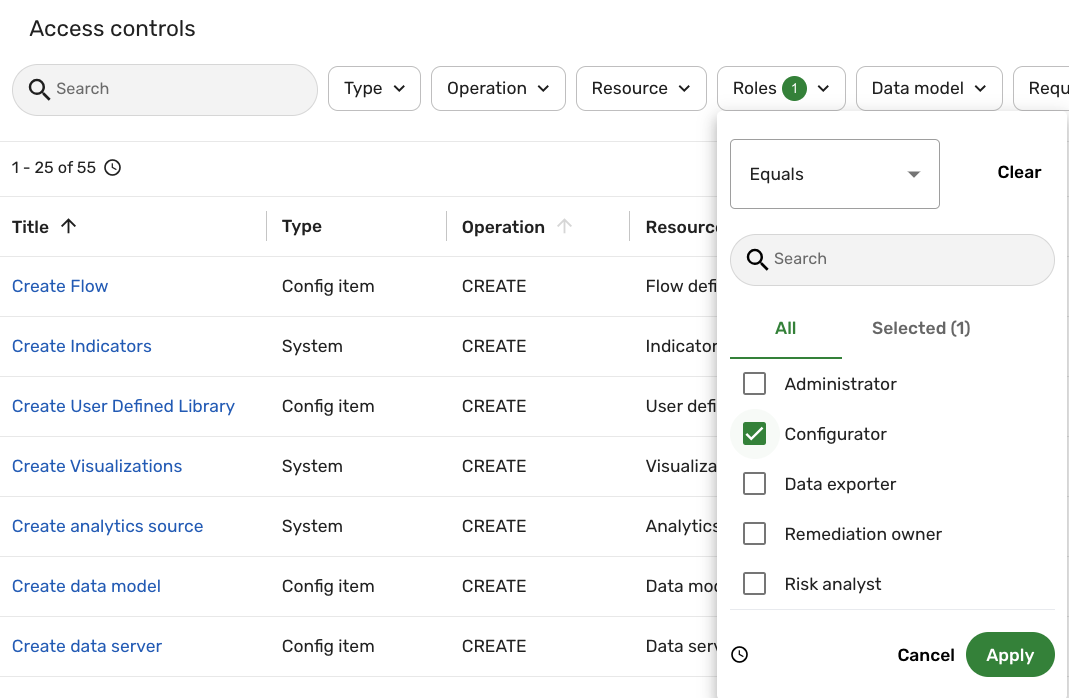
Click the Roles filter and select the role(s) you want to view the access controls for.
-
Click Apply.
The list updates with the access controls for the selected role. For example, the following screenshot illustrates filtering the access controls by the Configurator role:
The following sections cover the permissions of all the default roles in the Brinqa Platform. For additional information on the default roles, see the Roles documentation.
Administrator access controls
The Administrator role grants read-only access to all data in the Brinqa Platform, without the ability to perform actions or modify configurations. The following table details the default access controls for users with the Administrator role:
Table 1: Administrator access controls
| Permission | Resource |
|---|---|
| Access | CAASM and Brinqa Platform |
| Read | All datasets |
| Create, Read, Update, Delete | Saved query |
| Reset password | User |
Configurator access controls
Expand the section below to view the default access controls for users with the Configurator role:
Table 2: Configurator access controls
| Permission | Resource |
|---|---|
| Create, Read, Update, Delete | Analytics source |
| Read | Application event log |
| Access | CAASM and Brinqa Platform |
| Manage | Cache |
| Create, Read, Update, Delete | Cluster |
| Sync | Data source and its mapping |
| Create, Read, Update, Delete | Data model |
| Create, Read, Update, Delete | Data server |
| Create, Read, Update, Delete, Launch | Flow definition |
| Manage | Index |
| Create, Read, Update, Delete | Mail template |
| Create, Read, Update, Delete, Run | Report |
| Read | Role |
| Create, Read, Update, Delete | Saved query |
| Export, Import | Settings |
| Read | Task monitor |
| Read | User |
| Create, Read, Update, Delete | User defined library |
| Create, Read, Update, Delete, Share | View |
| Create, Read, Update, Delete | Visualization |
Data exporter access controls
The following table details the default access controls for users with the Data exporter role:
Table 3: Data exporter access controls
| Access Control | Resource |
|---|---|
| Read | Data export |
| Export | Datasets |
| Launch | Flow definition |
Promoter access controls
The following table details the default access controls for users with the Promoter role:
Table 4: Promoter access controls
| Permission | Resource |
|---|---|
| Promote | Dashboards |
Remediation owner access controls
The following table details the default access controls for users with the Remediation owner role:
Table 5: Remediation owner access controls
| Permission | Resource |
|---|---|
| Read | Analytics source |
| Read | Asset, Finding, Finding definition, and their child data models |
| Read | Attack mitigation |
| Read | Attack pattern |
| Read | Attack tactic |
| Read | Attack technique |
| Access | CAASM and Brinqa Platform |
| Read | Cluster |
| Create, Read, Update, Delete, Submit | Exception request |
| Create, Read, Update, Delete, Submit | False positive request |
| Read, Update, Delete | Remediation campaign |
| Create, Read, Update, Delete, Submit | Remediation validation request |
| Create, Read, Update, Delete, Share | Report |
| Read, Delete | Request |
| Create, Read, Update, Delete, Submit | Risk acceptance request |
| Create, Read, Update, Delete | Saved query |
| Read | User |
| Read, Update | Ticket and all child data models of Ticket |
| Read | View |
| Read | Visualization |
Risk analyst default access controls
The following table details the default access controls for users with the Risk analyst role:
Table 6: Risk analyst access controls
| Permission | Resource |
|---|---|
| Read | Assessment |
| Read | Attack mitigation |
| Read | Attack pattern |
| Read | Attack tactic |
| Read | Attack technique |
| Access | CAASM and Brinqa Platform |
| Read | Cluster |
| Read, Delete | False positive request |
| Read | EOL advisory |
| Read, Delete | Exception request |
| Read, Update, Delete | Remediation campaign |
| Read, Delete | Remediation validation request |
| Read, Delete | Request |
| Read, Delete | Risk acceptance request |
| Read | Security control |
| Read | Security control framework |
| Read | Threat intel |
| Read, Update | Ticket and all child data models of Ticket |
| Read | User |
Risk owner access controls
The following table details the default access controls for users with the Risk owner role:
Table 7: Risk owner access controls
| Permission | Resource |
|---|---|
| Read | Analytics source |
| Read | Asset, Finding, and Finding definition, and their child data models |
| Read | Attack mitigation |
| Read | Attack pattern |
| Read | Attack tactic |
| Read | Attack technique |
| Access | CAASM and Brinqa Platform |
| Read | Cluster |
| Read | Data export |
| Create, Read, Update, Delete, Submit, Review | Exception request |
| Create, Read, Update, Delete, Submit, Review | False positive request |
| Read, Update, Delete | Remediation campaign |
| Create, Read, Update, Delete, Submit, Review | Remediation validation request |
| Create, Read, Update, Delete, Share | Report |
| Read, Delete | Request |
| Create, Read, Update, Delete, Submit, Review | Risk acceptance request |
| Create, Read, Update, Delete | Saved query |
| Read | User |
| Read, Update | Ticket and all child data models of Ticket |
| Read | View |
| Read | Visualization |
Security administrator access controls
The following table details the default access controls for users with the Security administrator role, who have access only to items under Administration > Security. This includes managing users, roles, access controls, and security policies:
Table 8: Security administrator access controls
| Permission | Resource |
|---|---|
| Create, Read, Update, Delete | Access control |
| Create, Read, Update | Account lockout policy |
| Create, Read, Update | Password policy |
| Create, Read, Update, Delete | Role |
| Create, Read, Update, Delete | Saved query |
| Create, Read, Update, Delete | User |
System administrator access controls
Users with the System administrator role have full and unrestricted access to the Brinqa Platform. This role enables users to manage all aspects of the platform, including configuration, user management, security settings, and data models. With this level of access, users can create, edit, and delete any resources, configure system settings, and oversee all operations within the platform.
Due to the critical nature of this role, it is recommended to assign it only to trusted users who are responsible for the overall administration and security of the Brinqa Platform.
User access controls
The User role is a foundational role that provides basic access permissions. More specific permissions are inherited through roles that extend it, such as Risk analyst, Risk owner, and Remediation owner.
To ensure users have the appropriate permissions, assign them to specialized roles—such as Risk analyst, Risk owner, and Remediation owner—based on their responsibilities and avoid using the User role directly.
Access control filters
Access control filters define specific criteria that refine the access granted by an access control. The filter shown below grants access to users who are members of either a Remediation owner or Informed user cluster:
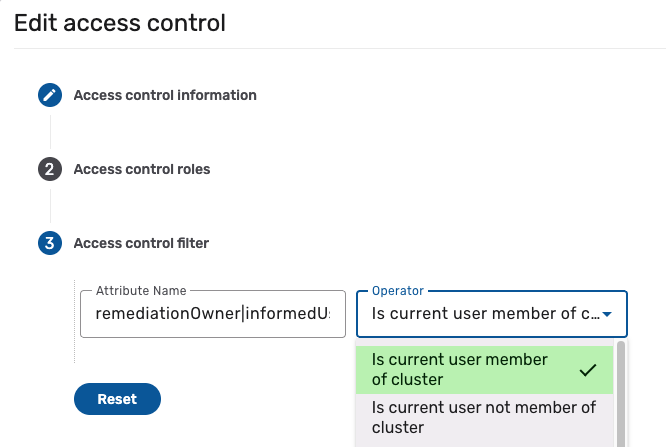
These filters are only available for Data model or Flow action access control types. When defining multiple filters for different attributes with the same operator, use the pipe character (|) instead of the OR operator for optimal performance.
For example, to grant access to users who are members of either a Remediation owner or Informed user cluster, you could use:
Option 1 (using | - recommended):
- Attribute Name:
remediationOwner|informedUser - Operator:
Is current user member of cluster
Option 2 (using OR - works but less efficient)
- Attribute Name:
remediationOwner - Operator:
Is current user member of cluster
OR
- Attribute Name:
informedUser - Operator:
Is current user member of cluster
Please contact Brinqa Support for assistance with these or other advanced filter configurations.
Create a new access control
Typically, you won't need to create custom access controls. The built-in access controls and ownership clusters provide sufficient access management. Only create custom access controls if you have specific requirements that the built-in options don't address.
Users with the System administrator or Security administrator role can create new access controls when needed. To create a new access control, follow these steps:
-
Navigate to Administration
 > Security > Access controls.
 -
Click Create.
-
Fill in the following fields:
-
Title: The title of the access control.
-
Name: The system name of the access control. This field is automatically populated based on the Title, converting it to camel case. For example, if the title is Test Access Control, the system name becomes testAccessControl.
-
Type: The type of the access control: Application, Data model, or Flow action. Each type has different configuration fields, as detailed in the following table:
Table 8: Access control fields by type
Selected type Available fields Description Application Operation The action that can be performed on the application. Options include: Access. Application The application that the access control applies to. Options include: Brinqa Platform, Cyber Risk. Data model Operation The action that can be performed on the data model. Options include: Create, Read, Update, Delete. Data model The data model that the access control applies to. Attributes The attributes of the data model. If no attributes are selected, you have access to all attributes of that data model. Flow action Operation The action that can be performed on the flow. Options include: Execute, Transition. Data model The data model that the access control applies to. Flow type The type of flow associated with the flow action. Options include: Business process, Button flow.
Business process: A flow that is automatically triggered when a dataset is created and can only be associated with one data model.
Button flow: A special flow that can be triggered manually to perform actions on a single dataset or multiple datasets within a data model.Flow definition The action that the flow accomplishes. Available options vary by the selected data model and may include consolidation flow, compute flow, or delete all data flow. -
Description: The description of the access control.
-
Active: Whether the access control is active. Inactive access controls are effectively archived.
-
-
Access control roles: Roles that this access control applies to.
Expand this section, click the Roles dropdown, and select the roles that inherit this access control.
-
Access control filter: (Optional) Define criteria to refine access. Only available for Data model or Flow action types. See Access control filters for details and examples.
-
Attribute: Click the dropdown and select the data model attribute you want to filter. This attribute determines what aspect of the data model or flow action will be filtered. For example, if you're working with the Vulnerability data model, all available attributes on the Vulnerability data model appear in the dropdown.
-
Operator: Click the dropdown and select an operator to further define how the attribute is compared to the value you specify. For example, the operator could be "Greater than" if you want to filter results based on attributes that exceed a specific value. For additional information, see BQL operators.
-
Value: If applicable, enter the value you want the selected attribute to be compared against. This is required for certain operators. For example, if you're filtering on the Base risk score attribute with the "Greater than" operator, you might enter "8" in the value field to filter for vulnerabilities with a base risk score greater than 8.
-
-
Click Create.
The Access controls page reloads and you should see your new access control listed.
Assign access controls to roles
Users with the System administrator or Security administrator role can assign access controls to specific roles. To do so, follow these steps:
-
Navigate to Administration
> Security > Access controls. -
Click the access control you want to assign to a role(s).
You can also point the cursor over the access control and click Edit.
The Edit access control page displays.
-
In the Access control roles section, click the Roles dropdown.
-
Select the role(s) to apply the access control to.
-
Click Update to save your changes.
Assigning access controls determines which users can access specific data and functionality within the Brinqa Platform. Improper assignments may grant unauthorized access to sensitive data or restrict users from performing essential tasks.
Before assigning access controls, carefully review these permissions and consult with your Brinqa Support team or security team to ensure they align with your organization's security policies.
Edit or delete an access control
Users with the System administrator or Security administrator role can edit or delete existing access controls. To do so, navigate to Administration > Security > Access controls, hold the pointer over the access control in the list view, and click Edit or Delete to modify or delete the existing access control.
In addition, users with the System administrator role can access and manage access controls from the data model level. To do so, navigate to Administration > Data > Models, select the data model for which you want to modify access controls, and then click Access controls.
Editing or deleting an access control is a critical action that can significantly impact the security and accessibility of data across the Brinqa Platform. Improper changes can lead to unintended access to sensitive data or the inability for users to perform essential tasks.
Before making any modifications, it is strongly recommended to review the changes carefully and consult with your Brinqa Support team or security team to ensure they align with your organization's security policies.