Data Validation
This article details the data validation process in the Brinqa Platform.
This article assumes that you've populated the Brinqa Platform with your data. For details on how to do so, see create a data integration.
What is data validation?
Data validation is the process of ensuring that the data imported from your various sources align with the data displayed in your Brinqa Platform. Data validation is a critical step in maintaining the accuracy and consistency of your data. It involves comparing record counts and specific data points between the source data and the Brinqa Platform to confirm that they align. It's crucial to understand the following factors during validation, as they can help explain any count discrepancies you may observe:
-
Quality of your source data: The quality and consistency of the source data can directly impact the data validation process. For example, inconsistencies or errors in the source data may cause discrepancies in the record counts once they have been consolidated into the Brinqa Platform.
-
Timing of data syncs: The timing of synchronization between the source data and the Brinqa Platform can influence the record counts. For example, if new data is added to the source between syncs, the Brinqa Platform may not reflect the expected record counts until the next sync completes.
-
Connector parameters: Specific parameters that are hard coded in the connectors may cause variations in the record counts. For example, a connector parameter might be set to ignore certain types of data, leading to a discrepancy in the counts between the source data and the data in the Brinqa Platform.
-
Connector operation options: The operation options specified for the connectors can impact the data import and, consequently, the record counts. For example, if a connector operation option is set to only import active assets or data from a specific time period, it can result in a count discrepancy with the source that includes all historical data.
-
Data lifecycle management policy: If a data lifecycle management policy is in place, it may affect the record counts. The policy could, for example, dictate that data older than a specific period should be deleted, leading to count variations between the source and the Brinqa Platform.
Understanding these factors and their potential impact on your data can help you better interpret the discrepancy in record counts. It's normal to see some variation in the counts and Brinqa generally considers an initial variation of 3-5% within the expected range. However, if you notice a significant discrepancy or if you're unsure about the record counts, please contact your Brinqa Support specialists.
How to view your data?
You can view datasets retrieved by connectors after they are ingested, enriched, and mapped to the Unified Data Models (UDM). For instance, to view vulnerabilities retrieved by a specific connector or connectors, follow these steps:
-
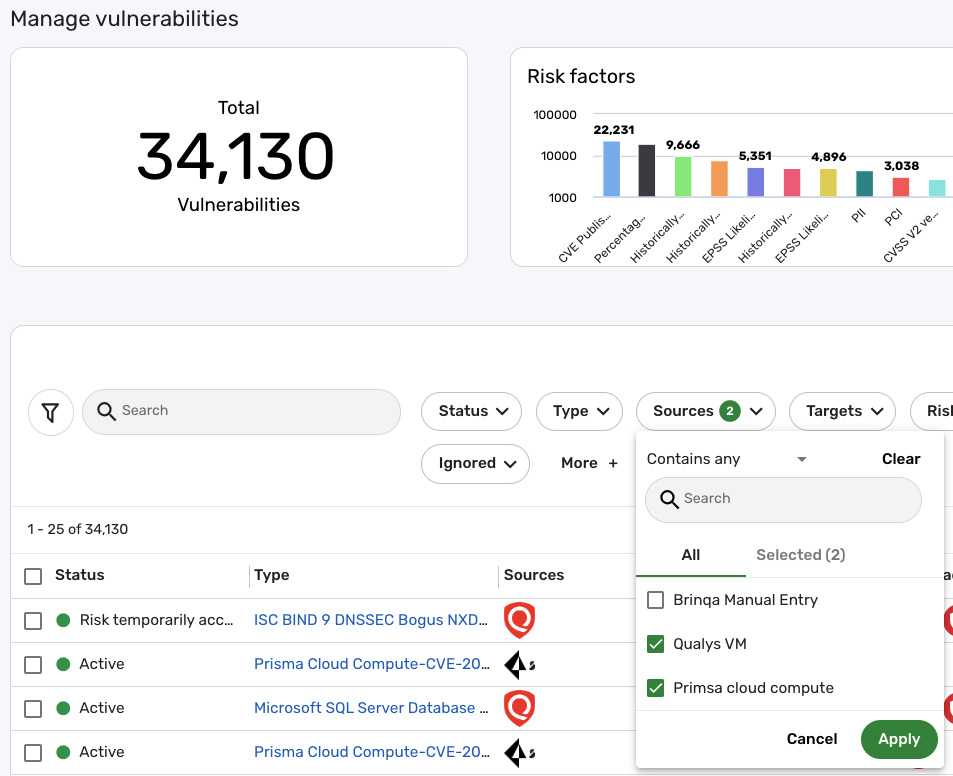
Navigate to Findings > Findings > Vulnerability.
-
Click the Sources filter.
- If you do not see the filter, click More, select Sources from the dropdown, and then click Apply.
-
Select the connector that you want to filter the results for.
-
Click Apply.
The list view refreshes and only displays the vulnerabilities retrieved by the specified source. For example, the following screenshot illustrates all vulnerabilities ingested by the Qualys Vulnerability Management (VM) or Prisma Cloud Compute connector:
You can repeat these steps to view different datasets by visiting their individual pages. For example, if you want to view all assets retrieved, navigate to Inventory > All assets; or if you want to view devices, navigate to Inventory > Devices.
How to validate your data?
In order to better understand the data validation process in the Brinqa Platform, consider a practical scenario where you're using a specific connector. For instance, suppose you're using the Qualys Vulnerability Management (VM) connector to import Host and Vulnerability data into the Brinqa Platform. The data validation process begins with a first-time or 'beginning of time' sync using the Qualys VM connector in a data integration. After the initial data import from Qualys VM, you can start the validation process.
Validate the record counts
Validating total record counts is a comprehensive solution to validating the accuracy of your data. This process places an emphasis on reviewing the complete volume of specific datasets imported into your Brinqa Platform from sources like Qualys VM. The goal here is not to ensure an exact count match between the Brinqa Platform and Qualys VM, but to confirm the counts fall within an expected range of variation, typically around 3-5%. This method provides a broader view of the data integrity at a high level. To begin validating record counts, follow these steps:
-
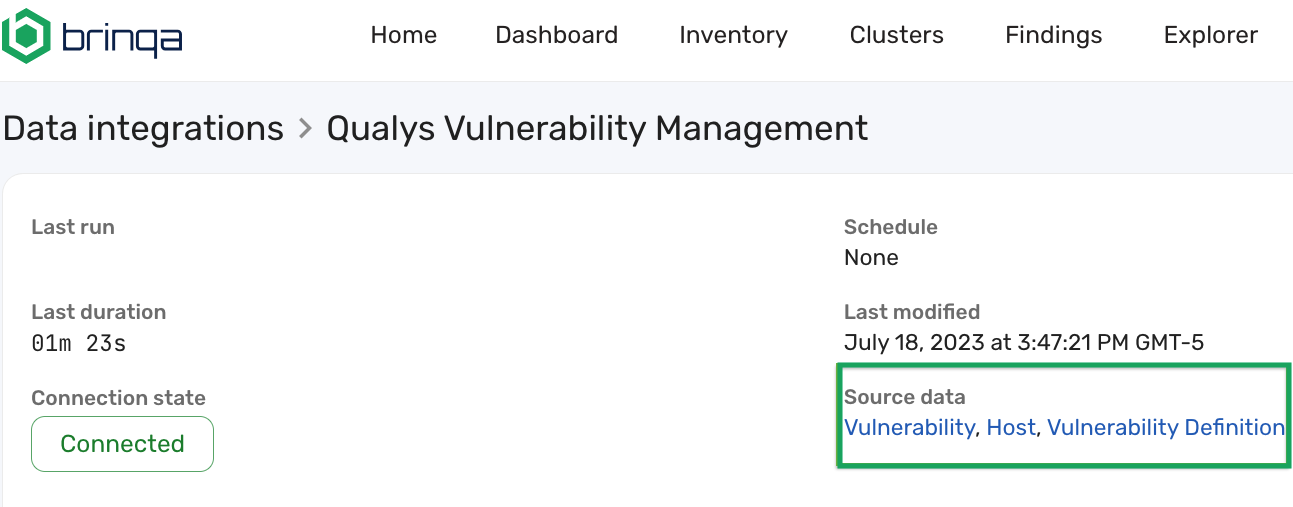
Navigate to Integrations > Sources.
-
Click the Title of the data integration that you want to validate the counts for.
- You can also point the cursor over the entry in the list view, and then click Details.
-
Click one of the links under "Source data". A new tab opens in your browser.
- These links take you to a list view of the corresponding Source Data Models (SDMs) that are specific to the data source.
-
Note the counts for the relevant entities that you are attempting to validate the counts for.
-
Log into the system where the source data reside, such as your organization's Qualys VM instance, and navigate to the dashboard or a similar page where you can see the counts for the same entities.
-
Compare the record counts in the Brinqa Platform with those visible in your data source or vendor specific software.
- As noted earlier, they may not match exactly, and a 3-5% variation is to be expected.
Repeat these steps for other datasets and data sources you are importing data from. This step-by-step validation can help ensure that the data has been consolidated correctly from your various data sources into your Brinqa Platform.
If you notice significant discrepancies or have concerns about the data validation, contact your Brinqa Support specialists.
Validate the accuracy of the import
After ensuring your record counts fall within the expected 3-5% range of variation, you can then transition to a more granular approach for data validation. Rather than attempting to validate every data point from Qualys VM, or any data source, consider validating samples of your data. Brinqa recommends that you examine known entities in your datasets. For instance, instead of examining every Host imported into your Brinqa Platform from Qualys VM, target a known host or familiar entity from Qualys VM. Then, examine the findings and information associated with that host and compare those details to the consolidated data in the Brinqa Platform. The objective isn't to achieve an exact match or a 1:1 ratio, but to ensure a consistency in the type of information found in both places. To validate your imported Host data, follow these steps:
-
Navigate to Inventory > Assets > Hosts.
-
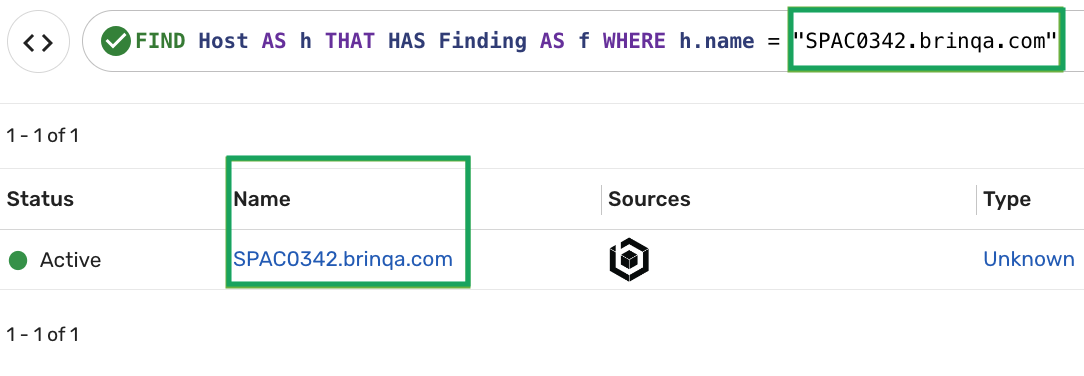
Search for a recognizable host in the list view. You can use the search filter dropdowns or type a Brinqa Query Language (BQL) query to search for a known host that should be present in the Brinqa Platform.
-
To make the search more specific, for example, you can use the following BQL query to search for a known host with findings (replace
HostNamewith the name of a known host in your data):FIND Host AS hTHAT HAS Finding AS fWHERE h.name = "HostName"
-
-
Click the name of the known host in the list view. You can also hold the pointer over the entry in the list view and click Details.
- This brings up the Details page for that specific host. This page includes the operating system that the host is running on, the model and manufacturer of the host, the MAC addresses, IP addresses (public and private), and more. From here, you can assess the accuracy of the information by comparing the data in the Brinqa Platform with the original source data.
-
Click the Findings tab.
- In the list view on the Findings tab, you can see all findings associated with that host.
You can also export the host list view, or any list view, as a .csv file. This export creates a snapshot of your data that you can use to analyze your data outside of the Brinqa Platform. By using the .csv file to compare the data in your Brinqa Platform with your source data, you can more easily validate the accuracy of the data in the Brinqa Platform. For steps on how to do so, see export and download list views.
Troubleshooting tips
Here are some common problems you might encounter when validating your data, along with suggestions for how you can diagnose and resolve them.
Record counts are low
If your record counts in the Brinqa Platform seem lower than expected, it's possible that the account used for the data integration doesn't have the right permissions or the integration isn't configured correctly. Here's how you can troubleshoot:
-
Check the account permissions: Confirm whether the account used in the integration has the necessary permissions to access and retrieve all the required data. The permissions of the account can significantly impact the volume of data that can be retrieved.
- For instance, if you're using the GitHub connector to import code and code repository data, the associated GitHub private key should have, at minimum,
Read-onlypermissions to the objects retrieved by the GitHub connector. Inadequate permissions could lead to the retrieval of incomplete data, resulting in lower than expected record counts or even prevent any data from being retrieved at all.
- For instance, if you're using the GitHub connector to import code and code repository data, the associated GitHub private key should have, at minimum,
-
Review the data integration configuration: Ensure that all desired data types are selected in the integration configuration, as some may not be included by default, leading to lower record counts. Additionally, check for any operation options that may be filtering data based on criteria like date, severity, or asset type. For example, an option set to retrieve only "Critical" vulnerabilities may limit imported records. Temporarily adjusting or disabling these options can help determine if filtering affects record counts.
-
Confirm data visibility: Confirm that the Brinqa user account account has the appropriate access to view the data within the Brinqa Platform. In certain situations, the visibility of data might be restricted based on user roles or access controls within the Brinqa Platform. Ensure that the Brinqa user has the necessary permissions to view the specific datasets that you're looking to validate.
Record counts are high
If your record counts are higher than anticipated, it may be due to filtering in your source tool, or a need to adjust the data lifecycle management policy. Here's how you can troubleshoot:
-
Check for filters in the source tool: If you're comparing the counts in your Brinqa Platform with those in the source tool, make sure you're looking at unfiltered data in the source tool. Filters could be hiding some data, making it appear as though the Brinqa Platform has imported more than it should have.
-
Review your data lifecycle management policy: If the data in your Brinqa Platform has existed for a while, you may need to adjust your data lifecycle management policy. The data lifecycle management policy determines when old data is marked as inactive and then removed from your Brinqa Platform. If data isn't being removed as expected, it could cause inflated record counts.
Desired data isn't being supplied by the connector
If the connector isn't supplying the data you want to pull in, here's how you can troubleshoot:
-
Check connector capabilities: Refer to documentation specific to the connector you're using to understand the types of data it can pull into the Brinqa Platform. The connector may not import the specific objects you're looking for.
-
Make sure your connectors are up-to-date: Connectors are updated to introduce new functionalities, enhancements, and sometimes, support for additional objects that can be imported into the Brinqa Platform. Running an outdated version of a connector means missing out on these important updates, which can potentially affect the data that is pulled in. For steps on how to update connectors, see Update a connector.
-
Contact Brinqa Support: If the information you need isn't available, or the connector should be pulling the data but isn't, consider these options:
-
Use the support portal to reach Brinqa Support specialists.
-
Email Brinqa Support at support@brinqa.com. When you do, be prepared to provide details about the issue, including which connector and version you're using, your Brinqa Platform version, and the data you're trying to pull in. Providing more information will help Brinqa Support assist you more efficiently.
-