Risk Factors
This article details risk factors and how to define and manage risk factors in a Brinqa Platform.
What are risk factors?
Risk factors is a configuration that enables you to modify the risk score, either increasing or decreasing it from the base risk score. Risk factors provide a way of assessing the likelihood and impact of different risks associated with your data. With Risk factors, you can track individual factors of a risk score for improved visibility, audit for significant deviations in risk scores, or answer questions like "Why is my asset ranked as critical?"
For example, if you have an asset marked as Critical in severity, the following are some factors that can attribute to such a rating:
-
The vulnerability is on a host supporting business essential functionality.
-
The vulnerability is being actively exploited in the wild.
-
The host contains sensitive personally identifiable information (PII) or payment card industry (PCI) information.
Built-in risk factors
v2 risk factors were introduced in Brinqa Platform version 11.28, and v2.1 risk factors were introduced in Brinqa Platform version 11.32. CVSS V4-related risk factors, as part of the v2 risk factors, were added in Brinqa Platform version 11.33.
Brinqa strongly recommends upgrading to the latest platform version to take full advantage of the functionality.
There are three versions of built-in risk factors available in the Brinqa Platform: v1, v2, and v2.1. The v1 risk factors were defined before the introduction of Brinqa Risk Intelligence. The v2 and v2.1 risk factors support the Brinqa Risk Intelligence integration and offer enhanced capabilities. You can choose to enable v1 or v2 risk factors based on your specific needs.
If you want to activate or deactivate all v1 or v2 risk factors, please contact your Brinqa Support team so that they can assist you. You cannot have a mix of v1 and v2 risk factors active at the same time; it must be either all v1 or all v2.
Users with the Configurator or System Administrator role can access the risk factor adjustments by navigating to Administration > Configuration > Risk factors. Brinqa provides the following built-in risk factors:
Table 1: v1 and v2 built-in risk factors
| Name | Risk Factor Version | Reason | Conditions | Score |
|---|---|---|---|---|
| CISA due date | 2.0 | Vulnerabilities related to CISA that need to be resolved within a due date. | Vulnerability: type.cveRecords.cisaDueDate IS NOT NULL Vulnerability Definition: cveRecords.cisaDueDate IS NOT NULL | +0.25 |
| CISA due date expired | 2.0 | Vulnerabilities related to CISA that were not resolved within the CISA due date timeline. | Vulnerability: cisaDueDateExpired IS NOT NULL AND cisaDueDateExpired = true | +1 |
| CISA exploitable | 2.0 | Vulnerabilities deemed exploitable by CISA are of greater risk for compliance. | Vulnerability: type.associatedCvesIsCisaExploitable IS NOT NULL AND type.associatedCvesIsCisaExploitable = true Vulnerability Definition: associatedCvesIsCisaExploitable IS NOT NULL AND associatedCvesIsCisaExploitable = true | +0.25 |
| CVSS V2 vector indicates local or adjacent access required | 1.0, 2.0 | Vulnerabilities that require local or adjacent access are less common. | Vulnerability: type.cvssV2BaseScore IS NOT NULL AND type.cvssV3BaseScore IS NULL AND (type.cvssV2AttackVector = "Local" OR type.cvssV2AttackVector = "Adjacent") Vulnerability Definition: cvssV2BaseScore IS NOT NULL AND cvssV3BaseScore IS NULL AND (cvssV2AttackVector = "Local" OR cvssV2AttackVector = "Adjacent") | -2 |
| CVSS V2 vector indicates no integrity or confidentiality impact | 1.0, 2.0 | Vulnerabilities that do not impact the integrity or confidentiality of the system can be deprioritized. | Vulnerability: type.cvssV2BaseScore IS NOT NULL AND type.cvssV3BaseScore IS NULL AND type.cvssV2ConfidentialityImpact = "None" AND type.cvssV2IntegrityImpact = "None" Vulnerability Definition: cvssV2BaseScore IS NOT NULL AND cvssV3BaseScore IS NULL AND cvssV2ConfidentialityImpact = "None" AND cvssV2IntegrityImpact = "None" | -3.5 |
| CVSS V3 vector indicates local or adjacent access required | 1.0, 2.0 | Vulnerabilities that require local or adjacent access are less common. | Vulnerability: type.cvssV3BaseScore IS NOT NULL AND (type.cvssV3AttackVector = "Local" OR type.cvssV3AttackVector = "Adjacent") Vulnerability Definition: cvssV3BaseScore IS NOT NULL AND (cvssV3AttackVector = "Local" OR cvssV3AttackVector = "Adjacent") | -2 |
| CVSS V3 vector indicates low integrity and low confidentiality impact | 1.0, 2.0 | Vulnerabilities with low impact on integrity or confidentiality can be deprioritized. | Vulnerability: type.cvssV3BaseScore IS NOT NULL AND type.cvssV3ConfidentialityImpact = "Low" AND type.cvssV3IntegrityImpact = "Low" Vulnerability Definition: cvssV3BaseScore IS NOT NULL AND cvssV3ConfidentialityImpact = "Low" AND cvssV3IntegrityImpact = "Low" | -1 |
| CVSS V3 vector indicates no integrity or confidentiality impact | 1.0, 2.0 | Vulnerabilities that do not impact the integrity or confidentiality of the system can be deprioritized. | Vulnerability: type.cvssV3BaseScore IS NOT NULL AND type.cvssV3ConfidentialityImpact = "None" AND type.cvssV3IntegrityImpact = "None" Vulnerability Definition: cvssV3BaseScore IS NOT NULL AND cvssV3ConfidentialityImpact = "None" AND cvssV3IntegrityImpact = "None" | -3.5 |
| CVSS V4 vector indicates local or adjacent access required | 2.0 | Vulnerabilities that require local or adjacent access are less common. | Vulnerability: type.cvssV4BaseScore IS NOT NULL AND (type.cvssV4AttackVector = "Local" OR type.cvssV4AttackVector = "Adjacent") Vulnerability Definition: cvssV4BaseScore IS NOT NULL AND (cvssV4AttackVector = "Local" OR cvssV4AttackVector = "Adjacent") | -2 |
| CVSS V4 vector indicates low integrity and low confidentiality impact | 2.0 | Vulnerabilities with low impact on integrity or confidentiality can be deprioritized. | Vulnerability: type.cvssV4BaseScore IS NOT NULL AND type.cvssV4VulnerableSystemConfidentialityImpact = "Low" AND type.cvssV4VulnerableSystemIntegrityImpact = "Low" Vulnerability Definition: cvssV4BaseScore IS NOT NULL AND cvssV4VulnerableSystemConfidentialityImpact = "Low" AND cvssV4VulnerableSystemIntegrityImpact = "Low" | -1 |
| CVSS V4 vector indicates no integrity or confidentiality impact | 2.0 | Vulnerabilities that do not impact the integrity or confidentiality of the system can be deprioritized. | Vulnerability: type.cvssV4BaseScore IS NOT NULL AND type.cvssV4VulnerableSystemConfidentialityImpact = "None" AND type.cvssV4VulnerableSystemIntegrityImpact = "None" Vulnerability Definition: cvssV4BaseScore IS NOT NULL AND cvssV4VulnerableSystemConfidentialityImpact = "None" AND cvssV4VulnerableSystemIntegrityImpact = "None" | -3.5 |
| EPSS Likelihood < 1% | 1.0, 2.0 | Vulnerabilities where EPSS indicates a likelihood of less than 1%. | Vulnerability: type.associatedCvesMaximumEpssLikelihood IS NOT NULL AND type.associatedCvesMaximumEpssLikelihood < 1 Vulnerability Definition: associatedCvesMaximumEpssLikelihood IS NOT NULL AND associatedCvesMaximumEpssLikelihood < 1 | -1.5 |
| EPSS Likelihood > 15% | 1.0, 2.0 | Vulnerabilities where EPSS indicates a likelihood of greater than 15%. | Vulnerability: type.associatedCvesMaximumEpssLikelihood IS NOT NULL AND type.associatedCvesMaximumEpssLikelihood > 15 Vulnerability Definition: associatedCvesMaximumEpssLikelihood IS NOT NULL AND associatedCvesMaximumEpssLikelihood > 15 | +0.25 |
| Exploited in the wild | 2.0 | Vulnerabilities whose exploit has been verified. These vulnerabilities are being used by threat actors, used as ransomware, identified under an active ransomware campaign, or used by Botnets. | Vulnerability: type.exploitedInTheWild IS NOT NULL AND type.exploitedInTheWild = true Vulnerability Definition: exploitedInTheWild IS NOT NULL AND exploitedInTheWild = true | +1 |
| Exploits exists | 2.0 | Vulnerabilities that are exploitable. | Vulnerability: type.exploitsExists IS NOT NULL AND type.exploitsExists = true Vulnerability Definition: exploitsExists IS NOT NULL AND exploitsExists = true | +0.5 |
| HIPAA | 1.0, 2.0 | Hosts needing to meet HIPAA (Health Insurance Portability and Accountability Act) standards have a greater impact on the business if exploited. | Host: complianceFlags CONTAINS ANY ["HIPAA"] OR tags CONTAINS ANY ["HIPAA"] Vulnerability: targets.complianceFlags CONTAINS ANY ["HIPAA"] OR targets.tags CONTAINS ANY ["HIPAA"] | +0.5 |
| NERC | 1.0, 2.0 | Hosts needing to meet NERC (North American Electricity Reliability Corporation) standards that have a greater impact on the business if exploited. | Host: complianceFlags CONTAINS ANY ["NERC"] OR tags CONTAINS ANY ["NERC"] Vulnerability: targets.complianceFlags CONTAINS ANY ["NERC"] OR targets.tags CONTAINS ANY ["NERC"] | +0.5 |
| PCI | 1.0, 2.0 | Hosts needing to meet PCI (Payment Card Industry) standards have a greater impact on the business if exploited. | Host: complianceFlags CONTAINS ANY ["PCI"] OR tags CONTAINS ANY ["PCI"] Vulnerability: targets.complianceFlags CONTAINS ANY ["PCI"] OR targets.tags CONTAINS ANY ["PCI"] | +0.5 |
| Percentage impacted is low | 1.0, 2.0 | Vulnerabilities that impact a very limited number of systems can be deprioritized. | Vulnerability: type.percentageImpacted IS NOT NULL AND type.percentageImpacted < 1 Vulnerability Definition: percentageImpacted IS NOT NULL AND percentageImpacted < 1 | -1 |
| PII | 1.0, 2.0 | Hosts with PII (Personally Identifiable Information) can have a greater impact on the business if exploited. | Host: complianceFlags CONTAINS ANY ["PII"] OR tags CONTAINS ANY ["PII"] Vulnerability: targets.complianceFlags CONTAINS ANY ["PII"] OR targets.tags CONTAINS ANY ["PII"] | +0.5 |
The following table details the v2.1 built-in risk factors. v2.1 risk factors were introduced in Brinqa Platform version 11.32 and they are enabled by default. Unlike v2 risk factors that only apply to the Host, Vulnerability, or Vulnerability Definition data models, v2.1 risk factors apply to all child data models of Asset and Finding, offering broader coverage across your potential attack surface.
Table 2: v2.1 built-in risk factors
| Name | Risk Factor Version | Reason | Conditions | Score |
|---|---|---|---|---|
| Externally facing | 2.1 | Assets that are accessible from the public internet. | Child data models of Asset: tags CONTAINS ANY ["External"] Child data models of Finding: targets.tags CONTAINS ANY ["External"] | +0.5 |
| HIPAA | 2.1 | Assets needing to meet HIPAA (Health Insurance Portability and Accountability Act) standards have a greater impact on the business if exploited. | Child data models of Asset: complianceFlags CONTAINS ANY ["HIPAA"] OR tags CONTAINS ANY ["HIPAA"] Child data models of Finding: targets.complianceFlags CONTAINS ANY ["HIPAA"] OR targets.tags CONTAINS ANY ["HIPAA"] | +0.5 |
| NERC | 2.1 | Assets needing to meet NERC (North American Electricity Reliability Corporation) standards that have a greater impact on the business if exploited. | Child data models of Asset: complianceFlags CONTAINS ANY ["NERC"] OR tags CONTAINS ANY ["NERC"] Child data models of Finding: targets.complianceFlags CONTAINS ANY ["NERC"] OR targets.tags CONTAINS ANY ["NERC"] | +0.5 |
| PCI | 2.1 | Assets needing to meet PCI (Payment Card Industry) standards have a greater impact on the business if exploited. | Child data models of Asset: complianceFlags CONTAINS ANY ["PCI"] OR tags CONTAINS ANY ["PCI"] Child data models of Finding: targets.complianceFlags CONTAINS ANY ["PCI"] OR targets.tags CONTAINS ANY ["PCI"] | +0.5 |
| PII | 2.1 | Assets with PII (Personally Identifiable Information) can have a greater impact on the business if exploited. | Child data models of Asset: complianceFlags CONTAINS ANY ["PII"] OR tags CONTAINS ANY ["PII"] Child data models of Finding: targets.complianceFlags CONTAINS ANY ["PII"] OR targets.tags CONTAINS ANY ["PII"] | +0.5 |
| Revenue generating | 2.1 | Assets that generate revenue for the business. | Child data models of Asset: tags CONTAINS ANY ["Revenue generating"] Child data models of Finding: targets.tags CONTAINS ANY ["Revenue generating"] | +0.5 |
Create a new risk factor
Users with the Configurator or System Administrator role can create new risk factors and apply them to data models to ensure accurate risk assessment and prioritization. To create a new risk factor, follow these steps:
-
Navigate to Administration
 > Configuration > Risk factors.
 -
Click Create and fill in the following fields:
-
Name: The name of the risk factor.
tipMake sure that you postfix the name with "(v1)" or "(v2)". Adding "(v1)" or "(v2)" to the name helps differentiate between the two versions of risk factors. This ensures that you can easily identify and manage the appropriate set of risk factors based on whether they are part of the original set (v1) or the enhanced Brinqa Risk Intelligence integration (v2).
-
Description: The description of the risk factor.
-
Icon: Select an icon, icon color, and background color to represent the risk factor when displayed in a list view or on the Explorer graph.
-
Reason: The justification of the value chosen for adjusting the risk score.
-
Score: Specify a number to adjust the base risk score of the data model. The risk score of a finding equals the base risk score plus the sum of all the risk factor scores on a 0-10 scale. For example, a risk factor score of
-1on the vulnerability data model decreases the risk score of the associated findings by 1. -
Version: (Optional) Click the dropdown and select the version of the risk factor. The version field is primarily for grouping and organization and has no impact on scoring or functionality. Options include: v1, v2, and v2.1.
-
Conditions: Click + to add risk factor criteria for each data model. You can create a risk factor that applies to multiple data models.
-
Target data model: Click the dropdown and select the data model to which the risk factor applies.
ImportantAvoid selecting a parent data model (such as Asset, Finding, or Ticket) as the target. For example, instead of Finding, select a data model that extends Finding, such as Vulnerability, Violation, Pentest finding, and so on. This is because parent data models are not computed during consolidation and choosing a parent data model can lead to issues preventing the proper application of the new risk factor.
-
Active: Indicate whether the condition is active.
-
Condition: Specify the condition to filter your data. The supported syntax is Brinqa Condition Language (BCL). For example:
firstFound EXISTSorstatus = "Confirmed active".
-
Click + to add additional conditions to the risk factor.
-
-
Select Active to indicate whether the risk factor is active. Inactive risk factors are effectively archived and not in use.
-
Select Default if you want the risk factor to be applied only if no other risk factors are applied.
-
Click Create.
Repeat these steps for each risk factor you want to create.
Clone an existing risk factor
Rather than creating a new risk factor from scratch, you can clone a built-in one and modify it to better fit your needs. Cloning not only allows you to keep the built-in risk factor intact but also ensures that your modifications won't be overwritten during release updates. This way, you get a duplicated version to tailor as you like without unintentionally altering important default settings.
-
Navigate to Administration
> Configuration > Risk factors. -
Hold the pointer over the risk factor that you want to modify and click Clone.
-
Make any necessary changes.
tipMake sure that you postfix the name with "(v1)" or "(v2)". Adding "(v1)" or "(v2)" to the name helps differentiate between the two versions of risk factors. This ensures that you can easily identify and manage the appropriate set of risk factors based on whether they are part of the original set (v1) or the enhanced Brinqa Risk Intelligence integration (v2).
-
Select Active to activate the cloned risk factor, and then click Create.
The page reloads, and the cloned risk factor displays in the list view.
noteIf the cloned risk factor's conditions include multiple target data models, your changes apply to all of them. For instance, if you clone a risk factor that applies to the Vulnerability and Vulnerability definition data models, the cloned risk factor displays on the respective data model pages.
Activate or deactivate a risk factor
If you want to activate a risk factor, whether built-in or cloned, do the following:
-
Hold the pointer over the risk factor in the list view.
-
Click Activate.
If you want to deactivate a risk factor, whether built-in or cloned, do the following:
-
Hold the pointer over the risk factor in the list view.
-
Click Deactivate.
This prevents any overlapping conditions from being applied twice.
Activate or deactivate all risk factors
If you want to activate or deactivate all v1 or v2 risk factors, please contact your Brinqa Support specialists so that they can assist you. You cannot have a mix of v1 and v2 risk factors active at the same time; it must be either all v1 or all v2.
Launch risk factors
Your new risk factor applies when the data orchestration runs. However, if you want the new risk factor to go into effect immediately, follow these steps:
-
Navigate to Administration
> Data > Models. -
Navigate to the data model you've selected as the target data model to apply the risk factor, and click Flows.
-
Click the compute flow for your data model. For example, if you've added a new risk factor to the Vulnerability data model, click Vulnerability compute flow.
-
Click Launch, and then click Launch again in the confirmation dialog.
-
Repeat steps 2-4 for each target data model you've selected during the risk factor creation process.
-
Navigate to the Risk factor data model and click Flows.
-
Click Risk factor compute flow, then Launch, and then click Launch again in the confirmation dialog.
- This step updates the total number of your data that is impacted by the new risk factor.
To see the total number of your data that is impacted by the new risk factor, navigate to Administration ![]() > Configuration > Risk factors. Locate the risk factor in the list view. The counts display in the Total column.
> Configuration > Risk factors. Locate the risk factor in the list view. The counts display in the Total column.
View and manage risk factors
Users with the Configurator or System Administrator role can view, manage, and revise existing risk factors. To view or modify your risk factors, follow these steps:
-
Navigate to Administration
> Configuration > Risk factors. -
Hold the pointer over the risk factor and click Edit.
-
Edit the fields as needed. These are the same fields you completed when creating the risk factor.
-
Click Update.
Tutorial: Create a new risk factor for PII
This tutorial demonstrates how you can create a new risk factor for both the Host and Vulnerability data model to prioritize assets and findings that contain PII . You may want to create such a risk factor for the following reasons:
-
Compliance regulations: Data protection laws and regulations, such as the General Data Protection Regulation (GDPR), California Consumer Privacy Act (CCPA), and Health Insurance Portability and Accountability Act (HIPAA), require organizations to safeguard PII. By prioritizing assets and findings with PII, you can ensure that you are taking necessary steps to maintain compliance and avoid potential legal penalties.
-
Minimize risk of data breaches: Prioritizing assets and findings with PII enables you and your organization to quickly identify and address vulnerabilities that may put sensitive information at risk. This proactive approach can help prevent data breaches and reduce the potential impact on both individuals and your organization.
-
Protect user trust: Ensuring the privacy and security of PII is crucial for maintaining trust between your organization and customers. Demonstrating a commitment to protecting PII can enhance and build customer loyalty.
-
Improve overall security posture: By focusing on assets and findings with PII, you can gain a better understanding of your organization's overall security posture. This can enable you to make more informed decisions about resource allocation, risk management, and security controls, ultimately contributing to a more robust and resilient security environment.
To create a new risk factor to prioritize assets and findings that contain PII, follow these steps:
-
Navigate to Administration
> Data > Models. -
Locate the Host or Vulnerability data model.
-
Click Risk factors.
-
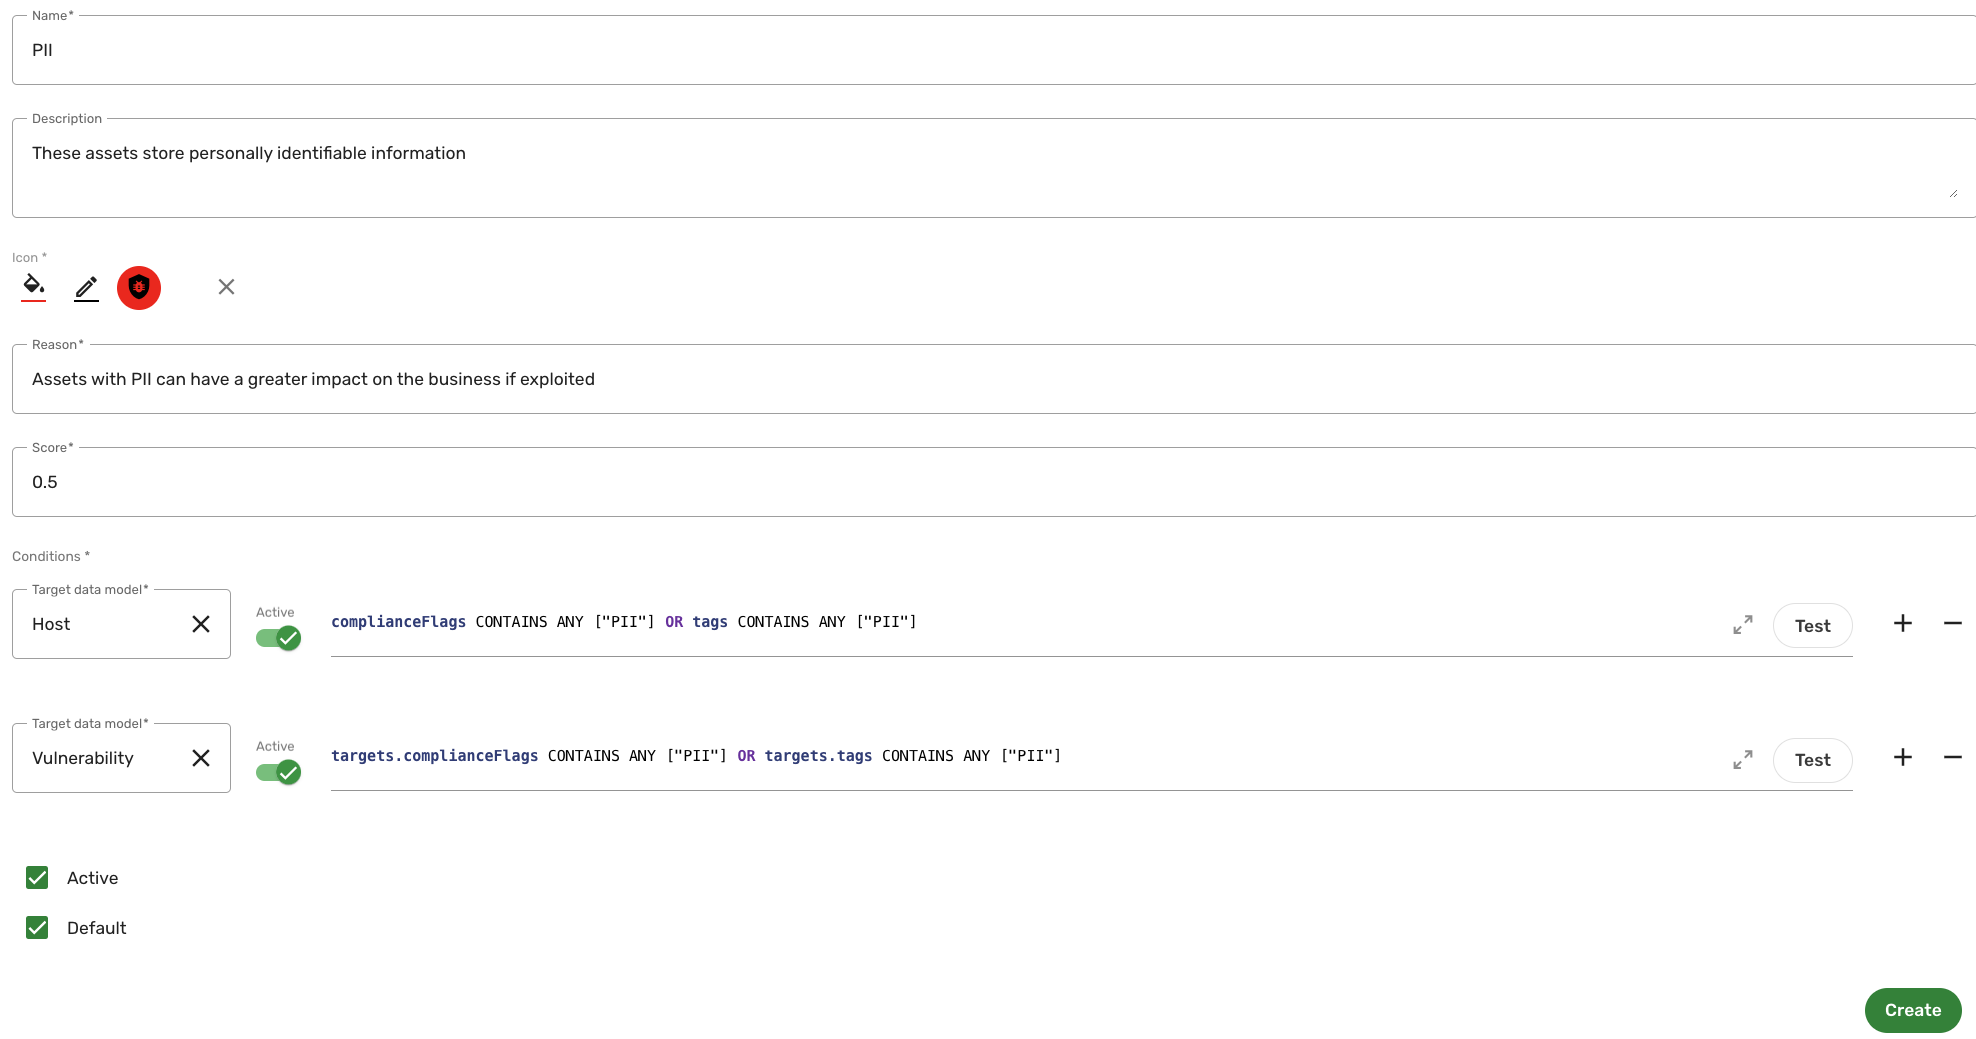
Click Create and fill in the fields as shown below:
-
Name: Type "PII (v1)" or "PII (v2)" as appropriate.
Postfixing the name with "(v1)" or "(v2)" helps differentiate between the original set of risk factors (v1) and the enhanced Brinqa Risk Intelligence integration (v2).
-
(Optional) Description: Provide a description of the risk factor. For example, "The asset stores personally identifiable information."
-
Icon: Set the background color to #dc2531, the icon color to #ffffff, and then select the Bug icon.
-
Reason: Provide a reason for the justification of the value being used to adjust the risk score of the assets or findings with PII. For example, "Assets with PII can have a greater impact on the business if exploited."
-
Score: Enter "0.5". This raises the base risk score of the dataset by 0.5.
-
Conditions: Specify the criteria to apply the risk factor.
-
Target data model: Select Host.
-
Active: Keep as is. Active is selected by default.
-
Condition: Enter
complianceFlags CONTAINS ANY ["PII"] OR tags CONTAINS ANY ["PII"]. This condition ensures that the risk factor is applied to all hosts with PII. -
Test condition: Click Test condition to see the results retrieved by the condition.
-
-
Click + and add another condition.
-
Target data model: Select Vulnerability.
-
Active: Keep as is. Active is selected by default.
-
Condition: Enter
targets.complianceFlags CONTAINS ANY ["PII"] OR targets.tags CONTAINS ANY ["PII"]. This condition ensures that the risk factor is also applied to all vulnerabilities with PII. -
Test: Click Test to see the results retrieved by the condition.
-
The following screenshot illustrates what the risk factor configuration may look like:
-
-
Click Create. The page reloads and the new risk factor displays. Since this risk factor targets the Host and Vulnerability data models, the PII risk factor displays on both the Host and Vulnerability data model pages.
-
If not there already, navigate to the Host data model page and click Flows.
-
Click Host compute flow, then Launch, and then click Launch again in the confirmation dialog. This starts the actions needed to apply the new risk factor to the data that meet the condition.
-
Navigate to the Vulnerability data model page and click Flows.
-
Click Vulnerability compute flow, then Launch. and then click Launch again in the confirmation dialog. This starts the actions needed to apply the new risk factor to the data that meet the condition.
-
Navigate to the Risk factor data model page and click Flows.
-
Click Risk factor compute flow, then Launch, and then click Launch again in the confirmation dialog.
-
Navigate to Inventory > Assets > All assets.
- You can also navigate to Findings since the risk factor applies to vulnerabilities with PII as well.
-
Click the Risk factors filter and select PII.
-
Click Apply.
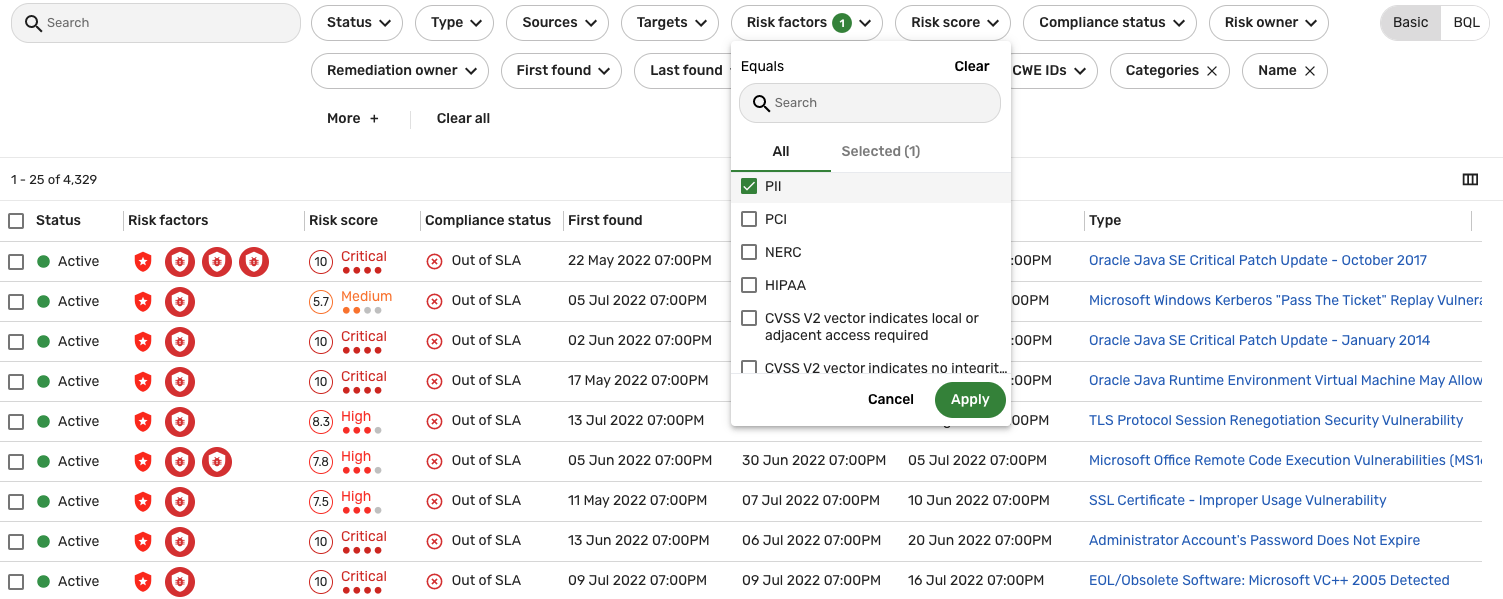
The list view refreshes and only displays the assets or findings with the specified risk factor. Hold the pointer over an entry in the list view and then click Details to view specific information pertaining to the asset or finding. For example, if you are in Findings, some of this information includes the active risk factors, the final risk score, the risk factor offset (the sum of the risk factor adjustments applied to the score), and the base risk score (the risk score before risk factors have been applied).