
ServiceNow
IT Service ManagementServiceNow is a cloud-based, IT service management tool that provides records for incidents, problems, and assets. You can bring application, asset, business service, device, group, incident and more data from ServiceNow into Brinqa and in turn, use this information to make more informed decisions about your risk management, thus strengthening your cybersecurity posture. You can also push the remediation tickets created in the Brinqa Platform to ServiceNow.
This document details the information you must provide for the connector to authenticate with ServiceNow and how to obtain that information from ServiceNow. See create a data integration for step-by-step instructions on setting up the integration.
Required connection settings
When setting up a data integration, select ServiceNow from the Connector dropdown. If you cannot find the connector in the dropdown, make sure that you have installed it first. You must provide the following information to authenticate ServiceNow with Brinqa:
-
ServiceNow URL: Your organization's ServiceNow Server URL. The default format is
https://<ServiceNowServerName>.service-now.com. -
Username and Password: The username and password associated with the ServiceNow user account, which must have permissions to access the ServiceNow API return data.
Create a ServiceNow user
For the ServiceNow connector to access the ServiceNow API, you must create a user account. To create a new ServiceNow user, follow these steps:
-
Log in to your organization's ServiceNow server as an administrator.
-
Navigate to All > User Administration > Users.
-
Click New.
-
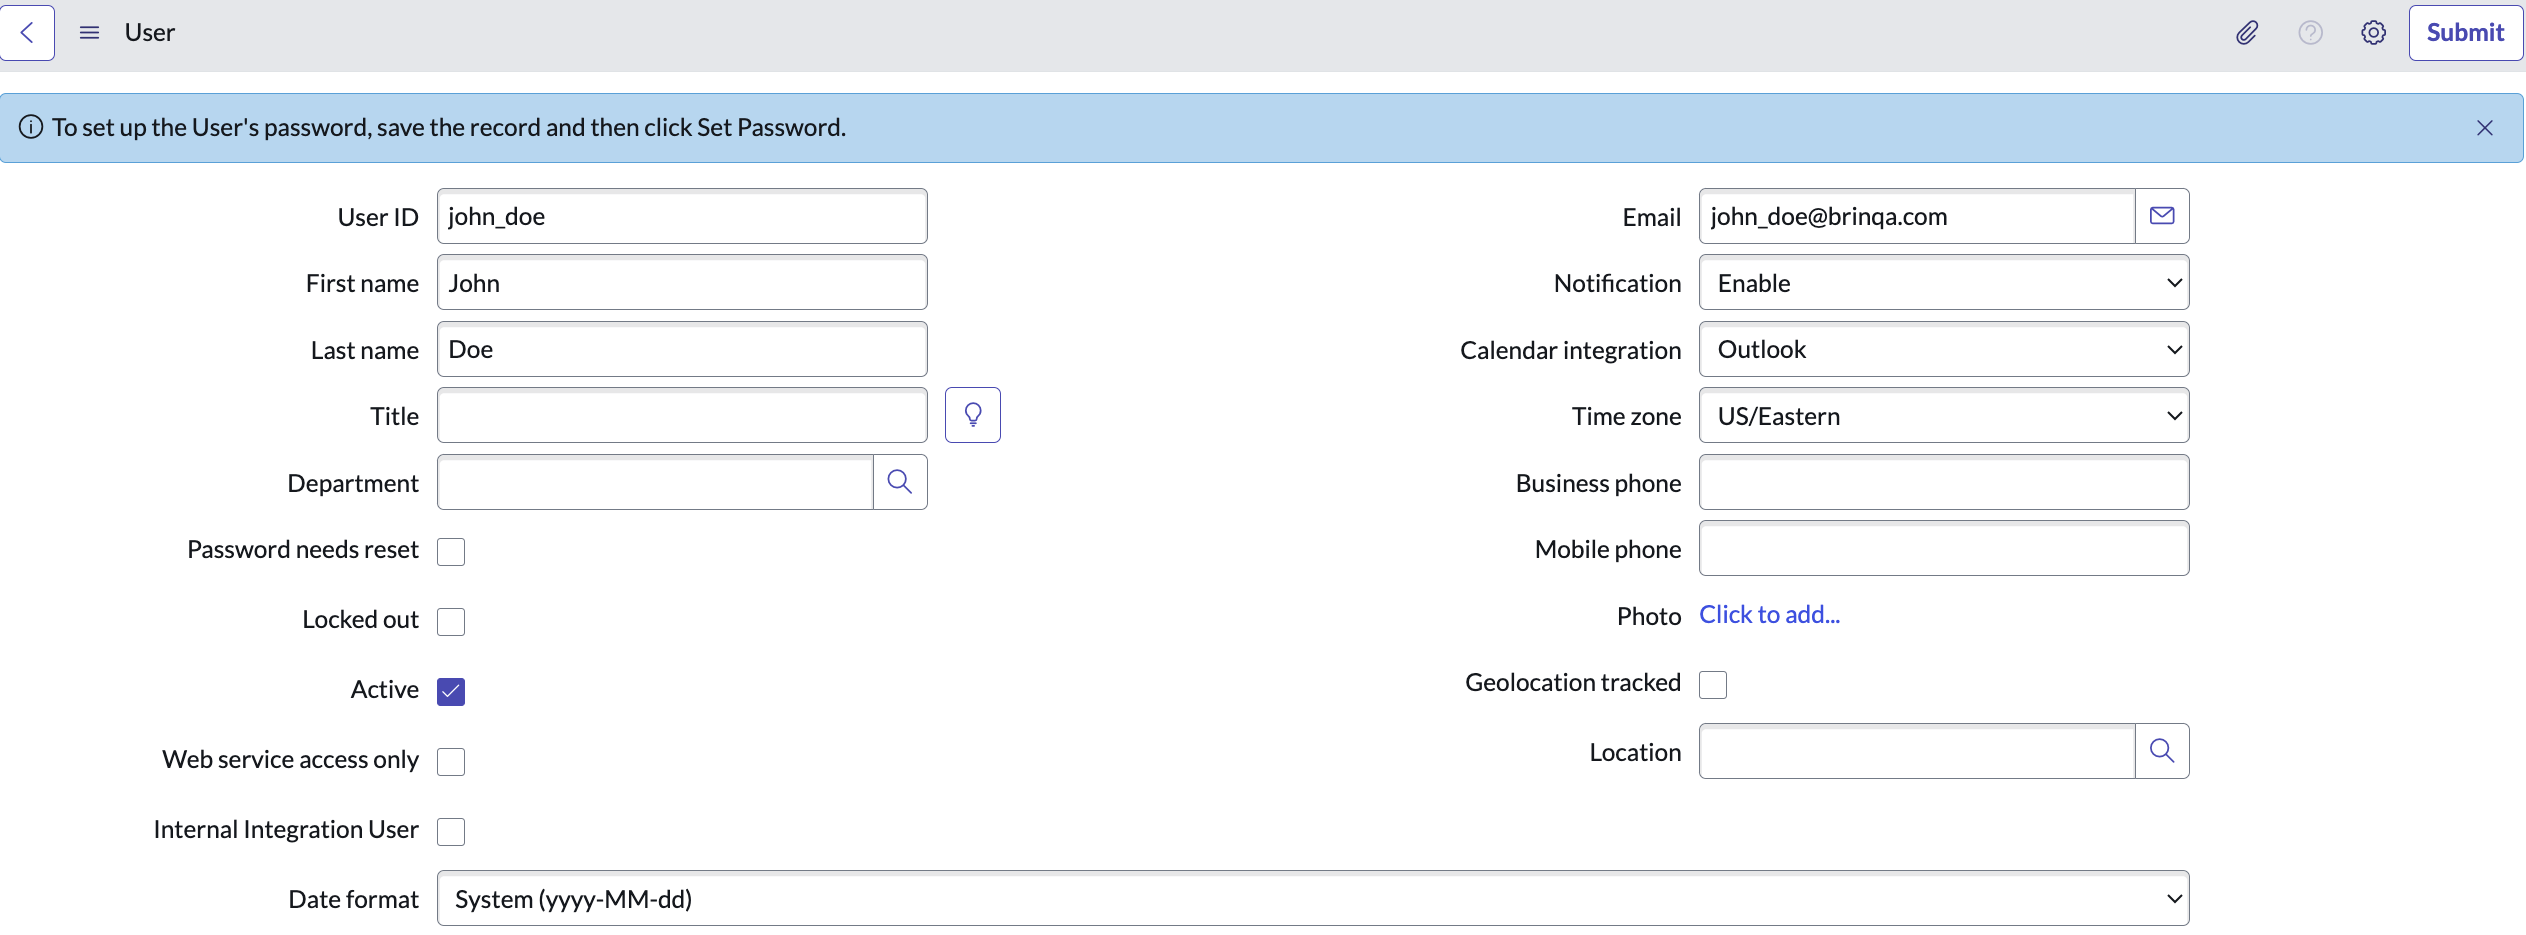
Provide a User ID, First name, and Last name for the new user, and ensure you select Active as well. Complete the other fields as desired.
-
Click Submit.
-
Locate the new user in the Users table, and click the user ID.
-
Click Set Password and generate a new password for the user. Take note of this password and provide it to the user accessing the account.
-
Click Close in the "Set Password" dialog, and then click Update.
Copy the User ID and the Password into the corresponding fields in the integration configuration.
If you do not have the permissions to create a new user, contact your ServiceNow administrator. For additional information, see ServiceNow documentation.
Assign the required roles and permissions
After you have created the ServiceNow user, you can assign the necessary roles to the user so that they have the proper permissions to retrieve data from the ServiceNow API. To assign roles to the user, follow these steps:
-
Locate the new user in the Users table and click the user ID.
-
Locate the Roles section on the page and click Edit.
-
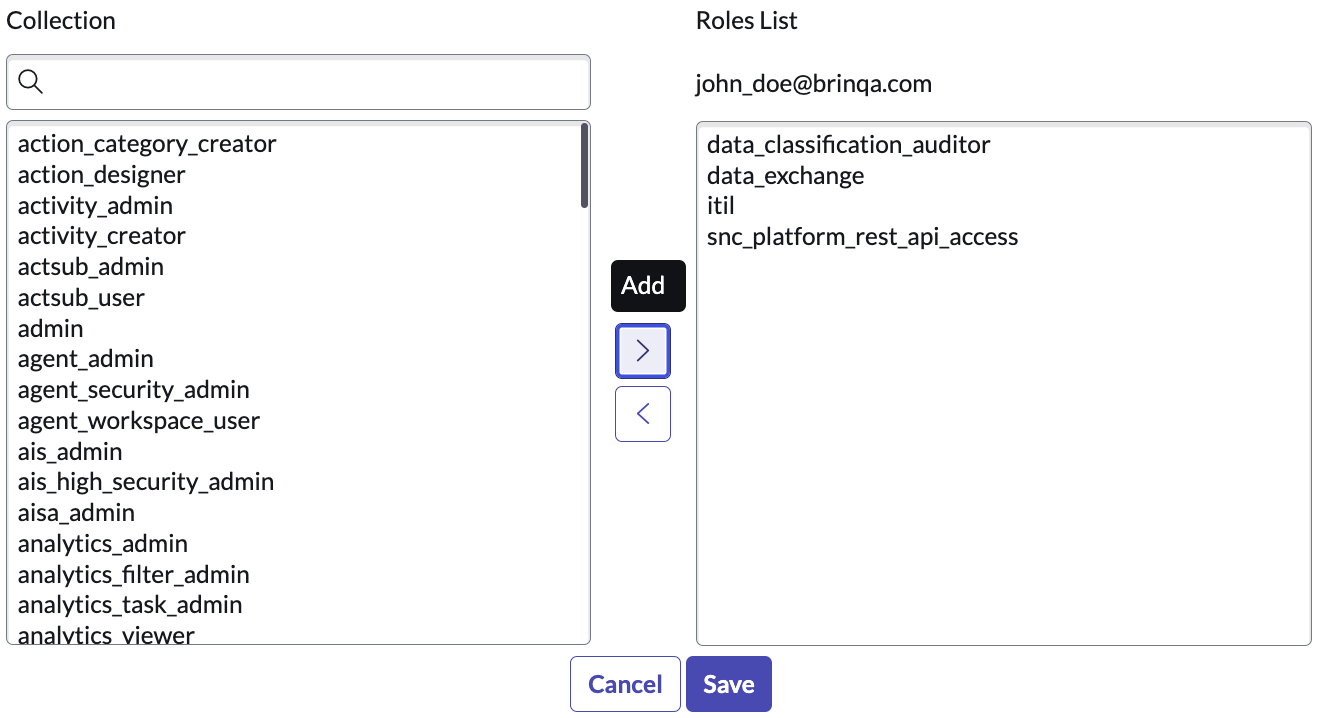
Under Collection, select the desired roles, and then click Add.
The user account must have the following roles to successfully retrieve your ServiceNow data and tables:
data_classification_auditordata_exchangeitilsnc_platform_rest_api_access
data_exchangeis a custom role that contains read permissions to the following tables:-
sys_dictionary*
-
sys_dictionary
-
sys_db_object*
-
sys_db_object
-
sys_glide_object*
-
sys_glide_object
sys_dictionary permissionsys_dictionaryis a required permission and is necessary for the ServiceNow connector to function properly, as it allows Brinqa to access and view your ServiceNow tables and retrieve the schema details in these tables from your ServiceNow instance.noteThe
*permissions grant access to both the table and all extensions of that table.
Your roles should resemble the following:
-
Click Save.
If you do not have the permissions to assign roles to users, contact your ServiceNow administrator. For additional information, see ServiceNow documentation about how to assign roles, create a new role, and base system roles.
(Optional) Obtain the client ID and client secret for OAuth2 authentication
The ServiceNow connector supports OAuth2 authentication using the Password grant type. If you want to use OAuth2 authentication, you must provide a client ID and client secret in addition to the ServiceNow username and password. To obtain the credentials, follow these steps:
-
Log in to your organization's ServiceNow server as an administrator.
-
Navigate to All > System OAuth > Application Registry.
-
Click New.
-
Click Create an OAuth API endpoint for external clients. A new page appears.
-
Provide a name for the OAuth2 client application, fill in the Client Secret field, and select Active. You can also leave the Client Secret field blank if you want the system to auto-generate one. Leave the other fields as is.
-
Click Submit.
You are taken back to the Application Registries page.
-
Click the name of the new OAuth2 client in the table.
-
Click Toggle Password Visibility next to the Client Secret field to reveal the secret.

Copy the Client ID and Client Secret values and paste them into the Client ID and Client secret fields in the integration configuration. Although you can return to this page to view the Client ID and Client secret, you should handle them with care by ensuring that they are stored in a secure location.
If you do not have the permissions to create the credentials for OAuth2 authentication, contact your ServiceNow administrator. For additional information, see ServiceNow documentation.
Additional settings
The ServiceNow connector contains additional options for specific configuration:
-
Client ID and Client secret: The client ID and client secret for OAuth2 access to ServiceNow. When specified, the ServiceNow connector uses OAuth2 authorization. If not specified, the ServiceNow connector reverts to basic authorization using the ServiceNow username and password provided. For additional information, see Obtain the client ID and client secret for OAuth2 authentication.
-
Additional tables: A comma-separated list of additional ServiceNow tables that you wish to include in addition to the tables the connector brings in by default, e.g.
problem,incident,change_request,sn_vul_vulnerability.-
By default, the ServiceNow connector brings in the following tables:
cmdb_ci_applcmdb_ci_servicecmdb_rel_cicmdb_ci_clustercmdb_ci_commcmdb_ci_computersys_user_groupsys_user_grmembercmn_locationcmdb_ci_msdcmdb_ci_netgearcmdb_ci_printercmdb_ci_servertasksys_usercmdb_ci_vm_instance
-
-
Page size: The maximum number of records to get per API request. The default setting is 1000. It is not recommended to go over 1000.
-
Parallel requests: The maximum number of parallel API requests. The default setting is 8.
-
Maximum retries: The maximum number of times that the integration attempts to connect to the ServiceNow API before giving up and reporting a failure. The default setting is 10.
-
Use cached schema: Select this option to allow Brinqa to use a previously stored version of the ServiceNow schema when connecting to ServiceNow. Rather than requesting the schema from ServiceNow each time a connection is established, this can speed up the connection process and reduce the load on ServiceNow.
Types of data to retrieve
The ServiceNow connector retrieves the following types of data from the ServiceNow tables through the ServiceNow Table API:
Table 1: Data retrieved from ServiceNow
| Connector Object | Required | ServiceNow Table |
|---|---|---|
| Application | No | cmdb_ci_appl |
| Business Service | No | cmdb_ci_service |
| CI Relationship | No | cmdb_rel_ci |
| Cluster | No | cmdb_ci_cluster |
| Communication Device | No | cmdb_ci_comm |
| Computer | No | cmdb_ci_computer |
| Group | No | sys_user_group |
| Group Member | No | sys_user_grmember |
| Hardware | No | cmdb_ci_hardware |
| Location | No | cmn_location |
| Mass Storage Device | No | cmdb_ci_msd |
| Network Gear | No | cmdb_ci_netgear |
| Printer | No | cmdb_ci_printer |
| Server | No | cmdb_ci_server |
| Task | No | task |
| User | No | sys_user |
| Virtual Machine Instance | No | cmdb_ci_vm_instance |
None of the connector objects in the above table are required. You can select tables based on your specific integration needs. You can also add additional ServiceNow tables, such as incident for ServiceNow incidents, to your integration in the additional settings section of the configuration.
Some ServiceNow objects and tables are mapped directly to data models in the Brinqa Platform. For example, Computer (cmdb_ci_computer) is mapped to Host and Incident (incident) is mapped to Ticket. For the other objects, you must define the mappings yourself. See Data Consolidation for additional information.
For detailed steps on how to view the data retrieved from ServiceNow in the Brinqa Platform, see How to view your data.
For additional information about ServiceNow tables, see ServiceNow documentation.
Computer to Host attribute mappings
The table below details the attribute mappings from the ServiceNow Computer object to the Host data model in Brinqa:
Table 2: Computer to Host attribute mappings
| Source Field Name | Maps to Attribute |
|---|---|
| categories | categories |
| fdqn | dnsNames, publicDnsName, privateDnsName |
| first_discovered | firstSeen |
| hostname | hostnames |
| ip_address | ipAddresses, publicIpAddresses, privateIpAddresses |
| last_discovered | lastSeen |
| mac_address | macAddresses |
| name | name |
| operational_status | status |
| os | operatingSystem |
| serial_number | serialNumber |
| short_description | description |
| sys_created_on | sourceCreatedDate |
| sys_updated_on | sourceLastModified |
| uid | uid |
Operation options
The ServiceNow connector supports the following operation options. See connector operation options for information about how to apply them.
Table 3: ServiceNow connector operation options
| Option | All Possible Values | Description | Example |
|---|---|---|---|
| lower_case_name | false | Retains the original case of names. By default, the ServiceNow connector converts all names to lowercase. | Key: lower_case_name Value: false. This key and value combination ensures that the original casing of names is preserved. |
| reference_fields | Any ServiceNow object reference field. | Retrieves the sys_ids for specified fields instead of their display values. | Key: reference_fields Value: location,assigned_to. This key and value combination retrieves the sys_ids for the location and assigned_to fields of the Computer object, instead of their display values. |
| query | Any ServiceNow query used to filter results | Specifies the query used to filter the results retrieved by the connector. You can use logical operators and conditions. | Key: query Value: =employee_number!=NULL&active=true. This key and value combination filters the results to only include records where the employee_number is not NULL and the active field is set to true. |
The operation options can be used in conjunction with any ServiceNow tables that are retrieved by the connector. For additional information, see ServiceNow documentation about reference fields and query parameters.
The option keys and values are case-sensitive as they are shown in this documentation.
APIs
The ServiceNow connector uses the ServiceNow Table API. Specifically, it uses the following endpoints:
Table 4: ServiceNow Table API endpoints
| Connector Object | API Endpoint |
|---|---|
| Application | GET /api/now/table/cmdb_ci_appl |
| Business Service | GET /api/now/table/cmdb_ci_service |
| CI Relationship | GET /api/now/table/cmdb_rel_ci |
| Cluster | GET /api/now/table/cmdb_ci_cluster |
| Communication Device | GET /api/now/table/cmdb_ci_comm |
| Computer | GET /api/now/table/cmdb_ci_computer |
| Group | GET /api/now/table/sys_user_group |
| Group Member | GET /api/now/table/sys_user_grmember |
| Hardware | GET /api/now/table/cmdb_ci_hardware |
| Location | GET /api/now/table/cmn_location |
| Mass Storage Device | GET /api/now/table/cmdb_ci_msd |
| Network Gear | GET /api/now/table/cmdb_ci_netgear |
| Printer | GET /api/now/table/cmdb_ci_printer |
| Server | GET /api/now/table/cmdb_ci_server |
| Task | GET /api/now/table/task |
| User | GET /api/now/table/sys_user |
| Virtual Machine Instance | GET /api/now/table/cmdb_ci_vm_instance |
Troubleshooting the ServiceNow connector
Here are some common error codes and their meanings that you might encounter while working with the ServiceNow connector and suggestions on how to resolve them:
Table 5: ServiceNow connector error codes
| Error Code or Problem | Suggestion |
|---|---|
| Forbidden Request | Indicates that the ServiceNow connector is configured with user credentials that lack the necessary permissions to access the ServiceNow API. Ensure that the user credentials used in the ServiceNow connector has the appropriate permissions to access the ServiceNow API and retrieve data. |
Illegal character in https://<ServiceNowServerName> | Typically occurs due to an illegal character in the ServiceNow URL. Double-check and correct the URL in the ServiceNow URL section of the configuration. |
| Table Not Found | The ServiceNow connector is trying to access a table in the ServiceNow instance that either doesn't exist or is incorrectly specified. Ensure the ServiceNow table name is correctly specified in the Additional tables section of the configuration. |
| Timeout Error | Typically occurs when the ServiceNow connector doesn't receive a response from the ServiceNow server within an expected time frame. This could be due to network latency, server overload, or other issues affecting response time. You can increase the Maximum retries value in the Additional settings section of the configuration to attempt to resolve this error. |
| Insufficient rights to query records | The ServiceNow connector hasn't been configured with valid user credentials, or the provided credentials are not being recognized by the ServiceNow instance. Double-check that the ServiceNow connector is configured correctly with valid user credentials. |
Changelog
The ServiceNow connector has undergone the following changes:
Table 6: ServiceNow connector changelog
| Version | Description | Date Published |
|---|---|---|
| 3.2.9 | Bug Fixes - Fixed an attribute type mismatch on date fields for the Computer and Server models where date values were not always parsed as timestamps. Migration Required - 'Computer': Date attributes (First Seen, Last Seen, Source Created Date, Source Last Modified) may contain string values instead of timestamps from previous syncs — Action: purge and re-sync - 'Server': Inherits the same date attribute fix from Computer — Action: purge and re-sync | June 9th, 2026 |
| 3.2.8 | Improvements Dependency Upgrades - Upgraded internal framework and model libraries to the latest stable versions for improved reliability, security patches, and alignment with the rest of the connector platform. No Migration | June 9th, 2026 |
| 3.2.7 | Added Hardware as a connector object, retrieving IP addresses (including both public and private IP addresses). | January 22nd, 2026 |
| 3.2.6 | - Enabled advanced logging for cURL requests. Please contact your Brinqa Support team for additional information or assistance. - Code cleanup and general maintenance. | August 13th, 2025 |
| 3.2.5 | Fixed an issue where the connector did not retrieve all user records from the sys_user table in ServiceNow. | January 6th, 2025 |
| 3.2.4 | - Fixed a data mismatch issue where some attribute types were incorrectly converted to strings instead of their respective data types. - Corrected the conversion for decimal attributes to ensure proper handling. - Added a new float data type to support attributes that require floating-point precision. | July 15th, 2024 |
| 3.2.3 | Added a new operation option: lower_case_name. | March 13th, 2024 |
| 3.2.2 | More updates to handle ServiceNow reference field types correctly. | October 6th, 2023 |
| 3.2.1 | Fixed an issue where field display value was not displaying properly. | October 5th, 2023 |
| 3.2.0 | - Added a new operation option:reference_fields. This option supports obtaining ServiceNow reference fields as sys_id rather than their display values. - Removed the display_value operation option from the Computer object. - Added methods to convert text from ServiceNow to their appropriate types, such as Boolean, Integer, or Long. (The ServiceNow API returns all field values as text or string.) | October 1st, 2023 |
| 3.1.4 | Added a check for null values. | September 13th, 2023 |
| 3.1.3 | Improved its handling of dates when creating and updating records. | July 21st, 2023 |
| 3.1.2 | Normalized names for data consolidation. | June 23rd, 2023 |
| 3.1.1 | The connector now provides better help messages. | June 19th, 2023 |
| 3.1.0 | - Reduced the ServiceNow source tables to only the most commonly-used ones. - Improved performance by loading all table schema in parallel. - Added additional connector objects, such as Group, Group Member, Mass Storage Device, and Server. | June 14th, 2023 |
| 3.0.6 | Code cleanup and general maintenance. | June 9th, 2023 |
| 3.0.5 | Added FQDN as a source attribute and mapped it to DNS names. | June 8th, 2023 |
| 3.0.4 | Displayed all date and time values in the Date format. | May 11th, 2023 |
| 3.0.3 | The connector now uses consistent values for the HOSTNAME attribute on the Computer object. | February 14th, 2023 |
| 3.0.2 | The connector now normalizes MAC addresses on the Computer object. | February 9th, 2023 |
| 3.0.1 | Code cleanup and general maintenance. | February 2nd, 2023 |
| 3.0.0 | Initial Integration+ release. | January 22nd, 2023 |