Remediation Requests
This article details the different remediation requests you can create in the Brinqa Platform and the request workflow.
What are remediation requests?
In vulnerability management, an exception is a decision to deviate from the standard remediation process for a known vulnerability. Exceptions are typically granted when the vulnerability is a false positive, implementing the mitigation needs more time, or remediation of the vulnerability is deemed infeasible.
As you adopt the Brinqa Platform to prioritize vulnerabilities and accelerate the remediation process, you can create remediation requests to handle exceptions. You can select the relevant findings and create requests for time-based extensions, false positives, or risk acceptance. The following table provides more details on each type of request:
| Request Name | Description |
|---|---|
| Exception | This request asks for a time-based extension on the selected findings. You need to specify the extension date by which the findings must be resolved. |
| False positive | This request nominates the selected findings to be false positives. |
| Remediation validation | This request seeks to mark a finding as fixed. For example, if a pen test doesn't provide a status, this request can help provide one. |
| Risk acceptance | This request accepts the risks associated with the selected findings. |
The remediation request workflow
In the Brinqa Platform, a remediation request workflow involves a submitter and a reviewer. Submitters can create requests or submit requests created by other authorized personnel. Reviewers evaluate the selected findings and approve or reject the requests. The designated users receive notifications when they need to perform an action and they must provide a justification for each action they take. All activities in the workflow are audited for compliance purposes. The following diagram illustrates the process:
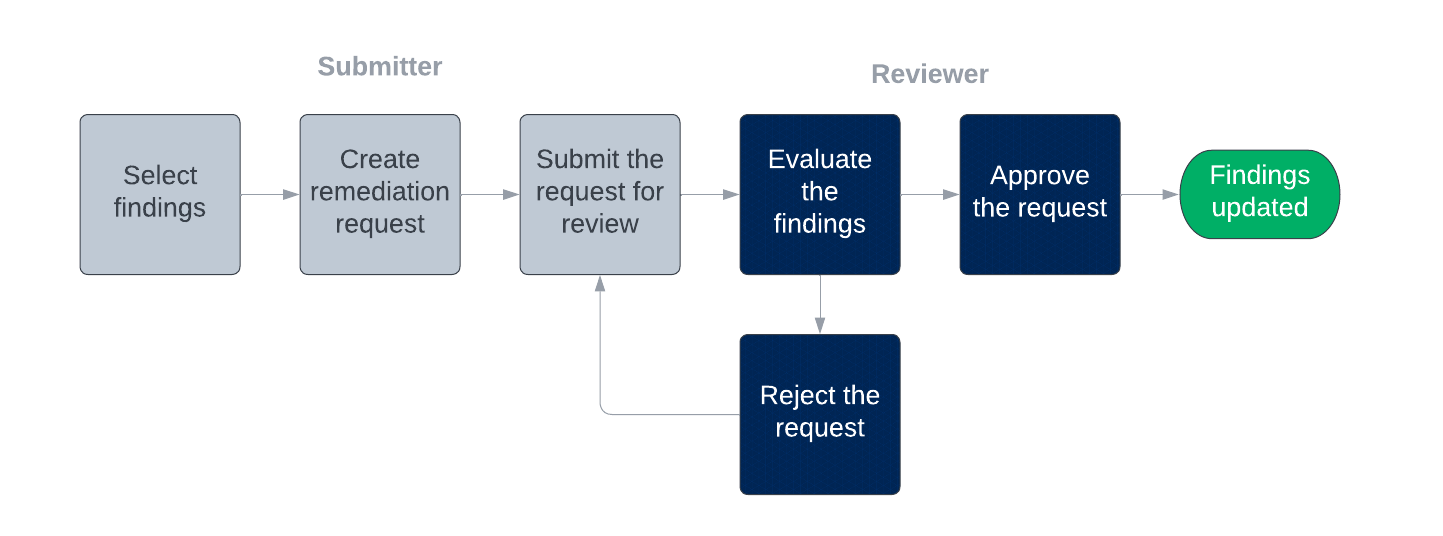
Figure 1. The remediation request workflow
Submitters and Reviewers must be able to view the findings included in a remediation request. By default, only system administrators can view all the findings, but you can provide users of the Risk analyst role access to the relevant findings by creating risk owners and remediation owners clusters, respectively.
Risk owners cannot delegate approval of remediation requests to another risk owner.
Create remediation requests
There are two methods to create remediation requests:
-
Select the findings manually. The list of findings in the request does not change if you select the findings manually.
-
Use automations. The list of findings in the request updates automatically each time the automation runs.
The benefit of using automations is that you can set the automation to run at a schedule or as part of the data orchestration, so that the Brinqa Query Language (BQL) query you specify to identify the findings is executed every time the automation runs, keeping the findings in the request dynamic and up-to-date.
Create a request manually
To create a request manually, follow these steps:
-
Navigate to Findings.
-
Click the checkbox next to the findings you want to include in the request.
-
Click the Select an action drop-down to choose the request you want to create.
The Select an action option doesn't display until you select at least one finding.
-
A request form displays with the following fields:
-
Name: Enter a name for your request.
-
Description: Provide a description for the request.
-
Justification: Provide an explanation for the request.
-
Evidence: Provide evidence to support your explanation.
-
Exception request date: Select the extension or expiration date for the exception. This field is only available in exception requests.
-
Submitter: Select the user designated to be the submitter. The user must possess the Risk analyst role, and you can restrict their access to specific findings by assigning them to a risk owners cluster.
-
Reviewer: Select the user designated to be the reviewer. The user must possess the Risk analyst role, and you can restrict their access to specific findings by assigning them to a remediation owners cluster.
-
-
Click Submit.
When creating a remediation request, you may encounter the following error message:
"The flow cannot be launched because it does not pass the condition. All items did not meet the condition."
This error occurs when some of the findings selected have already been included in another request and therefore cannot be added to the new one. To proceed, ensure that only findings not already tied to an existing request are selected for the new exception request.
Create a request through automation
To create a request through automation, follow these steps:
-
Navigate to Automation.
-
Click Create.
-
Provide a title and description for the automation.
-
Type a BQL query to limit your findings.
-
Click Test to ensure that your query is valid and returns the expected data.
-
In Actions, select the request you want to create and fill out the following fields:
-
Name: Enter a name for your request.
-
Description: Provide a description for the request.
-
Justification: Provide an explanation for the request.
-
Evidence: Provide evidence to support your explanation.
-
Exception request date: Select the extension or expiration date for the exception. This field is only available in exception requests.
-
Submitter: Select the user designated to be the submitter. The user must possess the Risk analyst role, and you can restrict their access to specific findings by assigning them to a risk owners cluster.
-
Reviewer: Select the user designated to be the reviewer. The user must possess the Risk analyst role, and you can restrict their access to specific findings by assigning them to a remediation owners cluster.
-
-
In Run, select a method to run the automation:
-
Manual: Select this option if you don't want any changes to the list of findings in the request. You can manually run the automation once.
-
Schedule: Select a schedule from the drop-down.
-
Orchestration: Select After consolidation from the drop-down.
If you want the list to be updated automatically, select a schedule for the automation to run or set it to run as part of your data orchestration.
-
-
Click Create.
The Automation page reloads and your new automation appears in the list of available automations.
Review remediation requests
After a request has been created, submitters can revise the requests before submitting. The reviewer specified in the request receives an email after a request has been submitted. Reviewers then evaluate the findings and offer an approval or rejection. Submitters have the option to re-submit a request after it has been rejected. Submitters can also cancel requests. If the request has already been approved when it is canceled, the findings are removed from the request and their status are reverted.
Navigate to Remediation > Requests to view the requests. Users can only see the requests that they have access to, including the following:
-
Requests that you have created
-
Requests on findings that you can view
-
Requests of which you are a reviewer
Hold the pointer over the request and click Details to launch the detailed view of the request. The designated owners can perform actions through the buttons on the upper-right corner. Click the Comments & Attachments tab to view the justification (as comments) for each action and the Activity tab for the timeline.
Common questions about remediation requests
What happens to the associated findings when the request is approved?
The behavior varies based on the type of request. Expand the sections below to find out the specifics:
Exception
When an exception request is approved, the status of the associated findings change as follows:
- The status of active findings become "Risk temporarily accepted".
- The status of fixed findings remain unchanged.
Their Extended due date attribute is set to the date specified in the exception request and the compliance status is evaluated against the extended due date instead.
If a finding is resolved before the exception expires, the status of the finding changes to "Fixed".
Findings with the risk-temporarily-accepted status still count as active risks for reports and tickets.
False positive
When a false positive request is approved, the status of the associated findings change to "False positive", and their compliance status is always "No SLA required”
Findings with the false-positive status do not count as active risks for reports or tickets.
Remediation validation
When a remediation validation request is approved, the status of the associated findings change to "Fixed", and their compliance status is evaluated against the due date.
Risk acceptance
When a risk acceptance request is approved, the status of the associated findings change to "Risk accepted", and their compliance status is always "No SLA required”.
Findings with the risk-accepted status still count as active risks for reports, but they cannot generate tickets because they are considered closed.
This may affect the risk score of the host that the finding resides on. Specifically, if the risk-accepted finding is the only critical finding that the host has, the host's risk level might be downgraded. This downgrade occurs because a host's risk score is based on the highest risk score of its open findings. Since this single critical finding now has a status of "Closed," the host's risk score would be adjusted to reflect the next highest risk score among its open findings.
What happens to the associated findings when the request is expired?
The behavior varies based on the type of request. Expand the sections below to find out the specifics:
Exception
If the associated findings are not resolved by the extended due date, and the exception request has been approved, the request becomes expired and the status of the findings are reverted. The extended due date entries are removed, and the compliance status is re-evaluated against the original due date. You must re-submit the request if it still applies.
Exception requests that haven't been approved do not expire, even if the extended due date specified in the request has elapsed.
False positive
False positive requests do not expire but they can be canceled, whereupon the findings' status are reverted.
Remediation validation
Remediation validation requests do not expire but they can be canceled, whereupon the findings' status are reverted.
Risk acceptance
Risk acceptance requests do not expire but they can be canceled, whereupon the findings' status are reverted.
What happens to the associated findings when the request is reopened?
If needed, you may reopen expired exception requests, whereupon the status of the associated findings are reverted. The requests can then be submitted for review and go through the remediation request workflow again.
Approved requests can be canceled, but not reopened.
How are canceled and modified automation requests handled?
When a request created from an automation is canceled, the workflow restarts and continues processing the eligible findings that match the criteria of the BQL query. If the BQL query for an automation associated with a remediation request is modified, the request continues to use the original query. To apply a new query, you must create a new remediation request.
How do manual and automated requests interact?
If a finding associated with a manual exception request matches the criteria of an automation that generates exception requests, that finding is added into the automated request upon the next run of the automation and retains its status from the manual request. If the finding is in multiple approved requests, there's a hierarchy of which status it will give. The order of precedence is as follows: false positive > remediation validation > risk acceptance > risk temporarily accepted.
How are new findings handled in automated exception requests?
The new finding(s) is added to the existing request as long as the automation associated with that request runs again (i.e., it's set to run on a schedule or as part of orchestration). If that automation isn't run, nothing happens with that finding.
Can you modify the exception date for an approved exception request?
No, the exception date cannot be modified after an exception request has been approved. The exception either expires, and you can change the date during the review process, or you can cancel the exception and create a new request.
Can you submit and approve risk acceptance against risk-temporarily-accepted findings
Manual submissions and approvals of risk acceptance against risk-temporarily-accepted findings are not possible. However, this can be done through automation.