SmartFlows
SmartFlows enable the visual, low- or no-code construction of workflows that filter data models and perform automation actions on the results. Complex, decision-based automations can be built in a single canvas without extensive knowledge of BQL or Flow JSON schemas. A SmartFlow can run manually, on a schedule, as part of orchestration, or in response to an incoming webhook.
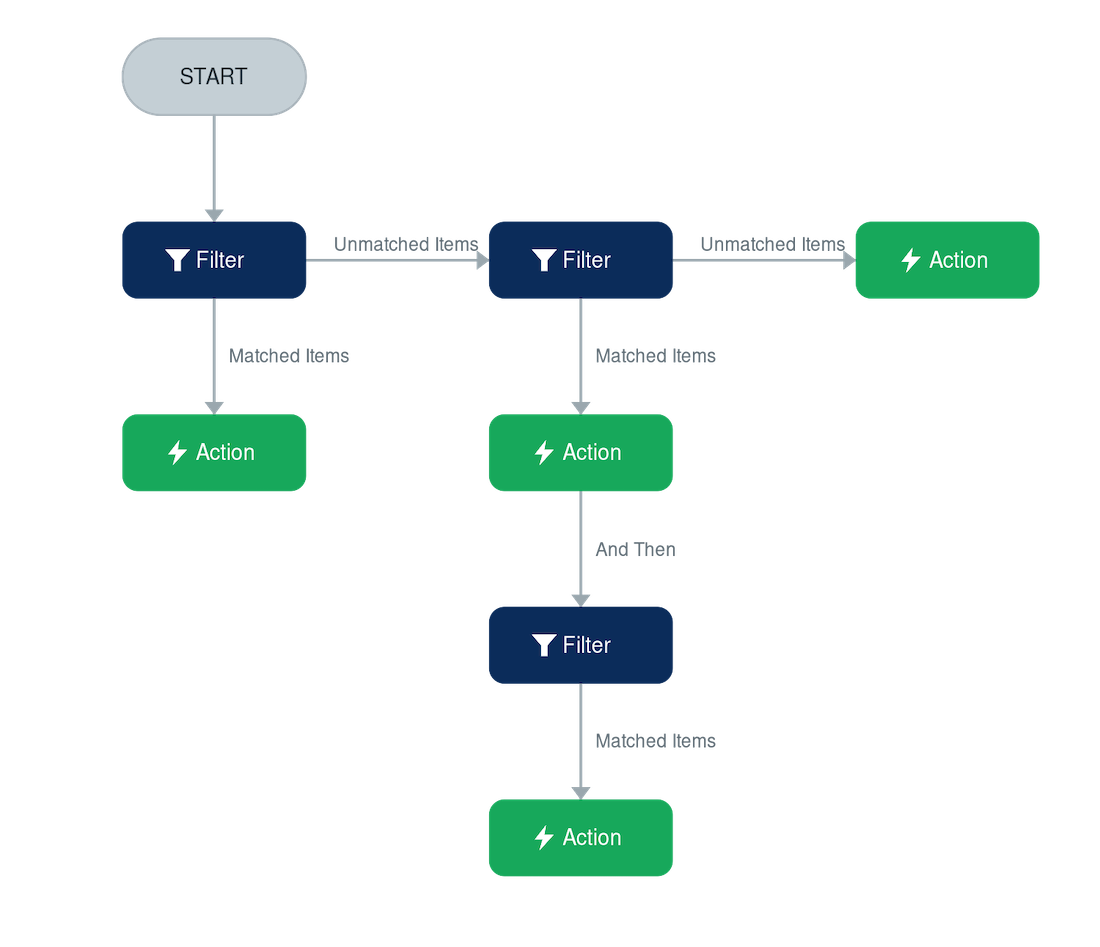
How SmartFlows work
A SmartFlow is a graph of connected nodes that data flows through, starting from a fixed START node. There are two kinds of nodes:
- Filter nodes issue a BQL query against the incoming set of records and split the results into those that match the query and those that do not match.
- Action nodes run an automation action, such as sending a notification or creating a ticket, against the records passed into them.
You build a SmartFlow by dragging nodes onto the canvas and connecting them into an execution path. Filter nodes let you branch the path based on whether records match, so a single SmartFlow can make different decisions for different subsets of your data.
Users with the Configurator or System Administrator role can create, edit, run, and delete SmartFlows from the Automation area.
SmartFlow modes
When you create a SmartFlow, you choose one of two modes. The mode determines whether the SmartFlow is scoped to a data model.
- Filters and Actions: The SmartFlow is scoped to a single data model. It begins by loading every record of that data model, and it must start with a Filter node. Use this mode when your automation acts on a set of records, for example, "find all critical vulnerabilities older than 30 days and create tickets for them."
- Actions Only: The SmartFlow is not scoped to a data model and contains no Filter nodes. It begins with an Action node and runs actions that do not operate on a dataset, for example, sending a scheduled notification. Use this mode when the automation is not about querying records.
You can switch a SmartFlow between modes while editing, but not in a way that would produce an invalid flow. You cannot switch from Filters and Actions to Actions Only while Filter nodes exist, and you cannot switch from Actions Only to Filters and Actions while the flow starts with an Action node. Resolve the conflicting nodes first.
Create a SmartFlow
-
Navigate to Automation and open the SmartFlows list.
-
Click Create and complete the steps in the dialog:
-
Information: Provide a Title (required) and an optional Description, then choose a Mode (Filters and Actions or Actions Only).
-
Data Model: Select the data model the SmartFlow will query. This step appears only in Filters and Actions mode.
-
Run: Choose how the SmartFlow is triggered. See Triggers.
-
External invocation: Optionally enable webhook triggering. See Trigger a SmartFlow with a webhook.
-
-
Click Create.
A blank canvas is presented with the START node in place, ready for you to add nodes.
The SmartFlow canvas
The canvas is where you assemble and connect nodes.
The START node
The START node is where execution begins. It is fixed in the upper-left of the canvas and displays the SmartFlow's title, its data model (in Filters and Actions mode), and its trigger type. Drag from the connector on the bottom of the START node to the first node of your flow.
In Filters and Actions mode, the first node must be a Filter. In Actions Only mode, the first node is an Action.
Add and connect nodes
Add nodes to the canvas in either of two ways:
- Drag a Filter or Action node from the toolbar onto the canvas.
- Click a node type in the toolbar to drop it onto the canvas.
To connect nodes, drag from a node's output connector to the input connector of the next node. Each connection is saved as you make it.
In Actions Only mode the Filter node is unavailable in the toolbar, because a SmartFlow with no data model cannot filter records.
Canvas controls
The toolbar provides controls for working with the canvas:
- Zoom: Zoom the canvas between 50% and 150%. Click the zoom level to choose a preset (50%, 75%, 100%, 125%, or 150%).
- Minimap and pan: Navigate large flows.
- Always show filter BQL: When enabled in the Options section, every Filter node displays its BQL on the canvas instead of its title.
If a node is not valid, a warning badge appears on that node, and flow-level problems are flagged on the START node. Hover over the badge to see what needs to be corrected.
Filter nodes
A Filter node issues a BQL query against the set of records passed in from the previous node (or, for the first node, every record of the SmartFlow's data model). The query splits the incoming records into two outputs:
- Matched Items (bottom connector): records that match the query.
- Unmatched Items (right connector): records that do not match the query. Connecting this output is optional.
Define a filter's query with the Visual Query Builder or by editing BQL directly, switching between the two as needed. Click Test to preview the records the filter returns without running the whole SmartFlow. When a filter is downstream of other filters, the preview reflects the combined result of the whole chain up to that node.
Adjust the Query Timeout to limit how long the query is permitted to run. The default is 300 seconds and the range is 60 to 1800 seconds.
If you provide a title for a Filter node, that title is displayed on the canvas; otherwise the node shows its BQL (or you can force BQL display for all filters with Always show filter BQL).
Almost all BQL is supported inside a Filter node, including WITH, UNWIND, OPTIONAL, CASE, RETURN, ORDER BY, LIMIT, SKIP, subqueries, and functions. Two constructs are not permitted and will block publishing: the USING OLTP/USING OLAP execution hint and REFRESH.
Action nodes
An Action node runs an automation action against the records passed into it, then passes that same set of records to the next node through its And then connector.
When you configure an Action node, the Select Action picker lists the actions that are available to SmartFlows and applicable to the SmartFlow's data model (actions marked as applying to all data models always appear). Selecting an action reveals its configuration fields, which vary by action. Provide an optional title for the node; if you do not, the selected action's name is displayed on the canvas instead.
Notification actions
SmartFlows include actions for sending notifications. These actions can render a reusable notification template with data from the SmartFlow, so the message includes resolved values instead of raw placeholders.
- Send Email: Select a notification template and configure recipients by username, role, data model attribute, or plain email address. You can optionally group by attributes (one email per group) and sort by attributes.
- Send Slack notification and Send Teams notification: Provide either a selected notification template or an inline message typed directly on the action, but not both. Only templates that have a plain-text body can be selected. For Teams, the webhook URL must be a Microsoft Teams Workflows webhook.
- Send Dashboard Snapshot: Choose how the snapshot PDF is delivered: Secure Link (an authenticated download link, the default) or PDF Attachment (the PDF attached to the email, useful for recipients who do not have a Brinqa account).
Notification templates are created and managed separately from SmartFlows. A template requires a Title, Name, and Subject; its Data model is optional, and setting it unlocks the record-based dynamic variables and the repeating table and section builders. If a template does have a data model, it can only be selected by a SmartFlow that uses the same data model. See Notification templates for the full authoring reference.
Get a Slack or Teams webhook URL
The Send Slack notification and Send Teams notification actions deliver messages to an incoming webhook that you create in Slack or Microsoft Teams. Create the webhook in the destination platform, then paste its URL into the action's webhook URL field.
A webhook URL lets anyone who has it post to the target channel. Treat it as a secret: do not share it or commit it to source control, and re-create it if it is exposed.
Slack
-
Go to the Slack apps page and sign in to your workspace.
-
Click Create New App, choose From scratch, enter a name (for example,
Brinqa Notifications), select the workspace, and click Create App. -
In the app's settings, under Features, select Incoming Webhooks, and turn Activate Incoming Webhooks on.
-
Click Add New Webhook to Workspace.
-
Choose the channel the SmartFlow should post to and click Allow.
-
Copy the generated Webhook URL. It begins with
https://hooks.slack.com/services/. -
In the SmartFlow's Send Slack notification action, paste the URL into the webhook URL field.
Microsoft Teams
Microsoft has retired the older Office 365 connector webhooks, so Teams webhooks are now created with the Workflows (Power Automate) app. The SmartFlow accepts only a Workflows webhook URL, which is hosted on logic.azure.com or powerplatform.com.
-
In Microsoft Teams, go to the channel the SmartFlow should post to, or open the chat the SmartFlow should post to.
-
For a channel, select the channel's More options (...) menu and choose Workflows. For a chat, open the Workflows app from the left rail and browse its templates.
-
Select the template that matches your destination: Post to a channel when a webhook request is received or Post to a chat when a webhook request is received.
-
Confirm the connection (sign in if prompted), then click Next.
-
Confirm the destination (the Team and Channel, or the chat) to post to, then click Add workflow.
-
Copy the generated HTTP POST URL. This is the webhook URL.
-
Click Done, then, in the SmartFlow's Send Teams notification action, paste the URL into the webhook URL field.
Chaining and branching
The power of SmartFlows comes from chaining nodes together to form an execution path. Because Filter nodes have both a matched and an unmatched output, a single SmartFlow can take different actions for different subsets of records.
Aside from the first-node rule for each mode, there is no restriction on how nodes are chained. Filters can connect to other Filters or to Actions through either the matched or unmatched output, and Actions can connect to further Actions or to Filters. When filters are chained, the Brinqa Platform automatically composes their queries so that each downstream filter operates on exactly the records handed to it by the nodes upstream.
Each node currently passes its output to a single next node, and there is no dedicated error or failure branch. Route decisions are made with Filter nodes' matched and unmatched outputs.
Drafts and publishing
Editing a SmartFlow creates a draft that is separate from the currently published version. This lets you change a live SmartFlow without affecting its behavior until you are ready.
- While a draft exists, editing the SmartFlow opens the draft. The draft does not run in orchestration.
- Click Publish to save the draft as the live version. Publishing removes the draft.
- Click Discard Draft to abandon your changes and return to the published version.
- Use the Draft / Published toggle to switch between editing the draft and viewing the published version. The published view is read-only.
You can publish only when the SmartFlow is valid: it must have a first node, every Filter must contain valid BQL that matches the data model, every Action must have its required fields filled in, and no Filter may use a disallowed BQL construct. Problems are surfaced as badges on the affected nodes.
Run a SmartFlow
After publishing, click Run to start the SmartFlow manually, and confirm when prompted. Click Cancel to stop a run in progress. The Run and Cancel controls reflect the current run state, including runs started elsewhere, without requiring a page reload.
A SmartFlow cannot be run until it has been published, and a SmartFlow cannot be launched again while an instance of it is already running.
The SmartFlows list shows each SmartFlow's active state, last run status, and next scheduled run. Open a SmartFlow to see its run history, and use View Logs to review a run's details. To investigate a failed run, copy its Transaction ID and search for it in the Application Event Log, as described in Troubleshooting automations.
Triggers
A SmartFlow can be triggered in the following ways, configured in the Run step:
- Manual: Launch the SmartFlow from the SmartFlows list or the canvas.
- Schedule: Run the SmartFlow on a recurring schedule, for example every day at a set time.
- Orchestration: Run the SmartFlow as part of data orchestration. Select the orchestration stage the SmartFlow runs in (for example, after consolidation or after data storage) and the execution mode (within orchestration, or in parallel with it). The stages are the same as those used by automations; see Create an automation for a description of each stage.
A SmartFlow can also be triggered by an external webhook, independently of the trigger above. See the next section.
Trigger a SmartFlow with a webhook
You can allow an external system to trigger a SmartFlow by sending it a webhook. Webhook triggering is enabled per SmartFlow in the External invocation step and does not require a data model, so it works with both SmartFlow modes.
When you enable webhook triggering, the Brinqa Platform provides:
- A webhook endpoint URL for the SmartFlow.
- A signing secret, shown once at the time it is created. Copy and store it securely. You can rotate the secret at any time, which invalidates the previous one.
Each incoming request must be authenticated with an API token and signed with the signing secret. The signature is an HMAC-SHA256 of the request's timestamp, a one-time value (nonce), and the raw body, computed with the signing secret as the key. The secret itself is never sent with the request. The Brinqa Platform verifies the signature and rejects requests that are unsigned, tampered with, replayed, or too old, so that no run is started for an invalid request. Sending the same request more than once with the same transaction identifier runs the SmartFlow only once.
A successful webhook launches the SmartFlow and returns a reference to the resulting run, which the caller can poll for status. The webhook payload is passed to the SmartFlow as input and recorded in the run log along with the trigger details.
Webhooks are the supported way to trigger a SmartFlow from an external system in this release. A general-purpose triggering API is not available.