
Microsoft Defender for Cloud
Microsoft Azure- Overview
- Setup
- Data & mappings
- Operations & API
- Changelog
The Microsoft Defender for Cloud connector integrates with Microsoft Azure to synchronize cloud security posture and workload-protection data. It queries Azure Resource Graph (ARG) and the Azure Resource Manager (ARM) REST APIs to pull security alerts, security assessments (recommendations) and their metadata, vulnerability sub-assessments, and the cloud assets they apply to (resources, hosts, subscriptions, and resource groups). For identity-targeting findings it optionally enriches records with account details from Microsoft Graph.
The connector maps this data into Brinqa's UDM as Alerts, Violations, Vulnerabilities, their corresponding definitions, and CloudResource/Host assets.
Data retrieved from Microsoft Defender for Cloud
| Connector Object | Required | Maps to Data Model |
|---|---|---|
| Alert / Alert Definition | Yes | Alert |
| Violation (Assessment) | Yes | Violation |
| Violation Definition (AssessmentMetadata) | Yes | Violation Definition |
| Vulnerability / Vulnerability Definition (SubAssessment) | Yes | Vulnerability |
| Cloud Resource (Asset) | Yes | Cloud Resource |
| Host | Yes | Host |
| Subscription | Yes | Cloud Resource |
| Resource Group | Yes | — |
Model relationships
For detailed steps on how to view the data retrieved from Microsoft Defender for Cloud in the Brinqa Platform, see How to view your data.
Connection settings
When setting up a data integration, select Microsoft Defender for Cloud from the Connector dropdown and provide the following:
| Setting | Required | Default | Description |
|---|---|---|---|
| API URL | Yes | https://management.azure.com | Defender for Cloud API URL |
| Login URL | Yes | https://login.microsoftonline.com | Microsoft Azure authentication URL |
| Client ID | Yes | — | The service principal client ID. The client ID is generated during service principal registration. |
| Client secret | No | — | The service principal client secret or password. |
| Private key | No | — | The service principal certificate credential's private key and public key. |
| Tenant ID | Yes | — | The tenant or domain the credential is authorized for. The tenant ID is generated during service principal registration. |
| Subscription ID | No | — | (Optional) Comma-separated list of Subscription IDs. If none is specified, the connector will automatically discover all subscriptions for the tenant. |
| Subscription Batch Size | No | 5 | (Optional) Maximum number of subscriptions bundled into a single Azure Resource Graph query. Default is 5 |
| Page Size | No | 1000 | (Optional) Maximum number of rows returned per Azure Resource Graph page ($top). Default is 1000 |
Authentication
The connector authenticates a service principal using the OAuth 2.0 client-credentials flow. It supports two mutually exclusive credential types — provide either a client secret or a private key (certificate), not both. When a private key is configured, the connector uses certificate-based authentication (via the Azure Identity SDK) and ignores the client secret; otherwise it falls back to the client secret. The chosen credential is used for both the Azure Resource Manager token and the Microsoft Graph token.
| Field | Required | Description |
|---|---|---|
| Client ID | Yes | The service principal client ID, generated during service principal registration. |
| Tenant ID | Yes | The tenant or domain the credential is authorized for, generated during service principal registration. |
| Client secret | One of secret / key | The service principal client secret or password. |
| Private key | One of secret / key | The service principal certificate credential's private key and public key (PEM). See below. |
Endpoint
| Method | URL |
|---|---|
POST | https://login.microsoftonline.com/{tenantId}/oauth2/v2.0/token |
Request Headers
| Header | Value |
|---|---|
Content-Type | application/x-www-form-urlencoded |
Request Body (client-secret flow)
grant_type=client_credentials
client_id=<clientId>
client_secret=<clientSecret>
scope=https://management.azure.com/.default   (or https://graph.microsoft.com/.default for Graph)
Sample Response
{
  "token_type": "Bearer",
  "expires_in": 3599,
  "ext_expires_in": 3599,
  "access_token": "eyJ0eXAiOiJKV1QiLCJhbGciOi..."
}
Response Fields
| Field | Type | Description |
|---|---|---|
token_type | string | Always Bearer. |
expires_in | number | Token lifetime in seconds. |
ext_expires_in | number | Extended token lifetime in seconds. |
access_token | string | The bearer token used on subsequent API calls. |
Usage
Once authenticated, all subsequent API requests include the bearer token:
Authorization: Bearer <access_token>
The connector acquires two separately-scoped tokens with the same credential: one for https://management.azure.com/.default (ARG + ARM REST) and one for https://graph.microsoft.com/.default (account enrichment).
Key and Certificate Generation
-
Generate the private key and certificate in a terminal:
# Generate private keyopenssl genpkey -algorithm RSA -out private_key.pem# Generate certificate signing request (enter the requested information at the prompts)openssl req -new -key private_key.pem -out csr.pem# Generate self-signed certificateopenssl x509 -req -in csr.pem -signkey private_key.pem -out certificate.pem -
Upload
certificate.pemin the Azure portal. -
Pass
private_key.pemandcertificate.pemtogether in the Private key input field (concatenated, as shown):-----BEGIN PRIVATE KEY-----<private_key.pem>-----END PRIVATE KEY----------BEGIN CERTIFICATE-----<certificate.pem>-----END CERTIFICATE-----
Required API Permissions
The connector's service principal needs two separate permission grants — one per API:
| API | Permission | Required for | How to grant |
|---|---|---|---|
Azure Resource Manager (management.azure.com) | Reader role on each subscription to be synced | All ARG queries (assessments, sub-assessments, alerts, resources, etc.) | Azure portal → Subscriptions → {sub} → Access control (IAM) → Add role assignment → Reader → assign to the connector's service principal |
Microsoft Graph (graph.microsoft.com) | User.Read.All (application permission) | Account enrichment on Vulnerabilities for identity-targeting sub-assessments — populates USER_PRINCIPAL_NAME, ACCOUNT_GIVEN_NAME, ACCOUNT_EMAIL | Azure portal → Microsoft Entra ID → App registrations → {SP} → API permissions → Add a permission → Microsoft Graph → Application permissions → User.Read.All → Grant admin consent |
If
User.Read.Allis not granted, identity-targeting Vulnerabilities still sync —IDENTITY_IDandVIOLATIONSpopulate, butUSER_PRINCIPAL_NAME/ACCOUNT_GIVEN_NAME/ACCOUNT_EMAILstay empty. The connector logs one warning per sync (HTTP 403 withAuthorization_RequestDenied) and continues; the sync does not fail.
How to obtain Microsoft Defender for Cloud credentials
Register a Microsoft Azure application
You must create a new application for the Microsoft Defender for Cloud connector to authenticate with Azure AD and access the Azure REST API. To register an application in your Azure AD tenant, follow these steps:
-
Log in to your Microsoft Azure Portal as an administrator.
-
Navigate to and click Microsoft Entra ID.
-
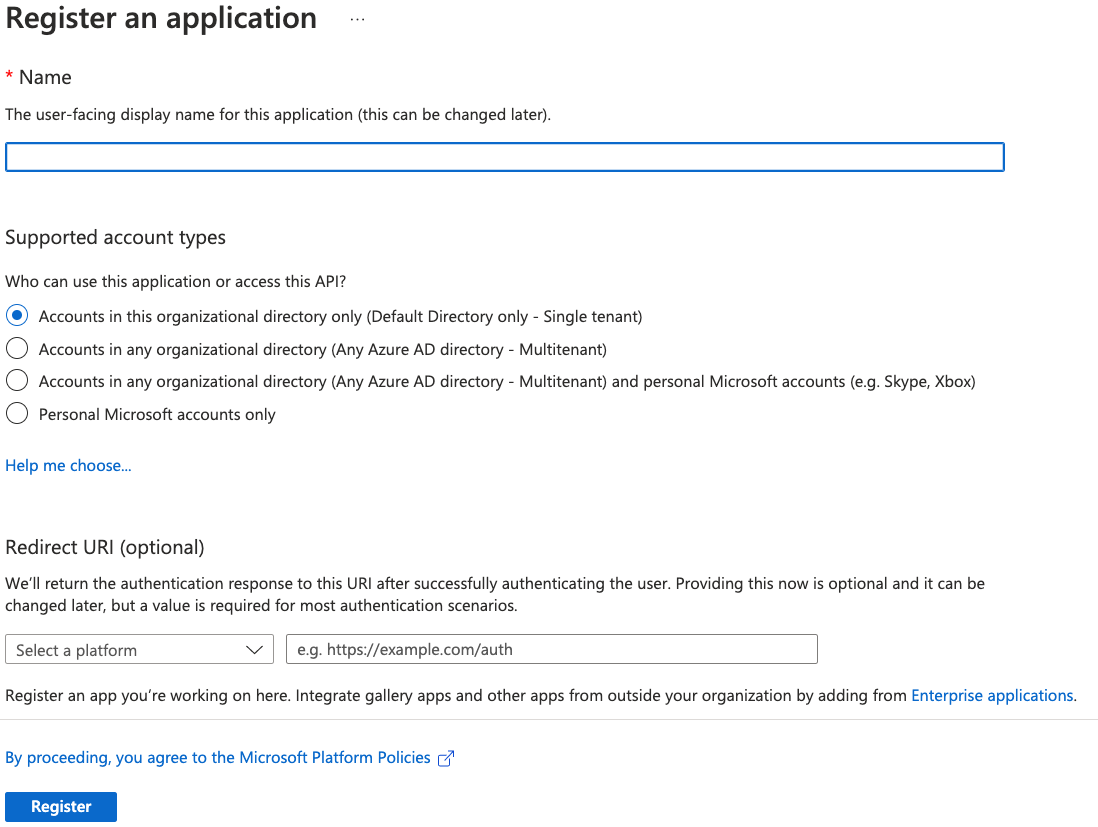
On the left-hand side of the page, click App registrations, and then click New registration.
-
Give your new application a name, select the supported account types, and provide an optional Redirect URI. If you do not have a redirect URI, you can leave the field as is.
-
Click Register.
Note: For additional details about registering an application in Azure AD and creating a service principal, see Microsoft Azure documentation.
Obtain Microsoft Azure credentials
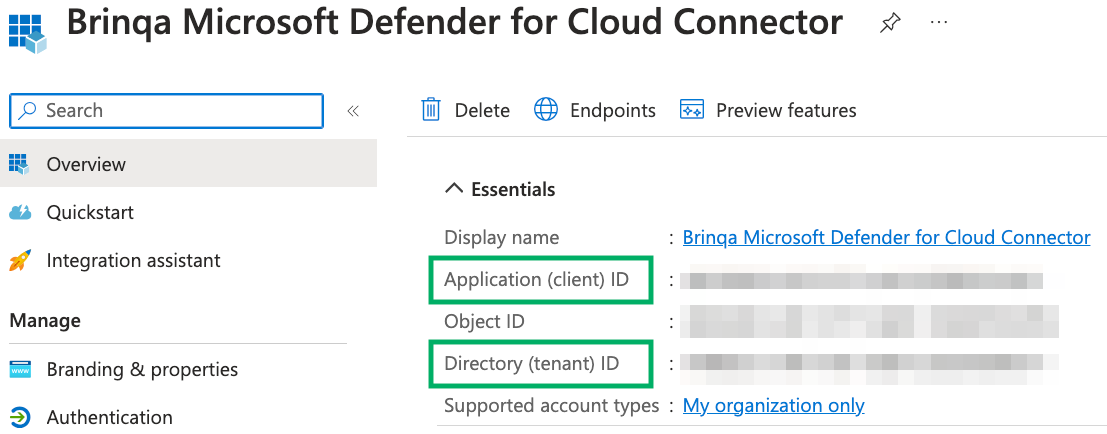
After you have created your new Microsoft Azure application, your client and tenant ID display. Copy the Application (client) ID and Directory (tenant) ID as shown below:
To obtain your client secret and optional subscription ID, follow these steps:
-
Click Certificates & secrets and then click New client secret.
-
Provide a description, set an expiry date, and then click Add.
The new client secret displays. You cannot view the client secret again. There is both a Value and Secret ID. The Value field is needed for authentication. Copy the Value field and save it to a secure location.

Note: For additional details about obtaining your Microsoft Azure credentials, see Microsoft documentation.
Generate a private key and certificate
If you want to use certificate-based authentication instead of a client secret, follow these steps to generate a private key and self-signed certificate:
-
Generate the private key and certificate in a terminal:
# Generate private keyopenssl genpkey -algorithm RSA -out private_key.pem# Generate certificate signing request (enter the requested information at the prompts)openssl req -new -key private_key.pem -out csr.pem# Generate self-signed certificateopenssl x509 -req -in csr.pem -signkey private_key.pem -out certificate.pem -
Upload
certificate.pemin the Azure portal under Certificates & secrets for your registered application. -
Paste the contents of
private_key.pemandcertificate.pemtogether (concatenated in the order shown below) into the Private key field in the integration configuration:-----BEGIN PRIVATE KEY-----<private_key.pem contents>-----END PRIVATE KEY----------BEGIN CERTIFICATE-----<certificate.pem contents>-----END CERTIFICATE-----
Assign permissions
After you have created your new Microsoft Azure application and obtained the authentication credentials, you must assign the required permissions for the application to access your data. To do so, follow these steps:
-
Navigate to the applicable Azure subscription.
-
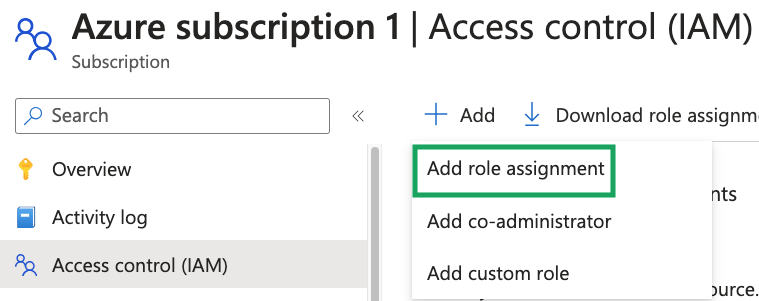
Click Access control (IAM), click Add, and then click Add role assignment from the dropdown.
-
In the Job function roles tab, search for and select the Reader role.
- The Reader role allows you to view all resources, but does not grant permission to modify them.
-
Click Next.
-
In the Members tab, click the User, group, or service principal option.
-
Click Select members, search for and click the application you registered earlier, and then click Select.
-
Navigate to the Review + assign tab and click Review + assign.
Note: If you do not have permissions to assign roles, contact your Azure administrator. For additional information, see Microsoft documentation.
(Optional) Grant Microsoft Graph permission for account enrichment
The connector can optionally enrich identity-targeting Vulnerability records with user details from Microsoft Graph (user principal name, given name, and email). This requires an additional application permission:
-
In the Microsoft Azure Portal, navigate to Microsoft Entra ID.
-
Click App registrations and select the application you registered earlier.
-
Click API permissions, then Add a permission.
-
Select Microsoft Graph, then Application permissions.
-
Search for and select User.Read.All, then click Add permissions.
-
Click Grant admin consent and confirm.
Note: If User.Read.All is not granted, identity-targeting Vulnerabilities still sync — IDENTITY_ID and VIOLATIONS populate, but USER_PRINCIPAL_NAME, ACCOUNT_GIVEN_NAME, and ACCOUNT_EMAIL remain empty. The connector logs one warning per sync and continues without failing.
(Optional) Create a management group for multiple subscriptions
If you have multiple Azure subscriptions, you can organize them into a single management group to uniformly set access controls. To do so, follow these steps:
-
Log in to your Microsoft Azure Portal as an administrator.
-
Search for "Management groups" in the search box and click Management groups.
-
Click Create, provide a management group ID and display name, and then click Submit.
-
On the Management groups page, click the name of the new management group.
-
Click Add subscription, select the Azure subscriptions you want to add to the management group, and then click Save.
-
Click Access control (IAM), click Add, and then click Add role assignment from the dropdown.
-
Search for and select the role you want to assign to the management group.
-
Click Next.
-
In the Members tab, click the User, group, or service principal option.
-
Click Select members, search for and click the application you registered earlier, or any relevant members who require this role, and then click Select.
-
Navigate to the Review + assign tab and click Review + assign.
Note: If you do not have permissions to create management groups, contact your Azure administrator. For additional information, see Microsoft documentation.
Attribute mappings
Expand the sections below to view the mappings between the source and the Brinqa data model attributes:
Alert / Alert Definition
| Source Field Name | SDM Attribute |
|---|---|
| Alert | SYS_ID |
| Alert | ASSOCIATED_RESOURCE |
| Alert | STATE |
| Alert | START_TIME |
| Alert | END_TIME |
| Alert/AlertDefinition | TITLE |
| AlertDefinition | DESCRIPTION |
| AlertDefinition | REMEDIATION |
| AlertDefinition | REPORTED_SEVERITY |
| — | VENDOR_NAME |
| — | COMPROMISED_ENTITY |
| — | ADDITIONAL_DATA |
| — | IS_INCIDENT |
| — | PROCESSING_TIME |
| — | ALERT_NAME |
| — | ALERT_URI |
| — | ALERT_TYPE |
| — | INTENT |
| — | PRODUCT_COMPONENT_NAME |
| — | PRODUCT_NAME |
Violation (Assessment)
| Source Field Name | SDM Attribute |
|---|---|
| Violation | SYS_ID |
| Violation | TITLE |
| Violation | STATUS_CODE |
| Violation | TARGET |
| — | SUBSCRIPTION_ID |
| — | STATUS_CAUSE |
| — | STATUS_DESCRIPTION |
| — | ADDITIONAL_DATA |
Violation Definition (AssessmentMetadata)
| Source Field Name | SDM Attribute |
|---|---|
| ViolationDefinition | SYS_ID |
| ViolationDefinition | NAME |
| ViolationDefinition | DESCRIPTION |
| ViolationDefinition | REMEDIATION |
| ViolationDefinition | SEVERITY |
| ViolationDefinition | CATEGORIES |
| — | ASSESSMENT_TYPE |
| — | POLICY_ID |
| — | USER_IMPACT |
| — | IMPLEMENTATION_EFFORT |
| — | PREVIEW |
| — | THREATS |
| — | CLOUD_PROVIDERS |
| — | MANAGEMENT_PROVIDER |
| — | PARTNER_NAME |
| — | PRODUCT_NAME |
| — | PROVIDER_ID |
| — | SECURITY_ISSUE |
| — | TACTICS |
| — | TECHNIQUES |
Vulnerability / Vulnerability Definition (SubAssessment)
| Source Field Name | SDM Attribute |
|---|---|
| Vulnerability | SYS_ID |
| Vulnerability | TIME_GENERATED |
| Vulnerability | TARGET |
| Vulnerability | STATUS_CODE |
| Vulnerability | LAST_REPORT_SCAN_TIME |
| Vulnerability | RESULTS |
| Vulnerability | IDENTITY_ID |
| Vulnerability | USER_PRINCIPAL_NAME |
| Vulnerability | ACCOUNT_GIVEN_NAME |
| Vulnerability | ACCOUNT_EMAIL |
| Vulnerability | VIOLATIONS |
| Vulnerability/VulnerabilityDefinition | TITLE |
| VulnerabilityDefinition | SEVERITY |
| VulnerabilityDefinition | DESCRIPTION |
| VulnerabilityDefinition | PATCHABLE |
| VulnerabilityDefinition | CATEGORY |
| VulnerabilityDefinition | SOLUTION |
| VulnerabilityDefinition | CVE_IDS |
| VulnerabilityDefinition | CPE_RECORDS |
| VulnerabilityDefinition | CVSS_V3_BASE_SCORE |
| VulnerabilityDefinition | CVSS_V2_BASE_SCORE |
| VulnerabilityDefinition | CVSS_V3_VECTOR |
| VulnerabilityDefinition | CVSS_V2_VECTOR |
| VulnerabilityDefinition | CWE_ID |
| VulnerabilityDefinition | FIXED_VERSION |
| VulnerabilityDefinition | PUBLISHED_DATE |
| VulnerabilityDefinition | REFERENCES |
| VulnerabilityDefinition | LAST_MODIFIED_DATE |
| VulnerabilityDefinition | EXPLOITS |
| VulnerabilityDefinition | EXPLOITABILITY |
| VulnerabilityDefinition | ZERO_DAY |
| — | STATUS_CAUSE |
| — | STATUS_DESCRIPTION |
| — | SUBSCRIPTION_ID |
| — | CVSS_V4_BASE_SCORE |
| — | CVSS_V4_VECTOR |
| — | IMPACT |
Cloud Resource (Asset)
| Source Field Name | SDM Attribute |
|---|---|
| CloudResource | SYS_ID |
| CloudResource | RESOURCE_ID |
| CloudResource | SUBSCRIPTION_ID |
| CloudResource | RESOURCE_NAME |
| CloudResource | RESOURCE_TYPE |
| CloudResource | CREATED_TIME |
| CloudResource | CHANGED_TIME |
| CloudResource | TAGS |
| CloudResource | STATUS |
| — | SKU_NAME |
| — | SKU_CAPACITY |
| — | SKU_FAMILY |
| — | SKU_MODEL |
| — | SKU_SIZE |
| — | SKU_TIER |
| — | KIND |
| — | LOCATION |
| — | IDENTITY_PRINCIPAL_ID |
| — | IDENTITY_TENANT_ID |
| — | IDENTITY_TYPE |
| — | PLAN_NAME |
| — | PLAN_PRODUCT |
| — | PLAN_PUBLISHER |
| — | PLAN_VERSION |
| — | PROVISIONING_STATE |
Host
| Source Field Name | SDM Attribute |
|---|---|
| Host | SYS_ID |
| Host | RESOURCE_NAME |
| Host | RESOURCE_ID |
| Host | SUBSCRIPTION_ID |
| Host | CREATED_TIME |
| Host | CHANGED_TIME |
| Host | TAGS |
| Host | CATEGORIES |
| Host | STATUS |
| — | RESOURCE_TYPE |
| — | PROVISIONING_STATE |
| — | SKU_NAME |
| — | SKU_CAPACITY |
| — | SKU_FAMILY |
| — | SKU_MODEL |
| — | SKU_SIZE |
| — | SKU_TIER |
| — | KIND |
| — | LOCATION |
| — | IDENTITY_PRINCIPAL_ID |
| — | IDENTITY_TENANT_ID |
| — | IDENTITY_TYPE |
| — | PLAN_NAME |
| — | PLAN_PRODUCT |
| — | PLAN_PUBLISHER |
| — | PLAN_VERSION |
Subscription
| Source Field Name | SDM Attribute |
|---|---|
| CloudResource | SYS_ID |
| CloudResource | NAME |
| CloudResource | STATUS |
| CloudResource | TAGS |
| CloudResource | CATEGORIES |
Resource Group
| Source Field Name | SDM Attribute |
|---|---|
| Local variable | type |
| Local variable | properties |
| Location | location |
| Name | name |
| Tags | tags |
| Uid | id |
Operations & API
Expand each connector object to see its operation options, delta-sync behavior, and the API it uses. See connector operation options for how to apply operation options (keys and values are case-sensitive).
Alert / Alert Definition
Operation options
This object does not support any operation options.
Delta sync
Not supported. The connector performs a full sync of Alert / Alert Definition on every run and applies no incremental date filter.
API
- Type: REST — Azure Resource Graph (ARG) · Endpoint:
POST https://management.azure.com/providers/Microsoft.ResourceGraph/resources?api-version=2022-10-01
Violation (Assessment)
Operation options
This object does not support any operation options.
Delta sync
Not supported. The connector performs a full sync of Violation (Assessment) on every run and applies no incremental date filter.
API
- Type: REST — Azure Resource Graph (ARG) · Endpoint:
POST https://management.azure.com/providers/Microsoft.ResourceGraph/resources?api-version=2022-10-01
Violation Definition (AssessmentMetadata)
Operation options
This object does not support any operation options.
Delta sync
Not supported. The connector performs a full sync of Violation Definition (AssessmentMetadata) on every run and applies no incremental date filter.
API
- Type: REST — Azure Resource Manager (ARM). Assessment metadata is not indexed by Azure Resource Graph, so it is read directly from the Security provider. · Endpoint:
GET https://management.azure.com/providers/Microsoft.Security/assessmentMetadata?api-version=2021-06-01
Vulnerability / Vulnerability Definition (SubAssessment)
Operation options
This object does not support any operation options.
Delta sync
Not supported. The connector performs a full sync of Vulnerability / Vulnerability Definition (SubAssessment) on every run and applies no incremental date filter.
API
- Type: REST — Azure Resource Graph (ARG). Identity-targeting sub-assessments are additionally enriched from Microsoft Graph (
GET https://graph.microsoft.com/v1.0/users/{identityId}). · Endpoint:POST https://management.azure.com/providers/Microsoft.ResourceGraph/resources?api-version=2022-10-01
Cloud Resource (Asset)
Operation options
This object does not support any operation options.
Delta sync
Not supported. The connector performs a full sync of Cloud Resource (Asset) on every run and applies no incremental date filter.
API
- Type: REST — Azure Resource Graph (ARG) · Endpoint:
POST https://management.azure.com/providers/Microsoft.ResourceGraph/resources?api-version=2022-10-01
Host
Operation options
This object does not support any operation options.
Delta sync
Not supported. The connector performs a full sync of Host on every run and applies no incremental date filter.
API
- Type: REST — Azure Resource Graph (ARG) · Endpoint:
POST https://management.azure.com/providers/Microsoft.ResourceGraph/resources?api-version=2022-10-01
Subscription
Operation options
This object does not support any operation options.
Delta sync
Not supported. The connector performs a full sync of Subscription on every run and applies no incremental date filter.
API
- Type: REST — Azure Resource Graph (ARG) · Endpoint:
POST https://management.azure.com/providers/Microsoft.ResourceGraph/resources?api-version=2022-10-01
Resource Group
Operation options
This object does not support any operation options.
Delta sync
Not supported. The connector performs a full sync of Resource Group on every run and applies no incremental date filter.
API
- Type: REST — Azure Resource Graph (ARG) · Endpoint:
POST https://management.azure.com/providers/Microsoft.ResourceGraph/resources?api-version=2022-10-01
Changelog
The Microsoft Defender for Cloud connector has undergone the following changes:
| Version | Description | Migration Steps |
|---|---|---|
| 3.5.10 | Bug Fixes - Vulnerability Definition sync no longer fails on very long finding titles — Vulnerability findings from Defender for DevOps / GitHub Advanced Security can carry an entire vulnerability writeup as their title. Because the title was used directly as the Vulnerability Definition identifier, these oversized values exceeded the database's indexable-property size limit and caused the entire Vulnerability Definition sync step to fail (and, with it, recurring sync errors). The identifier is now derived from a compact, deterministic hash of the title, so it always stays within the limit; the full, readable title is retained in the Name and a new Display name attribute on both the Vulnerability and Vulnerability Definition, and each Vulnerability continues to link to its definition. | • Vulnerability / Vulnerability Definition: The Vulnerability Definition identifier (UID) changed — it is now a hash of the finding title — and the matching Vulnerability→Definition link key changed accordingly. Because the UID changed, a re-sync alone is not enough — Action: purge the old Vulnerability Definition data and re-sync the connector to fetch fresh data, so records are re-keyed and relinked correctly. |
| 3.5.9 | New Features - Configurable subscription batch size — A new Subscription Batch Size configuration field controls how many subscriptions are included in each Azure Resource Graph batch query. The default is 5 (unchanged from previous behaviour). - Configurable page size — A new Page Size configuration field sets the $top value for Azure Resource Graph queries, capping the number of rows returned per page. The default is 1000. | N/A |
| 3.5.8 | Bug Fixes - Missing Subscription ID on Host and Cloud Resource — The Subscription ID attribute was not being properly declared on Host and Cloud Resource models. The attribute definition has been corrected so the Subscription ID is consistently available on all resource-type models. Improvements - Subscription identifier normalized — Subscription records now use the subscription GUID (e.g., <subscription_id>) as their UID instead of the full Azure Resource Manager path (/subscriptions/<subscription_id>). This aligns Subscription identifiers with the format used across other Defender for Cloud models and simplifies cross-referencing with other Azure data sources. - Attribute title casing standardized — Several attribute display titles (e.g., Identity Principal ID, Identity Tenant ID, Policy ID) were updated to use consistent capitalization. | • Subscription: The Subscription UID was changed from the fully qualified ARM resource path to the subscription GUID — Action: purge the old Subscription data and re-sync the connector so Subscription records are re-keyed with the new identifier. |
| 3.5.7 | No changes in this release. | N/A |
| 3.5.6 | New Features - Certificate-based authentication — The connector can now authenticate its service principal with a certificate credential instead of a client secret. Provide either a client secret or a private key (PEM-encoded private key plus certificate) — the two are mutually exclusive. When a private key is configured, the connector uses certificate-based authentication for both the Azure Resource Manager and Microsoft Graph tokens and ignores the client secret; otherwise it falls back to the client secret. The client secret is no longer a required field. Documentation - Defender-Cloud.md now documents the two authentication options and includes step-by-step OpenSSL instructions for generating the private key and certificate and the expected PEM input format. | N/A |
| 3.5.5 | No changes in this release. | N/A |
| 3.5.4 | No changes in this release. | N/A |
| 3.5.3 | New Features - Account enrichment for identity violations — When a Defender for Cloud sub-assessment targets an Entra ID identity (e.g., "Guest accounts with owner permissions on Azure resources should be removed"), the connector now resolves the affected user from Microsoft Graph and surfaces IDENTITY_ID, USER_PRINCIPAL_NAME, ACCOUNT_GIVEN_NAME, and ACCOUNT_EMAIL on the corresponding Vulnerability record. Customers can now identify and ticket the specific accounts that need remediation, instead of seeing a Violation with no affected-user information. Requires the connector's service principal to have Microsoft Graph application permission User.Read.All; tenants without it still sync successfully but see only IDENTITY_ID populated. Improvements - Vulnerability → Violation linkage — Each Vulnerability now exposes a VIOLATIONS attribute pointing at its parent Violation's UID, enabling navigation from a Violation to its constituent Vulnerabilities (and the accounts they affect). | N/A |
| 3.5.2 | No changes in this release. | N/A |
| 3.5.1 | No changes in this release. | N/A |
| 3.5.0 | New Features - Azure Resource Graph (ARG) migration — All data sources (assessments, sub-assessments, alerts, resources, subscriptions, resource groups) now query Azure Resource Graph instead of individual REST API endpoints, delivering faster and more consistent data retrieval across large Azure environments. - KQL filter support — All ARG-based models support a new kqlFilter operation option, allowing custom KQL expressions to filter data at the query level (e.g., filter by severity, subscription, or resource group). - Adaptive page size retry — When Azure Resource Graph returns ResponsePayloadTooLarge, the connector automatically halves the page size and retries, ensuring syncs complete even with large records. Improvements - Resource enrichment from security data — CloudResource and Host models now discover additional resources from assessment and sub-assessment data, supplementing the ARG resources table to provide more complete asset coverage. - Simplified Vulnerability/Violation data sourcing — Violations now sync exclusively from assessments; Vulnerabilities sync exclusively from sub-assessments. The previous CVE-based split logic ( hasCve) has been removed for cleaner data separation. - ViolationDefinition simplified — ViolationDefinition now syncs only from the AssessmentMetadata REST endpoint, removing the sub-assessment-based definition path. Bug Fixes - HTTP 500 errors are now retried — Server errors from the Microsoft API are now treated as retryable, preventing transient failures from aborting syncs. | N/A |
| 3.4.32 | No changes in this release. | N/A |
| 3.4.31 | No changes in this release. | N/A |
| 3.4.30 | No changes in this release. | N/A |
| 3.4.29 | No changes in this release. | N/A |
| 3.4.28 | New Features - Richer finding status and severity data — Violations and Vulnerabilities now surface the provider-reported status ( PROVIDER_STATUS, SOURCE_STATUS), status cause and description (STATUS_CAUSE, STATUS_DESCRIPTION), and normalized severity with a numeric severity score (SOURCE_SEVERITY, SEVERITY, SEVERITY_SCORE). The legacy STATUS and STATUS_CATEGORY attributes are retained but deprecated in favor of the new fields. | • Vulnerability / Violation: The identifier used for sub-assessment-derived findings was revised and additional status/severity fields were introduced — Action: re-sync the connector so existing findings are re-keyed and enriched with the new attributes. |
| 3.4.27 | No changes in this release. | N/A |
| 3.4.26 | Improvements - Consistent AWS target linking — Target identifiers for findings on AWS resources are now normalized to lowercase, matching the casing used for resource UIDs so findings link reliably to their assets. | • Violation / Vulnerability: AWS target identifiers were re-cased — Action: re-sync the connector so finding-to-asset relationships are rebuilt with consistent casing. |
| 3.4.25 | Improvements - Last-captured timestamp — Host and Vulnerability records now record a LAST_CAPTURED timestamp on each sync, making it easier to identify stale or recently observed data. | N/A |
| 3.4.24 | No changes in this release. | N/A |
| 3.4.23 | No changes in this release. | N/A |
| 3.4.22 | New Features - AWS resource support for Violations — Violations that target AWS resources (in multi-cloud Defender for Cloud deployments) now resolve and populate their target identifiers, so these findings link to the correct assets. | N/A |
| 3.4.21 | No changes in this release. | N/A |
| 3.4.20 | No changes in this release. | N/A |
| 3.4.19 | No changes in this release. | N/A |
| 3.4.18 | No changes in this release. | N/A |
| 3.4.17 | No changes in this release. | N/A |
| 3.4.16 | Improvements - Consistent Resource Group and target linking — Resource Group UIDs and finding target identifiers are now normalized to lowercase, ensuring findings and resources link reliably regardless of how Azure casing varies. | • Resource Group: Resource Group UIDs were re-cased to lowercase — Action: re-sync the connector so existing Resource Group records and their relationships are rebuilt. |
| 3.4.15 | No changes in this release. | N/A |
| 3.4.14 | No changes in this release. | N/A |
| 3.4.13 | Improvements - Streamlined Alert attributes — Several unused Alert attributes (Action Taken, Alert URI, Can Be Investigated, Confidence Reasons, Instance ID, Workspace ARM ID) were removed from the Alert schema to reduce noise and focus on populated, actionable fields. | N/A |
| 3.4.12 | Improvements - Richer CVSS and CVE data on Vulnerability Definitions — Vulnerability Definitions now emit the full set of CVSS metrics parsed from the CVSS vector string and link CVE-identified definitions to their CVE records ( CVE_IDS, CVE_RECORDS), improving vulnerability scoring and correlation. | N/A |
| 3.4.11 | Improvements - Vulnerability patch indicator renamed — The Vulnerability "patch available" indicator was renamed to PATCHABLE for clarity and consistency. | • Vulnerability: The patch-availability attribute identifier changed from PATCH_AVAILABLE to PATCHABLE — Action: re-sync the connector so Vulnerability records carry the renamed attribute. |
| 3.4.10 | Improvements - Client secret no longer mandatory — The client secret configuration field is no longer required, accommodating alternative credential setups. | N/A |
| 3.4.9 | No changes in this release. | N/A |
| 3.4.8 | Improvements - More reliable pagination — The connector now honors the NextLink continuation parameter when paging through Azure API results, ensuring complete data retrieval across large result sets. | N/A |
| 3.4.7 | No changes in this release. | N/A |
| 3.4.6 | Improvements - Vulnerability type attribute — Vulnerabilities now expose a VULNERABILITY_TYPE attribute identifying the assessed resource type. Sub-assessments without a display name are skipped to avoid creating empty Vulnerability records. | N/A |
| 3.4.5 | No changes in this release. | N/A |
| 3.4.4 | New Features - Resource Group model — The connector now synchronizes Azure Resource Groups as a dedicated "Resource Group" model, providing visibility into how cloud resources are organized. | N/A |
| 3.4.3 | No changes in this release. | N/A |
| 3.4.2 | Improvements - Cloud Resource identity and naming — Cloud Resource UIDs are now normalized to lowercase for consistent linking, the fully qualified resource ID is used as the record name to avoid duplicate-looking resources, and a dedicated RESOURCE_NAME attribute carries the short resource name. | • Cloud Resource: Cloud Resource UIDs were re-cased to lowercase and the name field changed — Action: re-sync the connector so existing Cloud Resource records and their relationships are rebuilt. |
| 3.4.1 | No changes in this release. | N/A |
| 3.4.0 | New Features - Cloud Resource model — The former "Asset" model is replaced by a richer "Cloud Resource" model representing Azure resources synchronized from Defender for Cloud. Improvements - Model consolidation — The connector's data model was reorganized around dedicated Violation, Violation Definition, Cloud Resource, Host, Subscription, Vulnerability, and Vulnerability Definition models for clearer separation of assets, findings, and finding definitions. | • Asset → Cloud Resource: The "Asset" model was renamed to "Cloud Resource" — Action: purge the old Asset data and re-sync the connector to populate Cloud Resource records. |
| 3.3.10 | Dependency Upgrades - Updated Azure SDK libraries (azure-identity, azure-core-http-netty, azure-resourcemanager). | N/A |
| 3.3.9 | No changes in this release. | N/A |
| 3.3.8 | No changes in this release. | N/A |
| 3.3.7 | Dependency Upgrades - Updated Azure SDK libraries (azure-identity, azure-core-http-netty, azure-resourcemanager) and supporting build dependencies. | N/A |
| 3.3.6 | No changes in this release. | N/A |
| 3.3.5 | No changes in this release. | N/A |
| 3.3.4 | No changes in this release. | N/A |
| 3.3.3 | Improvements - Consistent asset linking — Asset UIDs and finding target identifiers are now normalized to lowercase so findings link reliably to their assets regardless of Azure casing. | • Asset: Asset UIDs were re-cased to lowercase — Action: re-sync the connector so existing Asset records and their relationships are rebuilt. |
| 3.3.2 | No changes in this release. | N/A |
| 3.3.1 | No changes in this release. | N/A |
| 3.3.0 | No changes in this release. | N/A |
| 3.2.2 | No changes in this release. | N/A |
| 3.2.1 | No changes in this release. | N/A |
| 3.2.0 | No changes in this release. | N/A |
| 3.1.18 | No changes in this release. | N/A |
| 3.1.17 | New Features - Host model — Defender for Cloud assets that represent hosts (virtual machines and servers) are now synchronized as a dedicated "Host" model, with an includeAssetTypes option to control which resource types are treated as hosts. - Vulnerability and Vulnerability Definition models — The connector now synchronizes Vulnerabilities and their definitions, derived from Defender for Cloud sub-assessments, enabling vulnerability findings alongside policy violations. | N/A |
| 3.1.16 | No changes in this release. | N/A |
| 3.1.15 | No changes in this release. | N/A |
| 3.1.14 | No changes in this release. | N/A |
| 3.1.13 | No changes in this release. | N/A |
| 3.1.12 | New Features - Violation and Violation Definition models — Assessments are now synchronized as "Violation" findings and assessment metadata as "Violation Definition" records, aligning Defender for Cloud data with the platform's finding model. Violation status is normalized ( SOURCE_STATUS, STATUS, STATUS_CATEGORY) and the assessment type and provider identifier are surfaced. | • Assessment → Violation, Assessment Metadata → Violation Definition: These models were renamed and the Violation Definition identifier changed to use the assessment name — Action: purge the old Assessment and Assessment Metadata data and re-sync the connector. |
| 3.1.11 | Overview The Microsoft Defender for Cloud connector integrates with Microsoft Azure to synchronize security alerts, assessments, and the Azure assets and subscriptions they apply to. Category: Microsoft Azure Models | N/A |