
Microsoft Azure Compute
Microsoft Azure- Overview
- Setup
- Data & mappings
- Operations & API
- Changelog
The Azure Compute connector integrates with Microsoft Azure and synchronizes virtual machine inventory using the Azure Resource Manager APIs (via the Azure SDK for Java). For each configured subscription it lists all virtual machines, enriches each VM with instance-view status, agent details, network-interface IP configuration, and resource metadata, and maps the result to a Host connector object.
When no subscription is configured the connector enumerates every subscription accessible to the configured Azure AD application; otherwise it processes only the comma-separated subscriptions provided. Subscriptions and virtual machines are processed in parallel.
Data retrieved from Microsoft Azure Compute
| Connector Object | Required | Maps to Data Model |
|---|---|---|
| Virtual Machine | Yes | Host |
For detailed steps on how to view the data retrieved from Microsoft Azure Compute in the Brinqa Platform, see How to view your data.
Connection settings
When setting up a data integration, select Microsoft Azure Compute from the Connector dropdown and provide the following:
| Setting | Required | Default | Description |
|---|---|---|---|
| Client ID | Yes | — | The service principal client ID. The client ID is generated during service principal registration. |
| Client secret | Yes | — | The service principal client secret or password. |
| Tenant ID | Yes | — | The tenant or domain the credential is authorized for. The tenant ID is generated during service principal registration. |
| Subscription ID | No | — | (Optional) Comma-separated list of Subscription IDs. If none is specified, the connector will automatically discover all subscriptions for the tenant. |
Authentication
Method
Azure Active Directory OAuth 2.0 Client Credentials (client ID + client secret + tenant ID), performed by the Azure SDK for Java (ClientSecretCredential) against the Azure public-cloud Active Directory endpoint.
Endpoint
| Method | URL |
|---|---|
POST | https://login.microsoftonline.com/{tenantId}/oauth2/v2.0/token |
The token request is issued internally by the Azure Identity library when an AzureResourceManager client is authenticated; the connector does not call the token endpoint directly.
Request Body (form-urlencoded)
| Parameter | Value |
|---|---|
grant_type | client_credentials |
client_id | {clientId} |
client_secret | {clientSecret} |
scope | https://management.azure.com/.default |
Sample Response
{
  "token_type": "Bearer",
  "expires_in": 3599,
  "ext_expires_in": 3599,
  "access_token": "<access_token>"
}
Response Fields
| Field | Type | Description |
|---|---|---|
token_type | String | Authorization scheme prefix (Bearer) |
expires_in | Integer | Token lifetime in seconds |
ext_expires_in | Integer | Extended token lifetime in seconds |
access_token | String | Bearer token applied to subsequent Azure Resource Manager requests |
Usage
The Azure SDK attaches the bearer token to every Azure Resource Manager request and refreshes it automatically:
Authorization: Bearer <access_token>
The credential is built once and reused per subscription, scoped via withSubscription({subscriptionId}).
Sync Behavior
The connector performs a full sync on every run. Azure Resource Manager does not provide an incremental change filter for the virtual-machine list, so each sync enumerates all virtual machines across the configured subscriptions (or all accessible subscriptions when none is configured) and re-enriches each VM. Incremental (delta) syncs are not supported.
How to obtain Microsoft Azure Compute credentials
Register a Microsoft Azure Application
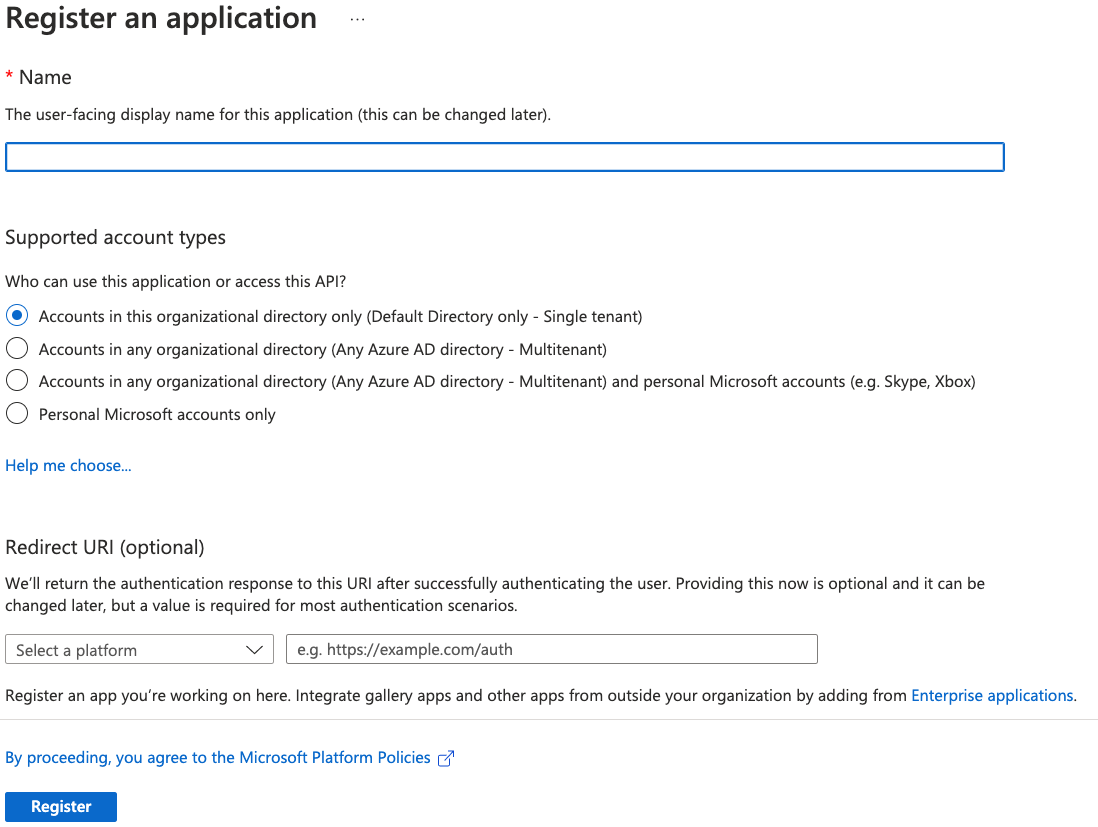
You must create a new application for the Microsoft Azure Compute connector to authenticate with Azure AD and access the Azure Compute API. To register an application in your Azure AD tenant, follow these steps:
-
Log in to your organization's Microsoft Azure Portal as an administrator.
-
Navigate to and click Microsoft Entra ID.
-
On the left-hand side of the page, click App registrations, and then click New registration.
-
Give your new application a name, select the supported account types, and provide an optional Redirect URI. If you do not have a redirect URI, you can leave the field as is.
-
Click Register.
Note: For additional details about registering an application in Azure AD and creating a service principal, see Microsoft documentation.
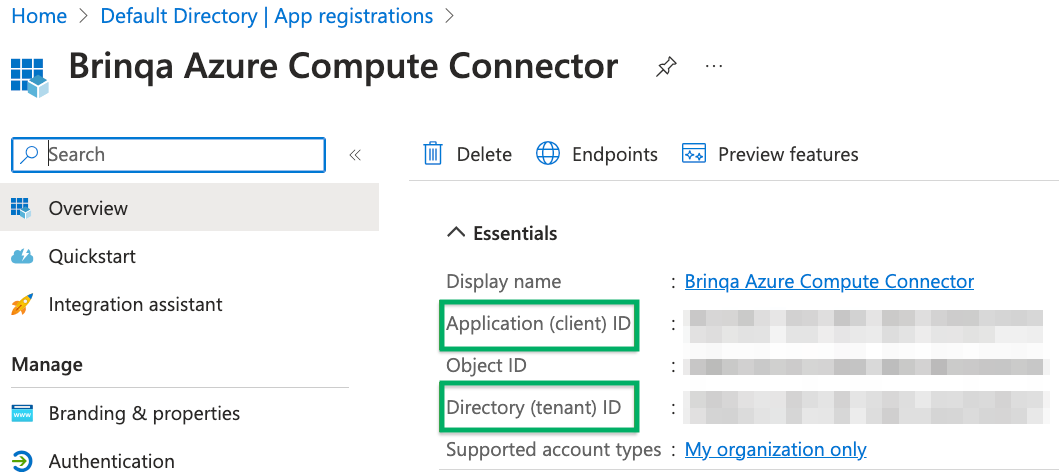
Obtain Microsoft Azure credentials
After you have created your new Microsoft Azure application, your client and tenant ID display. Copy the Application (client) ID and Directory (tenant) ID as shown below:
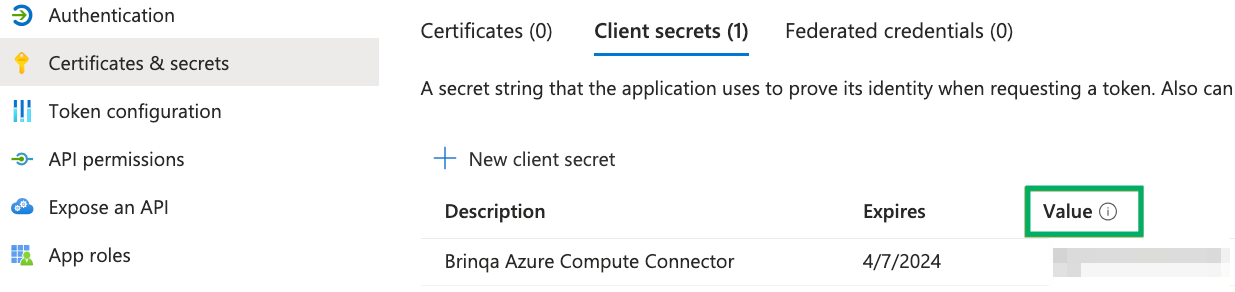
To obtain your client secret, follow these steps:
-
Click Certificates & secrets and then click New client secret.
-
Provide a description, set an expiry date, and then click Add.
The new client secret displays. You cannot view the client secret again. There is both a Value and Secret ID. The Value field is needed for authentication. Copy the Value field and save it to a secure location.
Note: For additional details about obtaining your Microsoft Azure credentials, see Microsoft documentation.
Assign permissions
After you have created your new Microsoft Azure application and obtained the authentication credentials, you must assign the required permissions for the application to access your data. To do so, follow these steps:
-
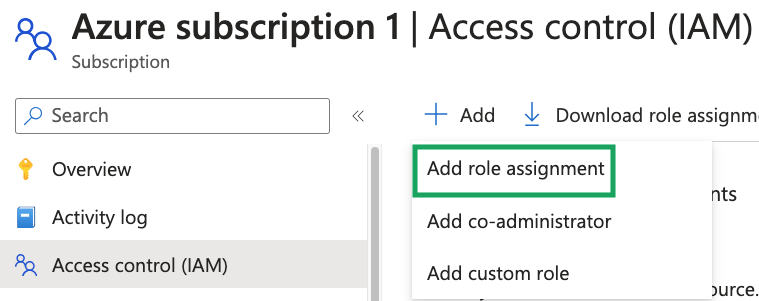
Navigate to the applicable Azure subscription.
-
Click Access control (IAM), click Add, and then click Add role assignment from the dropdown.
-
In the Job function roles tab, select the Virtual Machine Contributor role.
-
Click Next.
-
In the Members tab, click the User, group, or service principal option.
-
Click Select members, search for and click the application you registered earlier, and then click Select.
-
Navigate to the Review + assign tab and click Review + assign.
Note: If you do not have permissions to assign roles, contact your Azure administrator. For additional information, see Microsoft documentation.
(Optional) Create a management group for multiple subscriptions
If you have multiple Azure subscriptions, you can organize them into a single management group to uniformly set access controls. To do so, follow these steps:
-
Log in to your Microsoft Azure Portal as an administrator.
-
Search for "Management groups" in the search box and click Management groups.
-
Click Create, provide a management group ID and display name, and then click Submit.
-
On the Management groups page, click the name of the new management group.
-
Click Add subscription, select the Azure subscriptions you want to add to the management group, and then click Save.
-
Click Access control (IAM), click Add, and then click Add role assignment from the dropdown.
-
Search for and select the role you want to assign to the management group.
-
Click Next.
-
In the Members tab, click the User, group, or service principal option.
-
Click Select members, search for and click the application you registered earlier, or any relevant members who require this role, and then click Select.
-
Navigate to the Review + assign tab and click Review + assign.
Note: If you do not have permissions to create management groups, contact your Azure administrator. For additional information, see Microsoft documentation.
Attribute mappings
Expand the sections below to view the mappings between the source and the Brinqa data model attributes:
Virtual Machine
| Source Field Name | SDM Attribute |
|---|---|
| Derived from operating system + VM size | DESCRIPTION |
instanceView.osName + instanceView.osVersion (falls back to VirtualMachine.osType) | OPERATING_SYSTEM |
instanceView.statuses[].displayStatus | SOURCE_STATUS |
instanceView.statuses[].displayStatus (normalized) | STATUS |
instanceView.statuses[].time | LAST_SEEN |
instanceView.vmAgent.statuses[].displayStatus | AGENT_STATUS |
instanceView.vmAgent.vmAgentVersion | AGENT_VERSION |
| NIC IP configuration privateIpAddress | PRIVATE_IP_ADDRESSES |
Primary public IP + each NIC IP configuration (public and private) | IP_ADDRESSES |
| Primary public IP fqdn | PUBLIC_DNS_NAMES |
| Primary public IP ipAddress | PUBLIC_IP_ADDRESSES |
| Subscription being synced | SUBSCRIPTION_ID |
VirtualMachine.computerName (falls back to VirtualMachine.name) | NAME |
VirtualMachine.computerName (normalized) | HOSTNAMES |
VirtualMachine.osProfile.adminUsername | ADMIN_USER_NAME |
VirtualMachine.osType | OS_TYPE |
VirtualMachine.regionName | REGION |
VirtualMachine.resourceGroupName | RESOURCE_GROUP |
VirtualMachine.size | VM_SIZE |
VirtualMachine.tags | TAGS |
VirtualMachine.vmId | UID |
VirtualMachine.vmId | INSTANCE_ID |
| — | CATEGORIES |
| — | CLOUD_PROVIDER |
Operations & API
Expand each connector object to see its operation options, delta-sync behavior, and the API it uses. See connector operation options for how to apply operation options (keys and values are case-sensitive).
Virtual Machine
Operation options
| Option | Type | Default | Description |
|---|---|---|---|
parallelismLevel | Integer | 8 | Parallelism used when iterating subscriptions and virtual machines |
Delta sync
Not supported. The connector performs a full sync of Virtual Machine on every run and applies no incremental date filter.
API
- Type: REST — Azure Resource Manager, accessed through the Azure SDK for Java (
AzureResourceManager). The connector does not call raw REST paths; the SDK issues the underlyinghttps://management.azure.comrequests. · Endpoint:azure.virtualMachines().list()
Changelog
The Microsoft Azure Compute connector has undergone the following changes:
| Version | Description | Migration Steps |
|---|---|---|
| 3.5.9 | No changes in this release. | N/A |
| 3.5.8 | No changes in this release. | N/A |
| 3.5.7 | No changes in this release. | N/A |
| 3.5.6 | No changes in this release. | N/A |
| 3.5.5 | No changes in this release. | N/A |
| 3.5.4 | No changes in this release. | N/A |
| 3.5.3 | No changes in this release. | N/A |
| 3.5.2 | No changes in this release. | N/A |
| 3.5.1 | No changes in this release. | N/A |
| 3.5.0 | No changes in this release. | N/A |
| 3.4.32 | No changes in this release. | N/A |
| 3.4.31 | No changes in this release. | N/A |
| 3.4.30 | No changes in this release. | N/A |
| 3.4.29 | No changes in this release. | N/A |
| 3.4.28 | No changes in this release. | N/A |
| 3.4.27 | No changes in this release. | N/A |
| 3.4.26 | No changes in this release. | N/A |
| 3.4.25 | No changes in this release. | N/A |
| 3.4.24 | No changes in this release. | N/A |
| 3.4.23 | No changes in this release. | N/A |
| 3.4.22 | No changes in this release. | N/A |
| 3.4.21 | No changes in this release. | N/A |
| 3.4.20 | No changes in this release. | N/A |
| 3.4.19 | No changes in this release. | N/A |
| 3.4.18 | No changes in this release. | N/A |
| 3.4.17 | No changes in this release. | N/A |
| 3.4.16 | No changes in this release. | N/A |
| 3.4.15 | No changes in this release. | N/A |
| 3.4.14 | No changes in this release. | N/A |
| 3.4.13 | No changes in this release. | N/A |
| 3.4.12 | No changes in this release. | N/A |
| 3.4.11 | No changes in this release. | N/A |
| 3.4.10 | No changes in this release. | N/A |
| 3.4.9 | No changes in this release. | N/A |
| 3.4.8 | No changes in this release. | N/A |
| 3.4.7 | No changes in this release. | N/A |
| 3.4.6 | No changes in this release. | N/A |
| 3.4.5 | No changes in this release. | N/A |
| 3.4.4 | No changes in this release. | N/A |
| 3.4.3 | No changes in this release. | N/A |
| 3.4.2 | No changes in this release. | N/A |
| 3.4.1 | No changes in this release. | N/A |
| 3.4.0 | New Features - Added support for synchronizing virtual machines across multiple Azure subscriptions. The Subscription ID setting now accepts a comma-separated list of subscriptions, and when left blank the connector automatically discovers and syncs every subscription the configured credentials can access. Improvements - Virtual machine synchronization now runs in parallel across subscriptions and machines, with a configurable parallelism level, significantly reducing sync time for large environments. - A failure while syncing one subscription is now isolated and logged, allowing the sync to continue with the remaining subscriptions instead of aborting. | N/A |
| 3.3.10 | Improvements - The Subscription ID setting is now optional. When it is not provided, the connector falls back to the credential's default subscription rather than failing validation. | N/A |
| 3.3.9 | No changes in this release. | N/A |
| 3.3.8 | No changes in this release. | N/A |
| 3.3.7 | Improvements Dependency Upgrades - Upgraded the Azure SDK libraries (Azure Identity, Azure Resource Manager, and Azure HTTP client) to current releases for improved reliability and security. | N/A |
| 3.3.6 | No changes in this release. | N/A |
| 3.3.5 | No changes in this release. | N/A |
| 3.3.4 | No changes in this release. | N/A |
| 3.3.3 | No changes in this release. | N/A |
| 3.3.2 | No changes in this release. | N/A |
| 3.3.1 | No changes in this release. | N/A |
| 3.3.0 | No changes in this release. | N/A |
| 3.2.2 | No changes in this release. | N/A |
| 3.2.1 | No changes in this release. | N/A |
| 3.2.0 | No changes in this release. | N/A |
| 3.1.18 | No changes in this release. | N/A |
| 3.1.17 | Improvements - Hostname, public IP address, and public DNS name are now modeled as multi-valued attributes, allowing virtual machines with more than one of each to be represented accurately. | • Virtual Machine: The hostname, public IP address, and public DNS name attribute identifiers were renamed to their plural, multi-valued forms — Action: re-sync the connector to repopulate these attributes. |
| 3.1.16 | No changes in this release. | N/A |
| 3.1.15 | No changes in this release. | N/A |
| 3.1.14 | Improvements Dependency Upgrades - Upgraded the Azure SDK libraries (Azure Identity and Azure Resource Manager) to current releases for improved reliability and security. | N/A |
| 3.1.13 | No changes in this release. | N/A |
| 3.1.12 | No changes in this release. | N/A |
| 3.1.11 | No changes in this release. | N/A |
| 3.1.9 | No changes in this release. | N/A |
| 3.1.8 | No changes in this release. | N/A |
| 3.1.7 | Improvements - Increased the number of automatic retries on transient Azure API errors, improving sync resilience against intermittent throttling and network failures. | N/A |
| 3.1.6 | No changes in this release. | N/A |
| 3.1.5 | No changes in this release. | N/A |
| 3.1.4 | Overview The Azure Compute connector integrates with Microsoft Azure to synchronize virtual machine inventory and configuration details from your Azure subscriptions. Category: Microsoft Azure Models | N/A |