Supported MCP Clients
The following AI clients have been tested and are known to operate with BrinqaIQ MCP. Most clients use the stdio connection pattern described below; Open WebUI connects directly over Streamable HTTP.
Brinqa does not provide official support for third-party AI clients. Compatibility depends on each client's implementation of the MCP standard and may vary.
Connection pattern
Clients that use stdio (Claude Desktop, Claude Code CLI, Cursor, Cline, GitHub Copilot, and Goose) use the following connection shape: the mcp-remote npm shim wraps the Streamable HTTP endpoint and exposes it to the client as a local MCP server. Open WebUI connects directly to the Streamable HTTP URL instead. Customers need Node.js for the stdio clients, plus a Brinqa Platform API token — see API Token Authentication.
The base config snippet used by the stdio clients below:
{
  "mcpServers": {
    "brinqa": {
      "command": "npx",
      "args": [
        "-y",
        "mcp-remote",
        "https://<your-brinqa-platform-url>/brinqamax/mcp",
        "--header",
        "Authorization: ApiKey <your-brinqa-platform-api-token>"
      ]
    }
  }
}
Replace <your-brinqa-platform-url> with your Brinqa Platform hostname (for example, acme.internal.brinqa.cloud) and <your-brinqa-platform-api-token> with the API token you generated in the Brinqa Platform UI. See API Token Authentication for instructions on generating a token.
Claude Desktop
Prerequisites
- A Brinqa Platform API token — see API Token Authentication.
- Claude Desktop — download from claude.ai/download.
- Node.js (installs
npx).
Configure the MCP server
-
Open Claude Desktop on your machine.
-
Click your profile icon in the bottom-left corner of the sidebar.
-
Click Settings, then Developer.
-
Click Edit Config to open
claude_desktop_config.jsonin your default text editor.tipYou can also open the file directly:
- macOS:
~/Library/Application Support/Claude/claude_desktop_config.json - Windows:
%APPDATA%\Claude\claude_desktop_config.json
- macOS:
-
Add the base config snippet to the file, replacing the placeholders with your values.
-
Save the file.
-
Restart Claude Desktop.
Test the connection
-
Open Claude Desktop.
-
Ask a question that requires BrinqaIQ, such as "Are you connected to BrinqaIQ MCP?" or "List the flows in my Brinqa instance."
-
Claude should report that the
brinqaMCP server is connected and respond using the BrinqaIQ tools.
Claude Code CLI
Prerequisites
- A Brinqa Platform API token — see API Token Authentication.
- Claude Code CLI — see the Claude Code documentation.
- Node.js.
Configure the MCP server
- In the directory where you plan to run Claude Code, create a file named
.mcp.json. - Add the base config snippet to the file.
- Save the file.
Claude Code automatically picks up .mcp.json files when it starts in that directory. The config is scoped to that directory — repeat for other projects, or add the server to your user-level settings for global access.
Test the connection
-
Run
claudein that directory. -
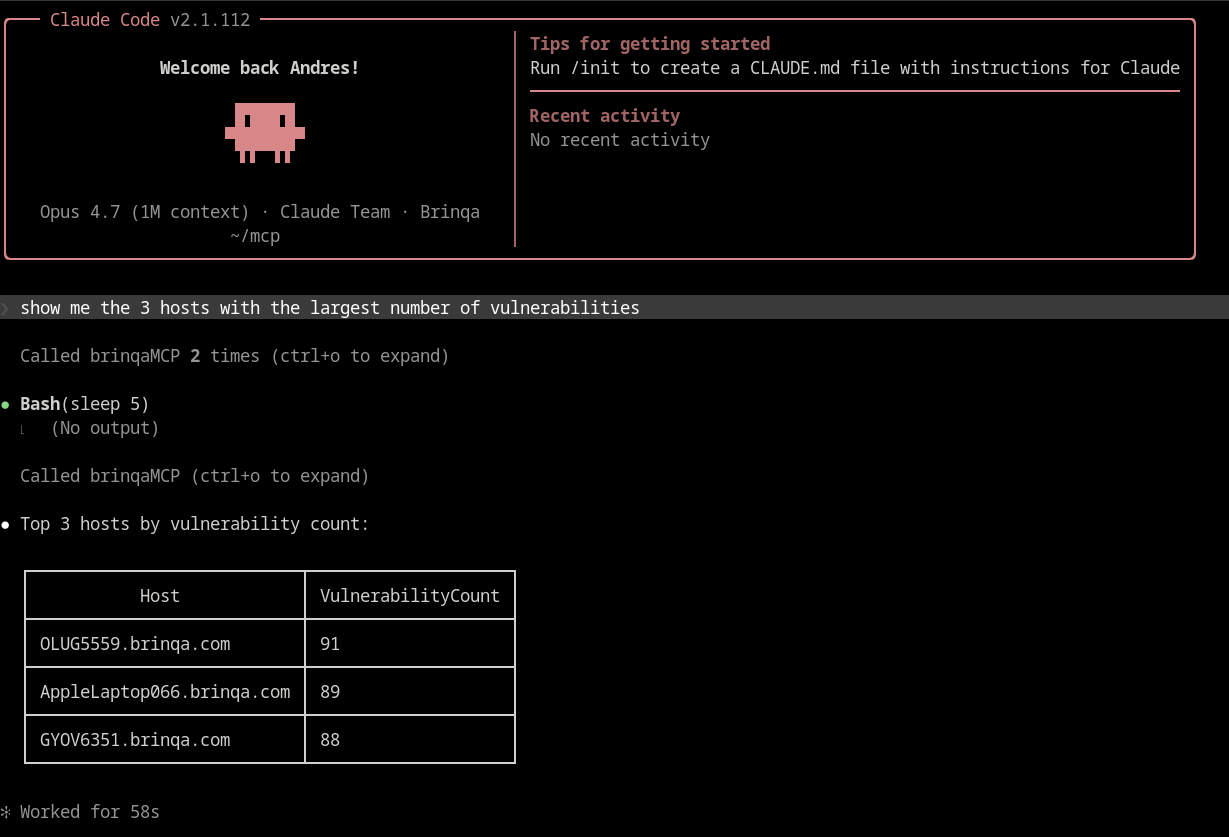
Ask a question that requires BrinqaIQ, such as "Show me the 3 hosts with the largest number of vulnerabilities."
-
Claude Code will call the BrinqaIQ MCP tools and return the result inline.
Cursor
Prerequisites
- A Brinqa Platform API token — see API Token Authentication.
- Cursor.
- Node.js.
Configure the MCP server
Cursor uses the same mcpServers shape as Claude Desktop. Create or edit one of these files:
~/.cursor/mcp.json— applies globally to every Cursor workspace.<workspace>/.cursor/mcp.json— applies only to the current workspace.
Add the base config snippet to whichever file matches your scope. If the file doesn't exist, create it. Restart Cursor after saving.
Cline
Prerequisites
- A Brinqa Platform API token — see API Token Authentication.
- Cline extension in VS Code.
- Node.js.
Configure the MCP server
- In VS Code, open the Cline extension panel.
- Click the MCP Servers icon at the top of the panel.
- Click Configure MCP Servers. Cline opens its
cline_mcp_settings.jsonfile. - Add the base config snippet to the file, replacing the placeholders with your values.
- Save the file. Cline restarts the MCP connection automatically.
GitHub Copilot in VS Code
Prerequisites
- A Brinqa Platform API token — see API Token Authentication.
- VS Code with GitHub Copilot and GitHub Copilot Chat installed.
- Node.js.
Configure the MCP server
- In VS Code, open the Command Palette (
Cmd+Shift+Pon macOS,Ctrl+Shift+Pon Windows/Linux). - Run MCP: Add Server.
- Select stdio as the server type.
- Enter
npxas the command, then provide the remaining arguments from the base config snippet when prompted. - VS Code saves the configuration to
.vscode/mcp.jsonin the current workspace. - Reload the window when prompted.
GitHub Copilot Chat will pick up the BrinqaIQ tools on the next session.
To apply the server globally across all workspaces, copy the servers block from .vscode/mcp.json into your VS Code User Settings (settings.json) under the mcp key instead.
Goose
Prerequisites
- A Brinqa Platform API token — see API Token Authentication.
- Goose installed.
- Node.js.
Configure the MCP server
Goose configures MCP servers through its Extensions UI using individual form fields rather than a JSON file.
-
Open Goose.
-
Go to Settings → Extensions → Add custom extension.
-
Fill in the fields as follows:
Field Value Name brinqaType STDIOCommand npxArguments -y mcp-remote https://<your-brinqa-platform-url>/brinqamax/mcp --header Authorization:${AUTH_HEADER}Environment variable AUTH_HEADER=ApiKey <your-brinqa-platform-api-token>Replace the placeholders with your actual hostname and API token.
Goose splits the Arguments field on whitespace, so the header value cannot be written inline:
Authorization: ApiKey <token>would be passed as three separate arguments and authentication would fail. Supplying the value through theAUTH_HEADERenvironment variable avoids this, and keeps the token out of the process argument list. Note that there is no space after the colon inAuthorization:${AUTH_HEADER}; the space belongs inside the environment variable value. -
Save the extension and enable it.
-
Start a new Goose session — Goose loads extensions at session start, so the BrinqaIQ tools will not appear until you open a new chat.
Open WebUI
Prerequisites
- A Brinqa Platform API token — see API Token Authentication.
- Open WebUI deployed and running (v0.6 or later recommended).
Configure the MCP server
-
Sign in to Open WebUI as an administrator.
-
Go to Admin Panel → Settings → Tools.
-
Click + to add a new tool server.
-
Set the server URL to:
https://<your-brinqa-platform-url>/brinqamax/mcp -
Add a request header with key
Authorizationand valueApiKey <your-brinqa-platform-api-token>. -
Save the configuration.
-
Reload the Open WebUI page (or restart the service if you modified a server-side config file) for the BrinqaIQ tools to appear.
The exact navigation path may vary by Open WebUI version. If the path above does not match your UI, see the Open WebUI MCP documentation for your installed version.

Troubleshooting
| Symptom | Likely cause |
|---|---|
| Client reports "MCP server failed to start" | npx cannot be found on PATH. Install Node.js and restart the client. |
| Tools list is empty | The API token is invalid or expired. Generate a new token and update the config. |
| Destructive tool runs without a prompt | Your client does not implement MCP tool annotations. Use a client that honors destructiveHint, or revoke API token permissions you don't want the agent to use. |
401 Unauthorized | The Authorization header is malformed. Confirm it uses ApiKey (note the space) and the token value with no surrounding quotes. |
404 Not Found on /brinqamax/mcp | Your Brinqa Platform is below 12.3. Use the v11 version of this page for the legacy OpenAPI-proxy configuration. |