JFrog Xray
JFrog Xray is an application security tool that scans for vulnerabilities in your applications. You can bring security data from JFrog Xray into Brinqa to gain a more comprehensive understanding of your risk and build a unified view of your attack surface, thus strengthening cybersecurity posture.
This document details the information you must provide for the connector to authenticate with JFrog Xray and how to obtain that information from JFrog. See create a data integration for step-by-step instructions on setting up the integration.
Required connection settings
When setting up a data integration, select JFrog Xray from the Connector dropdown. If you cannot find the connector in the dropdown, make sure that you have installed it first. You must provide the following information to authenticate JFrog Xray with Brinqa:
-
API URL: The JFrog API server URL.
-
Access token: The JFrog access token associated with the JFrog account, which must have permissions to log in to the API server and return data.
Generate a JFrog access token
For the JFrog Xray connector to use the JFrog API, you must provide an access token. JFrog does not allow retrieving the access token for an existing user. To generate a new token, follow these steps:
-
Log in to your organization's JFrog portal as an administrator.
-
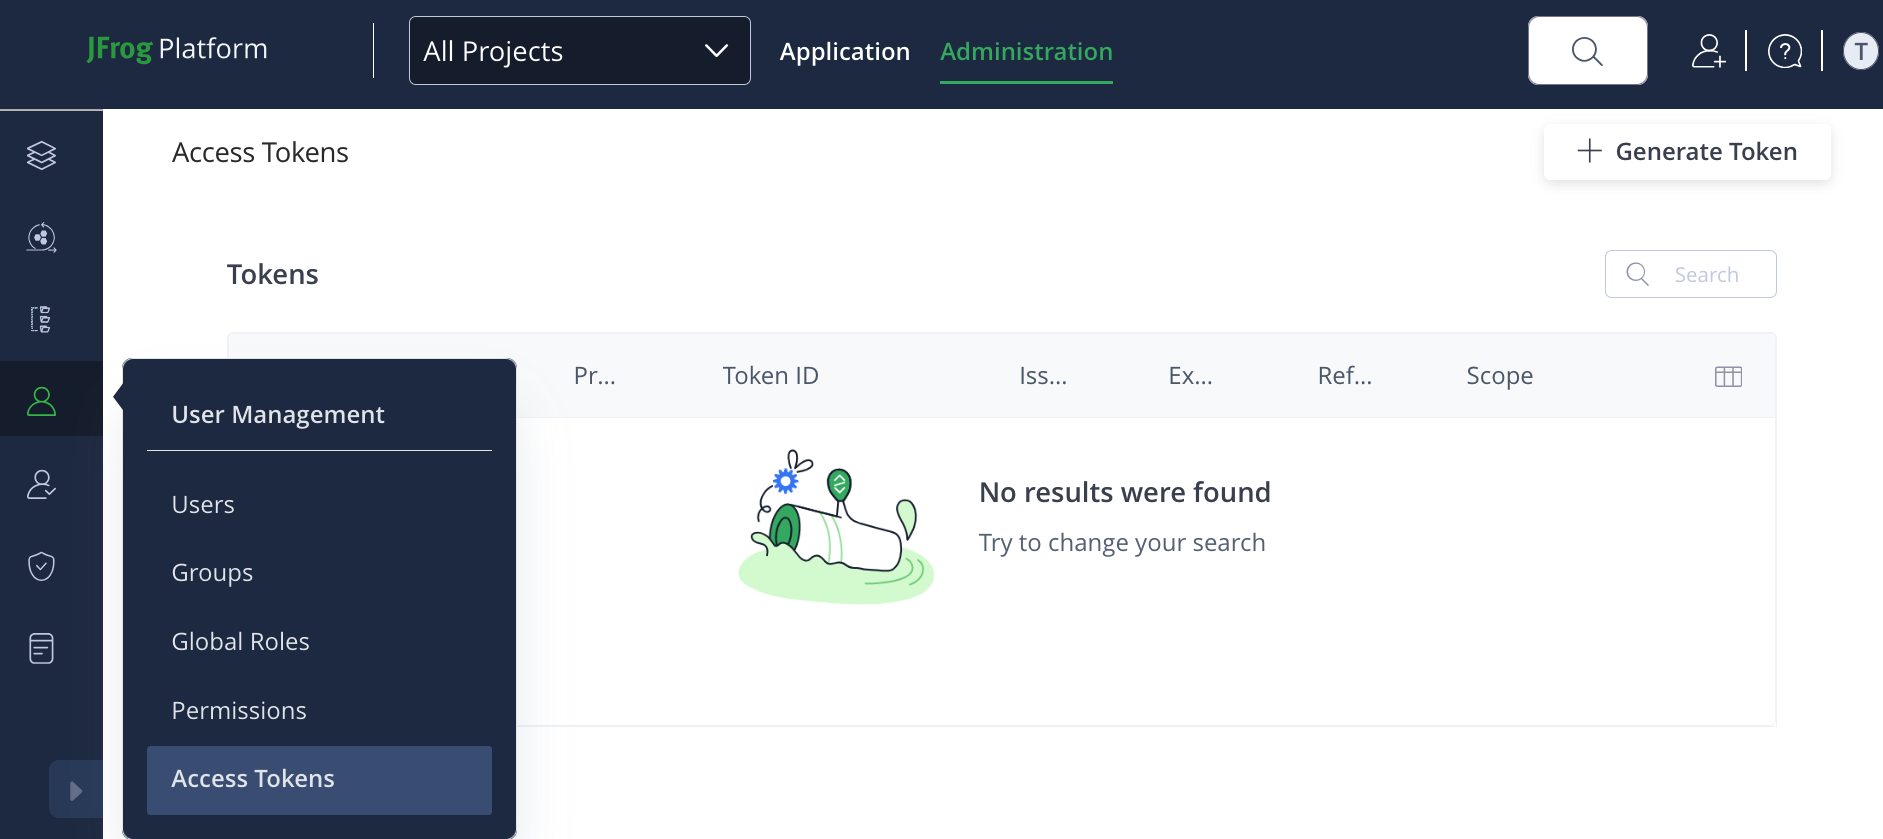
Navigate to User Management > Access Tokens.

-
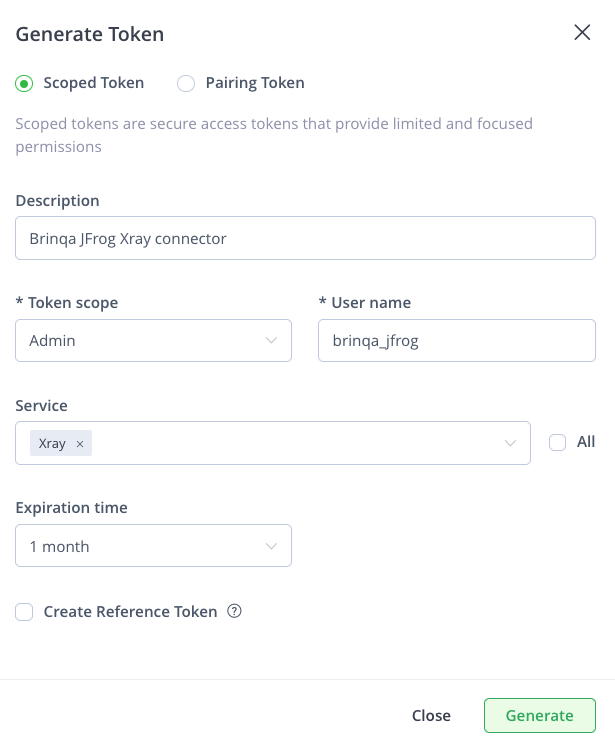
Click Generate Token, select Scoped Token, and then complete the following fields:
-
Description: Provide a description for the token.
-
Token scope: Click the dropdown and select the appropriate scope for your integration. You have three options:
-
Admin: Grants full administrative access. Use this option if retrieving your data requires complete control over all aspects of JFrog Xray. Proceed with caution, as this option provides extensive permissions.
-
User: Grants access based on a specific user's permissions. Use this option if retrieving your data requires performing actions that a typical user would require.
-
Group: Grants access based on a group of users' permissions. Use this option if retrieving your data needs permissions common to a specific group.
noteWhile all three options can be used to authenticate API requests, Brinqa recommends that you use the User or Group scope, as these can provide more controlled access. Consult the JFrog documentation to help you better understand which scope may better suit your needs.
-
-
User name: Provide a user name for the token.
-
Service: Click the dropdown and select Xray.
-
Expiration time: If desired, click the dropdown and set an expiry for the token. Options include: Never, 1 day, 3 days, 1 week, 1 month, or a custom time.
-
Create reference token: Not checked by default. Leave as is.

-
-
Click Generate.
Your access token displays. You cannot view the token after this. Copy and save it to a secure location.
If you do not have permissions to create an access token, contact your JFrog administrator. For additional information, see JFrog documentation.
Additional settings
The JFrog Xray connector contains additional options for specific configuration:
-
Page size: The maximum number of records to get per API request. The default setting is 100. It is not recommended to go over 100.
-
Parallel requests: The maximum number of parallel API requests. The default setting is 4.
Types of data to retrieve
The JFrog Xray connector can retrieve the following types of data from the JFrog Xray API:
Table 1: Data retrieved from JFrog Xray
| Connector Object | Required | Maps to Data Model |
|---|---|---|
| Vulnerability | Yes | Open Source Finding |
| Vulnerability Definition | Yes | Open Source Finding Definition |
For detailed steps on how to view the data retrieved from JFrog Xray in the Brinqa Platform, see How to view your data.
Attribute mappings
Expand the sections below to view the mappings between the source and the Brinqa data model attributes.
Vulnerability
Table 2: Vulnerability attribute mappings
| Source Field Name | Maps to Attribute |
|---|---|
| artifact_scan_time | lastScanned |
| component_physical_path | Local variable |
| cve | type |
| fixed_versions | fixedVersion |
| impact_path | result |
| impacted_artifact | result |
| package_type | Local variable |
| path | path |
| project_keys | targets |
| provider | Local variable |
| repository | targets |
| severity_source | Local variable |
| sys_id | uid |
| vulnerable_component | Local variable |
Vulnerability Definition
Table 3: Vulnerability Definition attribute mappings
| Source Field Name | Maps to Attribute |
|---|---|
| component_physical_path | Local variable |
| cve | uid, cveIds, cveRecords |
| cvss_v2_max_score | cvssV2BaseScore |
| cvss_v3_max_score | cvssV3BaseScore |
| description | description |
| package_type | Local variable |
| provider | Local variable |
| published | publishedDate |
| references | references |
| severity | severity, severityScore |
| severity_source | Local variable |
| summary | summary |
| vulnerable_component | Local variable |
Local variable indicates that the field is processed within a specific context, such as a particular workflow or calculation. Unlike other attributes, local variables aren't mapped to the unified data models. They only exist on the source data model.
Operation options
The JFrog Xray connector supports the following operation options. See connector operation options for information about how to apply them.
Table 4: JFrog Xray connector operation options
| Connector Object | Option | All Possible Values | Description | Example |
|---|---|---|---|---|
| Vulnerability | excludeRepo | Any repository name | A comma-separated list of repository names. You can use this option to exclude vulnerabilities from the specified repositories. | Key: excludeRepo Value: repo1,repo2,repo3. This key and value combination excludes vulnerabilities associated with the specified repositories. |
| Vulnerability, Vulnerability Definition | publishEnd | Any date in the YYYY-MM-DD format. | You can use this option to retrieve vulnerabilities by the specified published end date as determined by JFrog Xray. | Key: publishEnd Value: 2023-07-20. This key and value combination only retrieves vulnerabilities published up to 2023-07-20. |
| Vulnerability, Vulnerability Definition | publishStart | Any date in the YYYY-MM-DD format. | You can use this option to retrieve vulnerabilities by the specified publish start date as determined by JFrog Xray. | Key: publishStart Value: 2023-07-01. This key and value combination only retrieves vulnerabilities published from 2023-07-01. |
| Vulnerability, Vulnerability Definition | scanEnd | Any date in the YYYY-MM-DD format. | You can use this option to retrieve vulnerabilities by the specified scan end date as determined by JFrog Xray. | Key: scanEnd Value: 2023-07-20. This key and value combination only retrieves vulnerabilities scanned up to 2023-07-20. |
| Vulnerability, Vulnerability Definition | scanStart | Any date in the YYYY-MM-DD format. | You can use this option to retrieve vulnerabilities by the specified scan start date as determined by JFrog Xray. | Key: scanStart Value: 2023-07-01. This key and value combination only retrieves vulnerabilities scanned from 2023-07-01. |
| Vulnerability, Vulnerability Definition | severity | Low, Medium, High, Critical | A comma-separated list of severities. You can use this option to retrieve vulnerabilities of the specified severity level as determined by JFrog Xray. | Key: severity Value: Medium,High. This key and value combination only retrieves vulnerabilities with severity levels of Medium and High. |
The option keys and values are case-sensitive as they are shown in this documentation.
APIs
The JFrog Xray connector uses the Xray REST API. Specifically, it uses the following endpoints:
Table 5: JFrog Xray REST API Endpoints
| Connector Object | API Endpoints |
|---|---|
| Vulnerability | POST /xray/api/v1/reports/vulnerabilities/{reportId} |
| Vulnerability Definition | POST /xray/api/v1/reports/vulnerabilities/{reportId} |
Changelog
The JFrog Xray connector has undergone the following changes:
Table 6: JFrog Xray connector changelog
This connector is part of a bundled release with other connectors from the same vendor. If a version shows "No change", it means that the connector version was updated for consistency as part of the bundle, but no functional changes were made to this specific connector. You can update to or skip this version without affecting your existing configuration.
| Version | Description | Date Published |
|---|---|---|
| 3.0.5 | - Added a new operation option on the Vulnerability object to exclude vulnerabilities from specific repositories: excludeRepo | June 11th, 2025 |
| 3.0.4 | Enhanced the Vulnerability and Vulnerability Definition objects to dynamically apply time-based filters based on the sync duration. The connector now uses the sync window to calculate start and end values (e.g., Last 2 Weeks to Today), reducing the need for manual filter updates and avoiding unnecessary beginning-of-time syncs. | April 22nd, 2025 |
| 3.0.3 | No change. | February 28th, 2025 |
| 3.0.2 | - The Vulnerability object now maps to Open Source Finding and the Vulnerability Definition object now maps to Open Source Finding Definition. These changes ensure that the data retrieved from JFrog Xray consolidate to the appropriate Brinqa UDMs. - Moved the PATH attribute from the Vulnerability Definition object to the Vulnerability object. | February 19th, 2025 |
| 3.0.1 | Changed the SOURCE_SEVERITY attribute type on the Vulnerability Definition object from integer to string to fix a data mismatch error. | January 23rd, 2025 |
| 3.0.0 | Initial Integration+ release. | August 31st, 2023 |